How to run a survey among attendees
A survey among attendees - an evaluation once the event is over, a study of expectations before it, or a quick question in between - is in the SF-CONFERENCE system an ordinary custom form. A custom form is a form the attendee is given after registration, on their own participation summary page. They do not fill their personal details in again and they do not create a new account. The answers are appended to their existing registration, so it is immediately clear who said what.
The same mechanism handles everything you want to ask attendees once they have signed up. Most often it is a satisfaction survey - rating the lectures, the organisation and the catering - but it works just as well for workshop sign-ups, a menu choice or a declared arrival time. Workshop sign-ups are interesting in that a custom form can carry a price of its own and its own capacity limits, so the attendee pays for them right away. Below we go through the whole route: creating the survey, adding the questions, sending attendees the link, filling the survey in from their side, and reading and exporting the answers.
One situation calls for a different tool. Because the answers are appended to the attendee’s registration, every one of them shows who gave it, and sometimes that is exactly what you do not want, since a rating of the organisation or an opinion about a speaker comes out more honestly when nobody signs it. Reach for an external form instead of a custom one then: it has its own address, is filled in without logging in, and if you put no email field in it, it saves the answers alone, tied to no one. How to prepare one is described in the collecting entries with an external form instruction.
Where to find custom forms
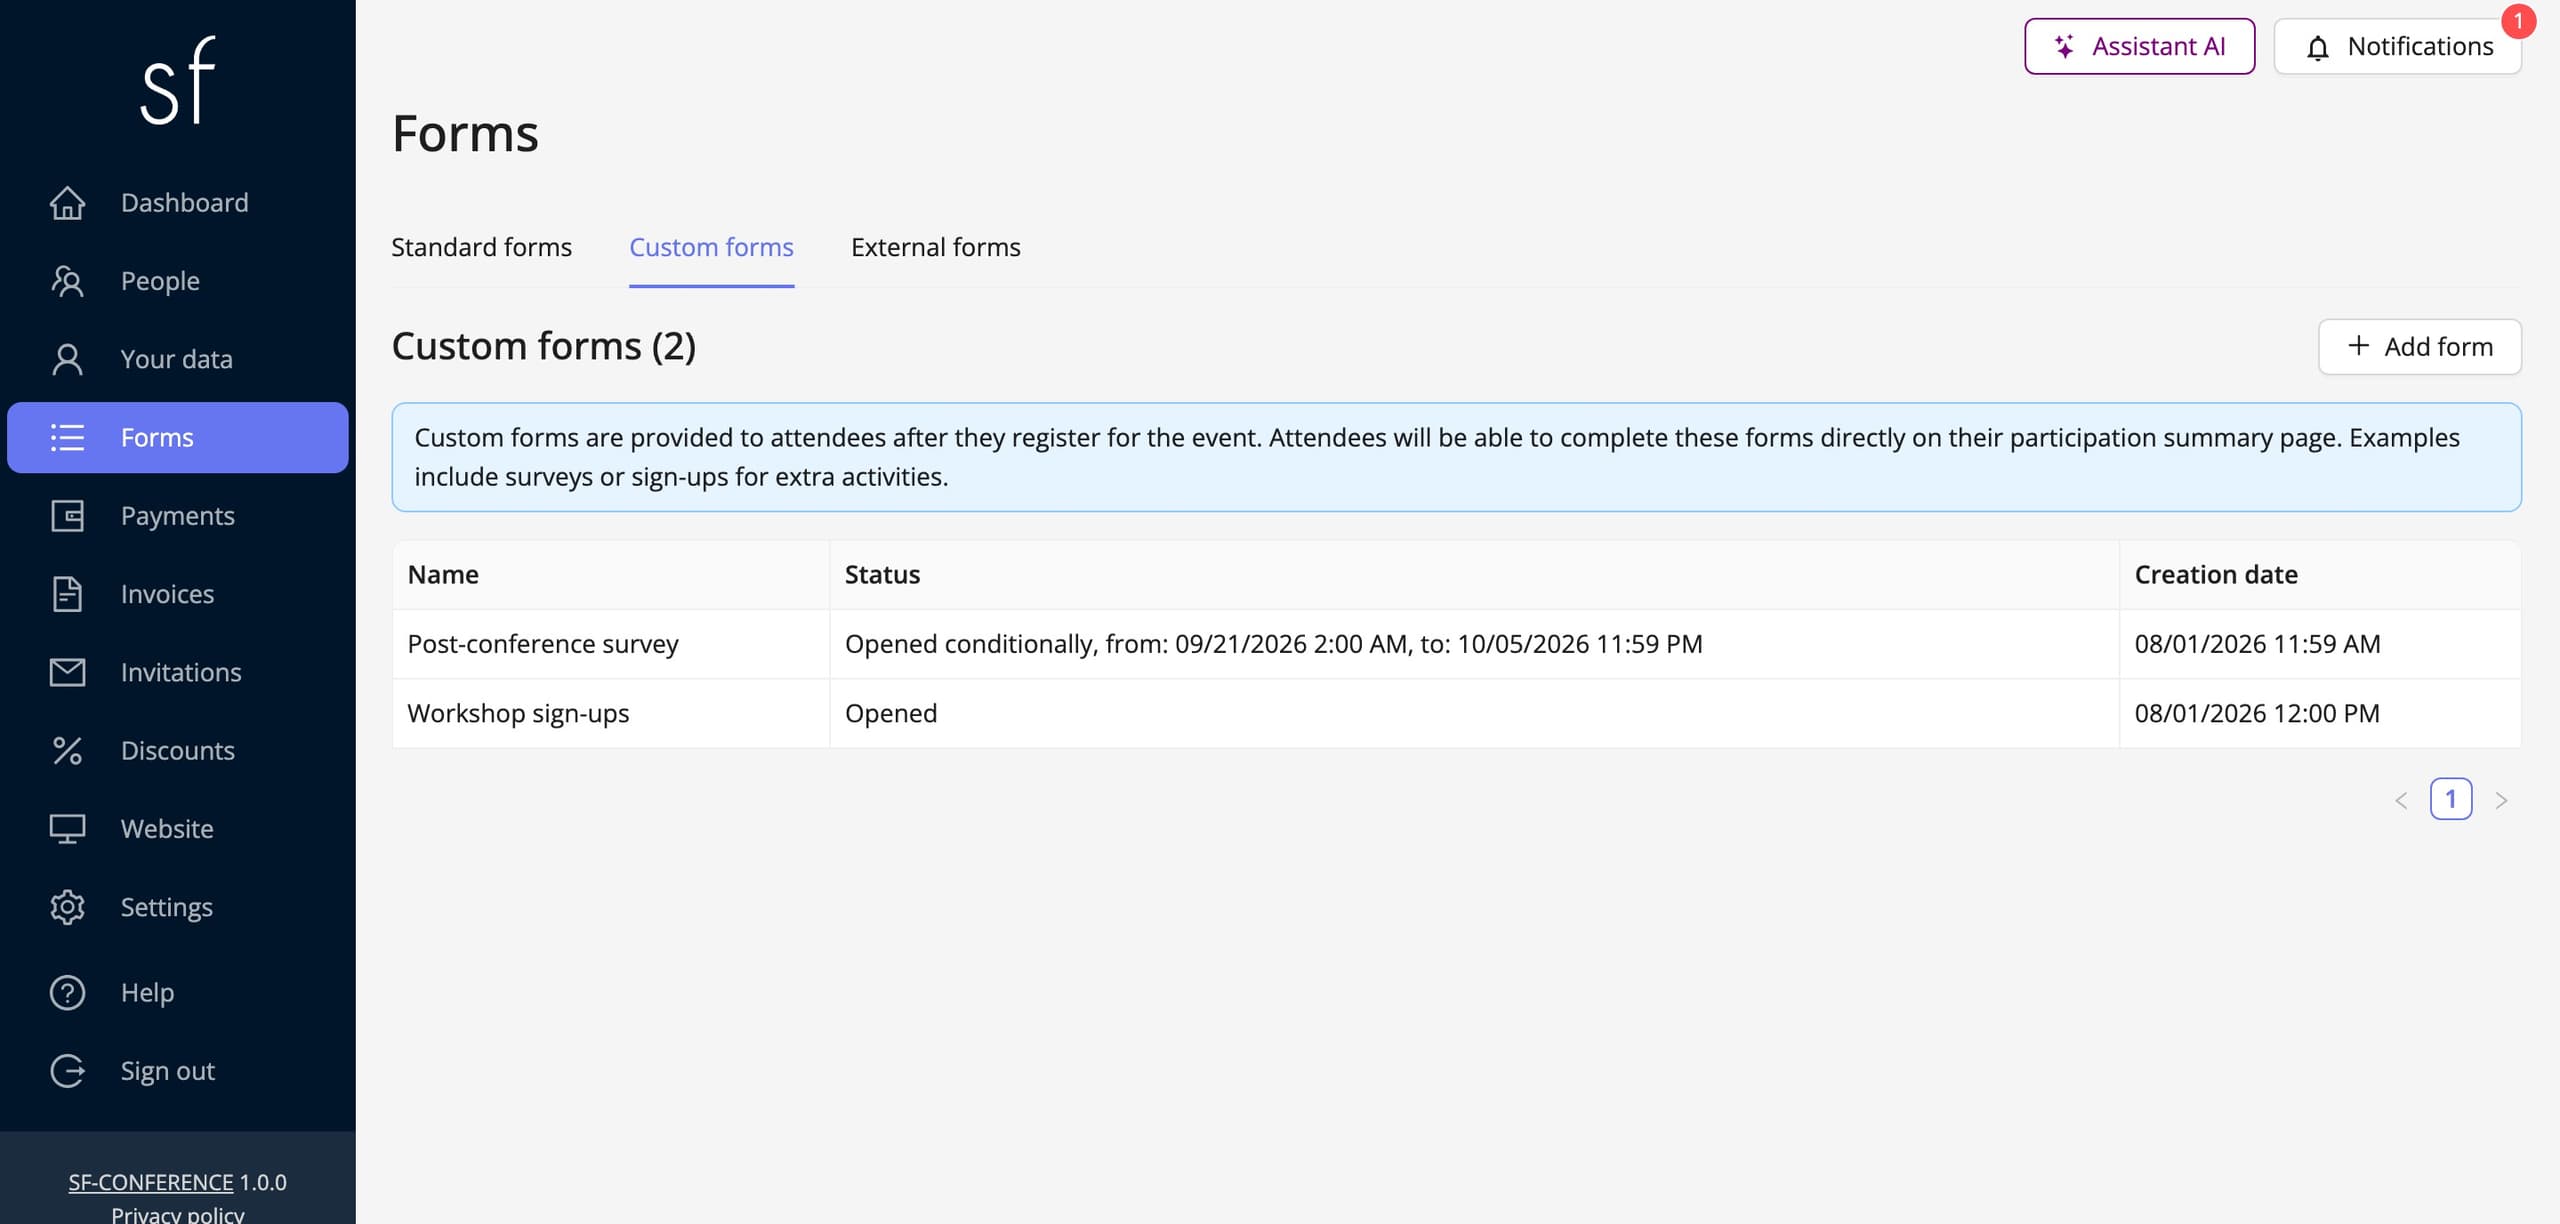
Go to the Forms entry in the side menu of the panel. The view splits into three tabs. Standard forms are created by the system and that is where the Registration form lives. External forms have an address of their own and are meant for people outside the attendee list. The survey belongs to the third tab, Custom forms. The only forms an attendee sees after registration.
The tab lists the custom forms you have created together with their status and creation date. You can have as many as you like and each works independently, so an evaluation survey, workshop sign-ups and a menu choice happily sit side by side. Clicking a row opens that form’s page.
Creating the survey
The Add form button above the table opens a window asking for one thing: the Name. It is the name the attendee will see as the section heading on their summary page, so it is worth saying plainly what it is about. Post-conference survey beats Form 1. You give the name in every language of the event; the switch above the field shows which version you are filling in.
Once saved, the system opens the new form’s page. It is built exactly like the registration form’s page: the whole form’s settings on top, the sections and fields table below. If you are seeing this layout for the first time, have a look at the editing the registration form instruction. Everything it says about fields, options and prices applies here too. Below we focus on what is specific to a survey.
When the survey is open
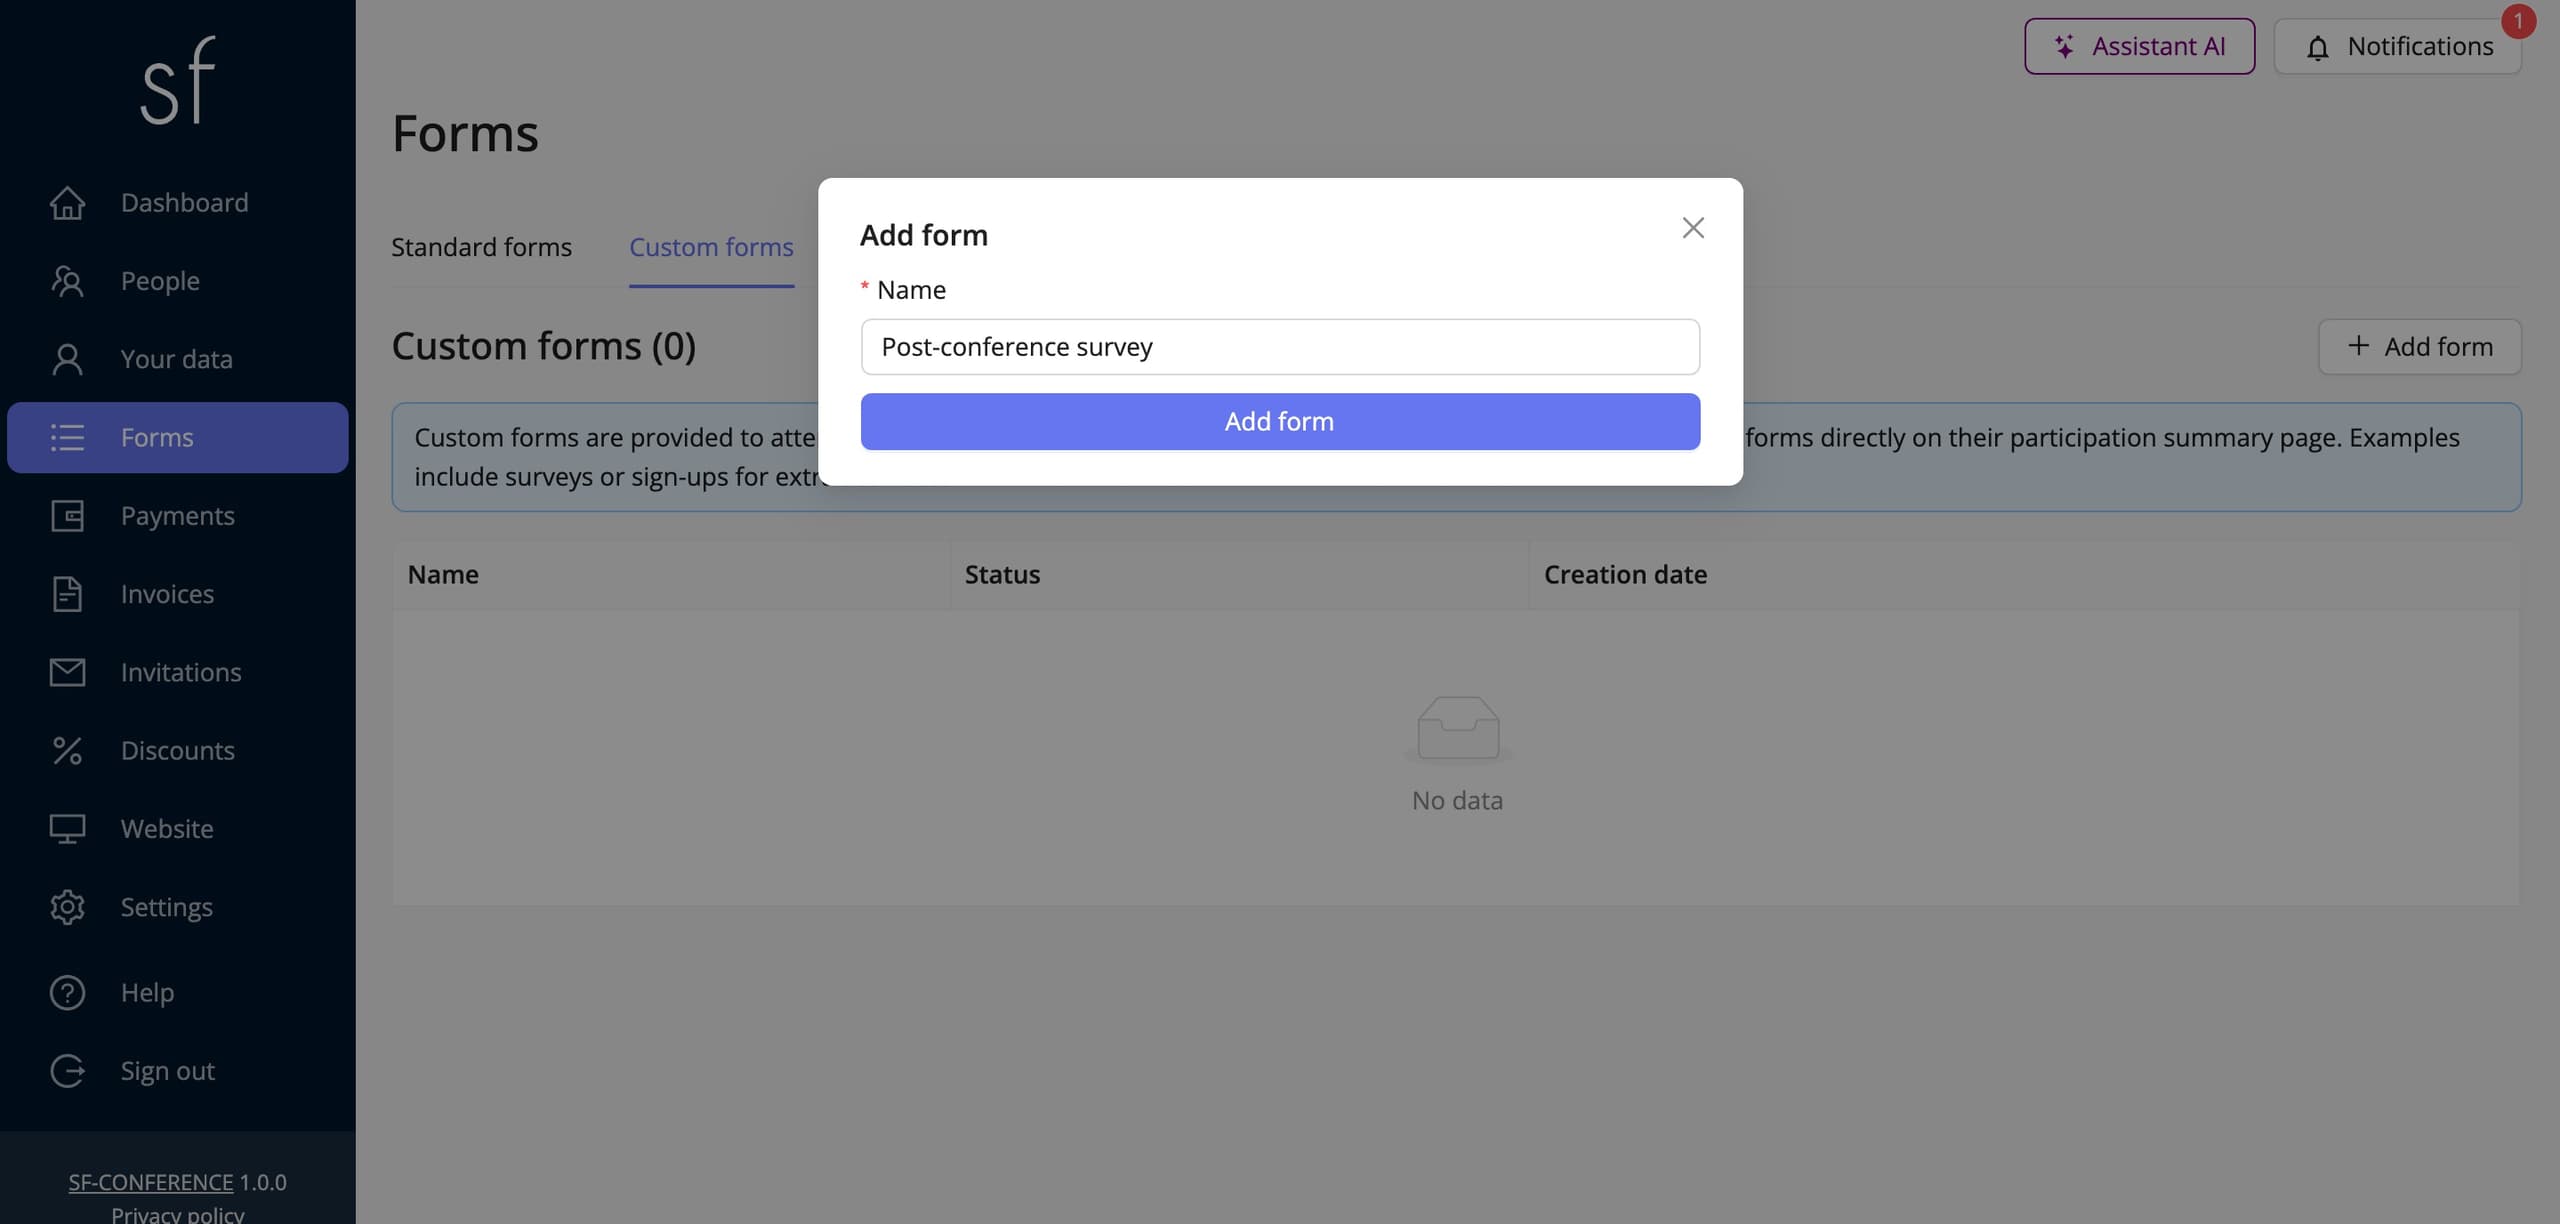
In the Basic information section, the Form status field decides whether the survey can be filled in. Opened means no time limits, Closed stops answers coming in, and Opened conditionally reveals the From and To fields with a date and time. For an evaluation survey that is the most convenient choice: set the window to the week after the event and the survey closes on its own, with no calendar watching.
It is worth setting the status right when you create the survey. A freshly created custom form is open, and its section appears on every attendee’s summary page as soon as you add the first field to it. Until you have finished laying out the questions, it is safer to keep it closed.
Below you will find three content editors. Content displayed at the beginning of the form appears above the first question. The place to explain why you are asking, how long it takes and whether the answers are anonymous. Content displayed at the end of the form goes above the submit button, and Content displayed when the form is closed replaces the whole survey once the window has passed. That last one is worth writing in advance, because without it a late attendee sees a system message instead of a thank-you.
Questions, that is sections and fields
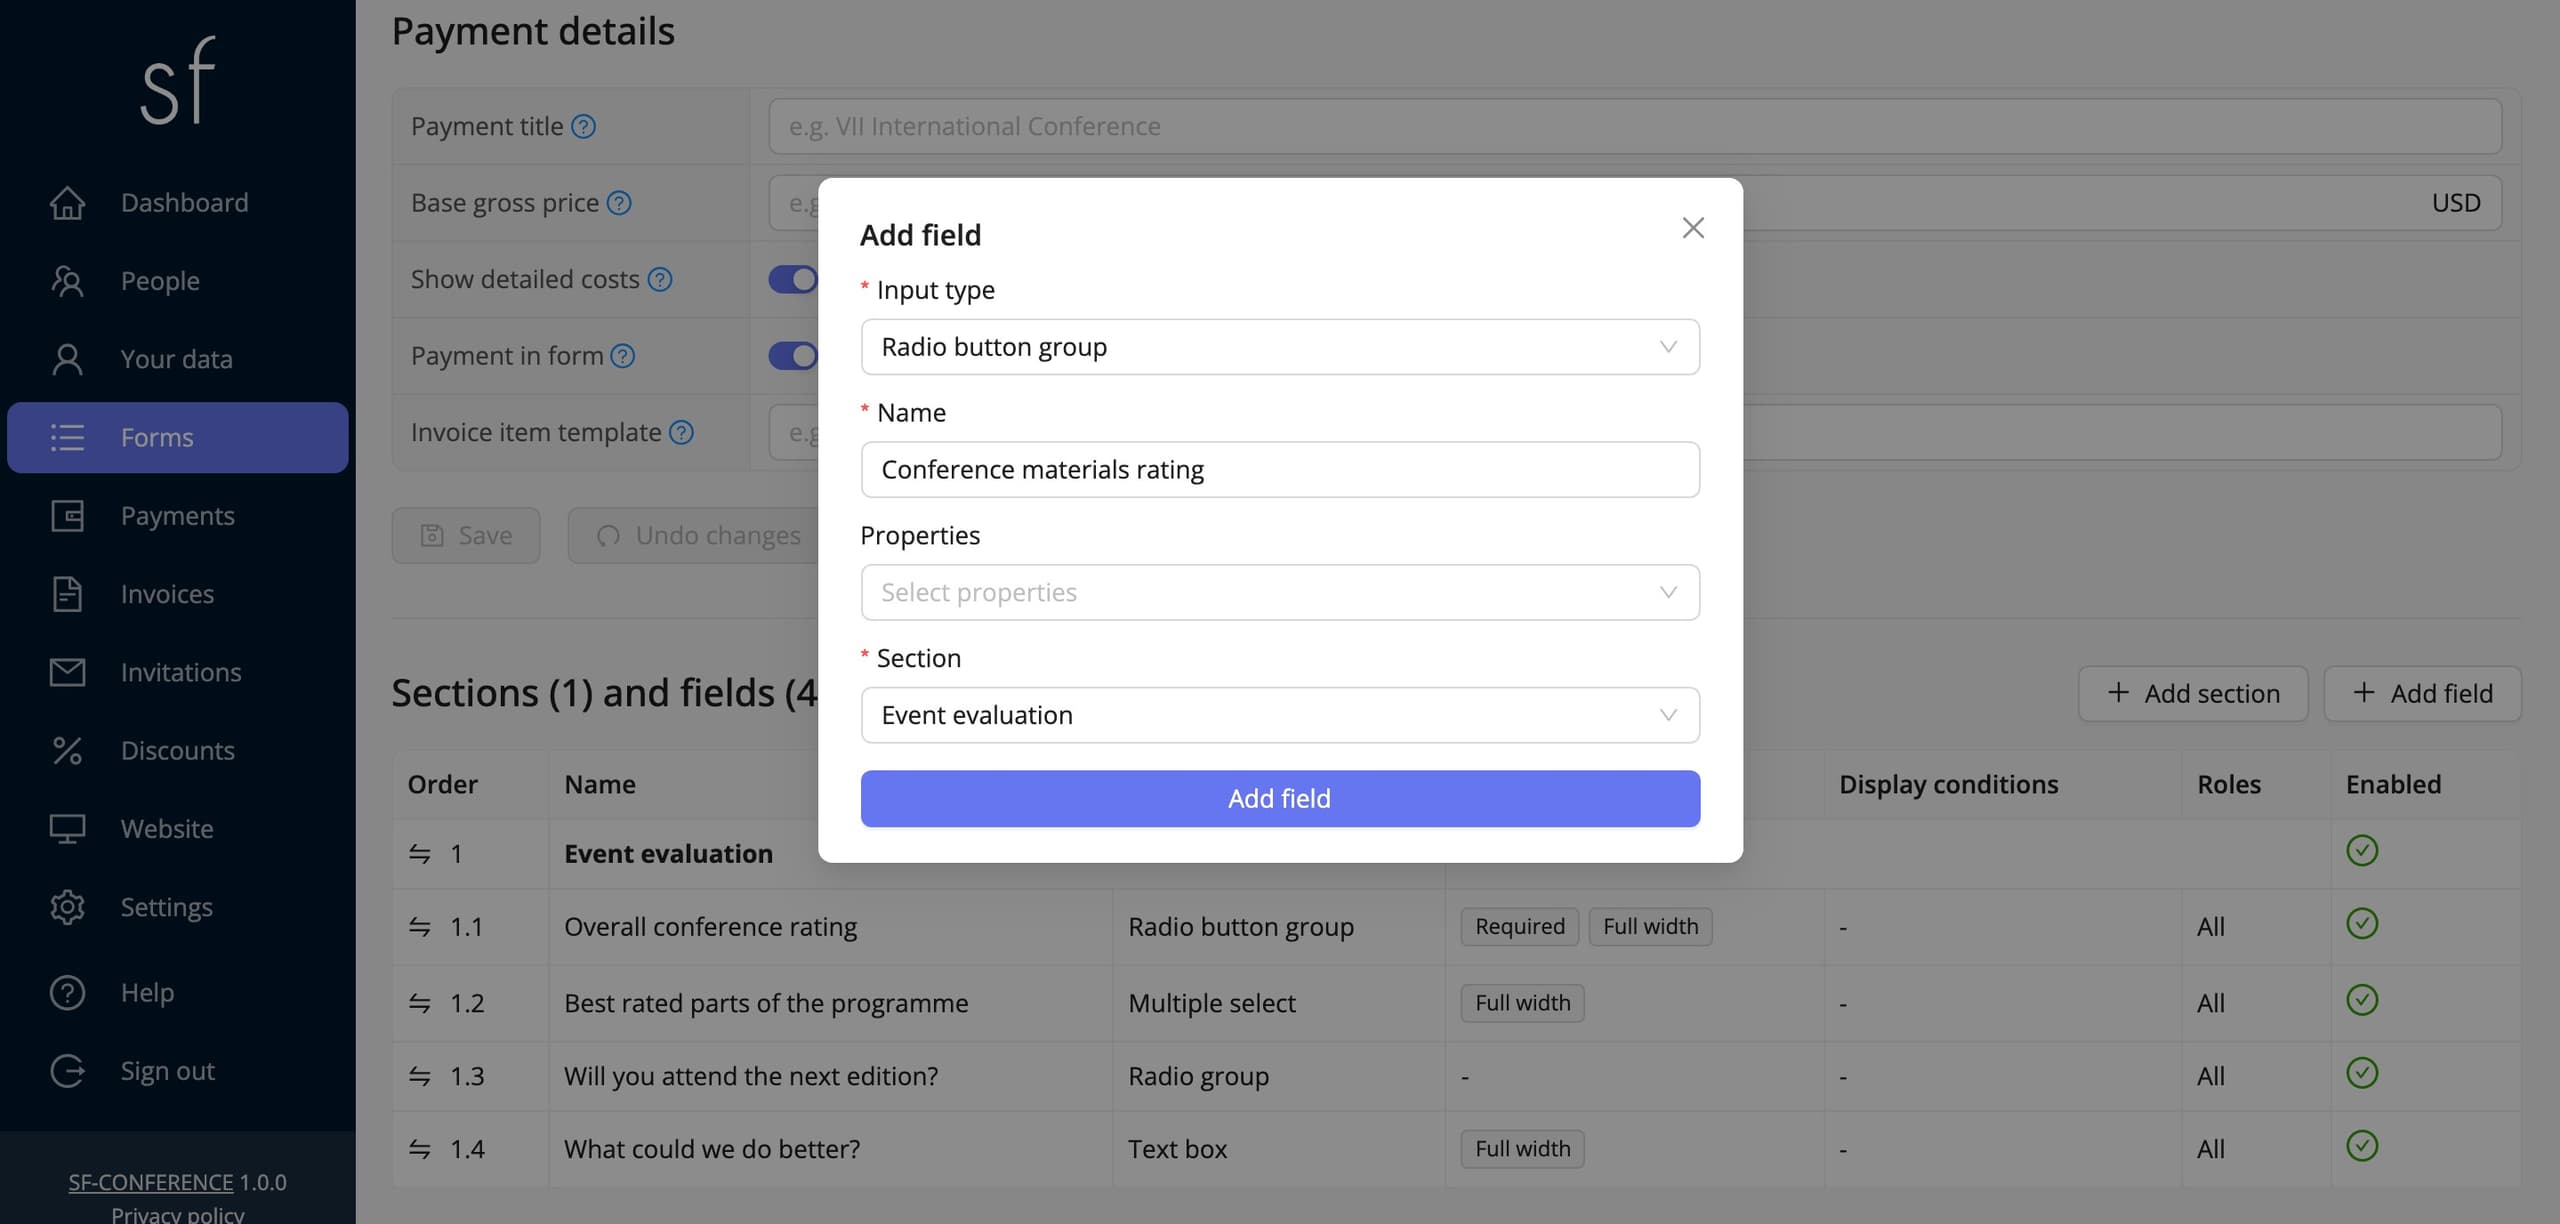
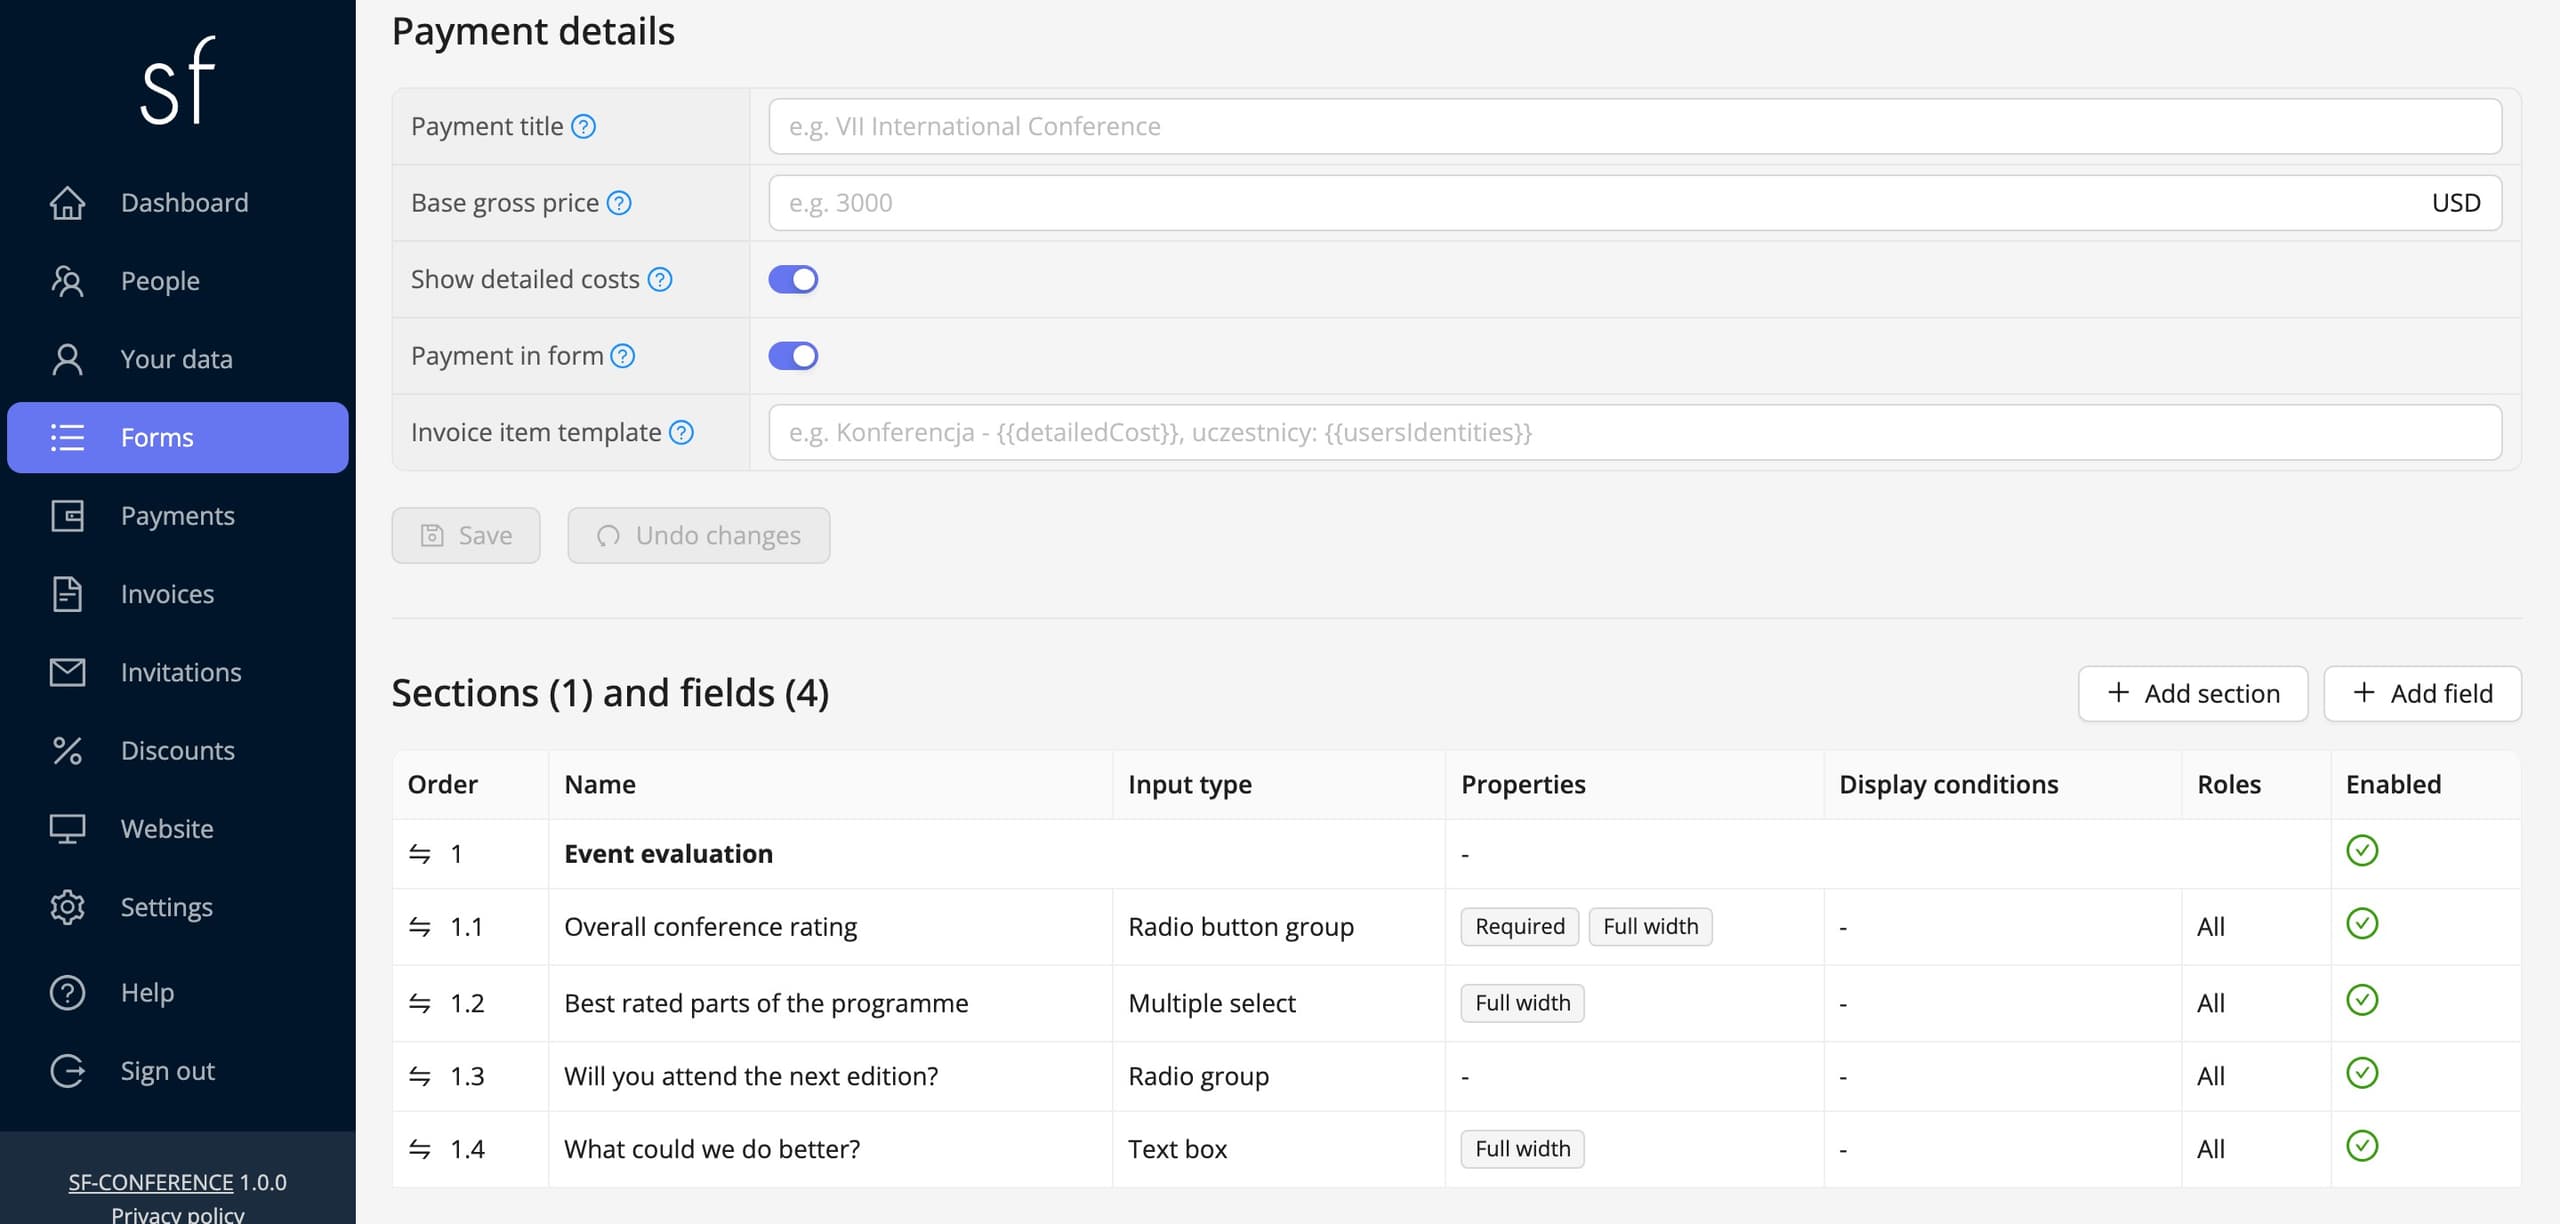
Below the settings sits the Sections and fields table with its Add section and Add field buttons. A section groups questions under a shared heading, and a field is a single question; every field belongs to exactly one section, so the section has to be created first. A short survey needs only one section; a longer one is worth splitting into topics, the programme separately, the organisation separately.
The add-field window asks for four things: the Input type, the Name (the wording of the question, in every language of the event), the Properties and the Section. Once saved, the field lands at the end of the chosen section and the system opens its page, where you fill in the description, the answer options and the rest of the settings.
Question types worth using in a survey
A rating on a scale of one to five has no field type of its own and does not need one. Pick a Radio button group and add five options named 1 through 5. The attendee sees a row of buttons and picks one. The same type with the options Strongly agree, Rather agree, Rather disagree and Strongly disagree gives a classic Likert scale.
For the remaining questions the types you know from the registration form are enough. A Radio group shows the answers as an always-visible list, a Single select hides them in a dropdown, which makes sense for longer sets, and a Multiple select lets several answers be ticked at once, for instance when asking which sessions the attendee took part in. A Text box collects free-form comments, a Checkbox a single consent, for example to using a quote in promotional material, and a Numeric field a number.
On each question’s page it is worth filling in the Description, the smaller text under the question wording, in which you spell out what exactly is being rated, or that the scale grows towards the better marks. Of the Properties, two matter in a survey. Required blocks the survey from being submitted without an answer to that question. Use it sparingly, because the more compulsory questions there are, the fewer completed surveys you get. Full width stretches the field across the whole form instead of laying it out in two columns, which reads far better for rating scales and longer comments. Visible only to administrators is useful too, if you want a field in the survey for a note of your own that the attendee never sees.
Sending attendees a link to the survey
The survey has no address of its own. It lives on the participation summary page, and every attendee has a page of their own. That is why the invitation is not sent as one shared link, but as a message in which the system substitutes each person’s own link.
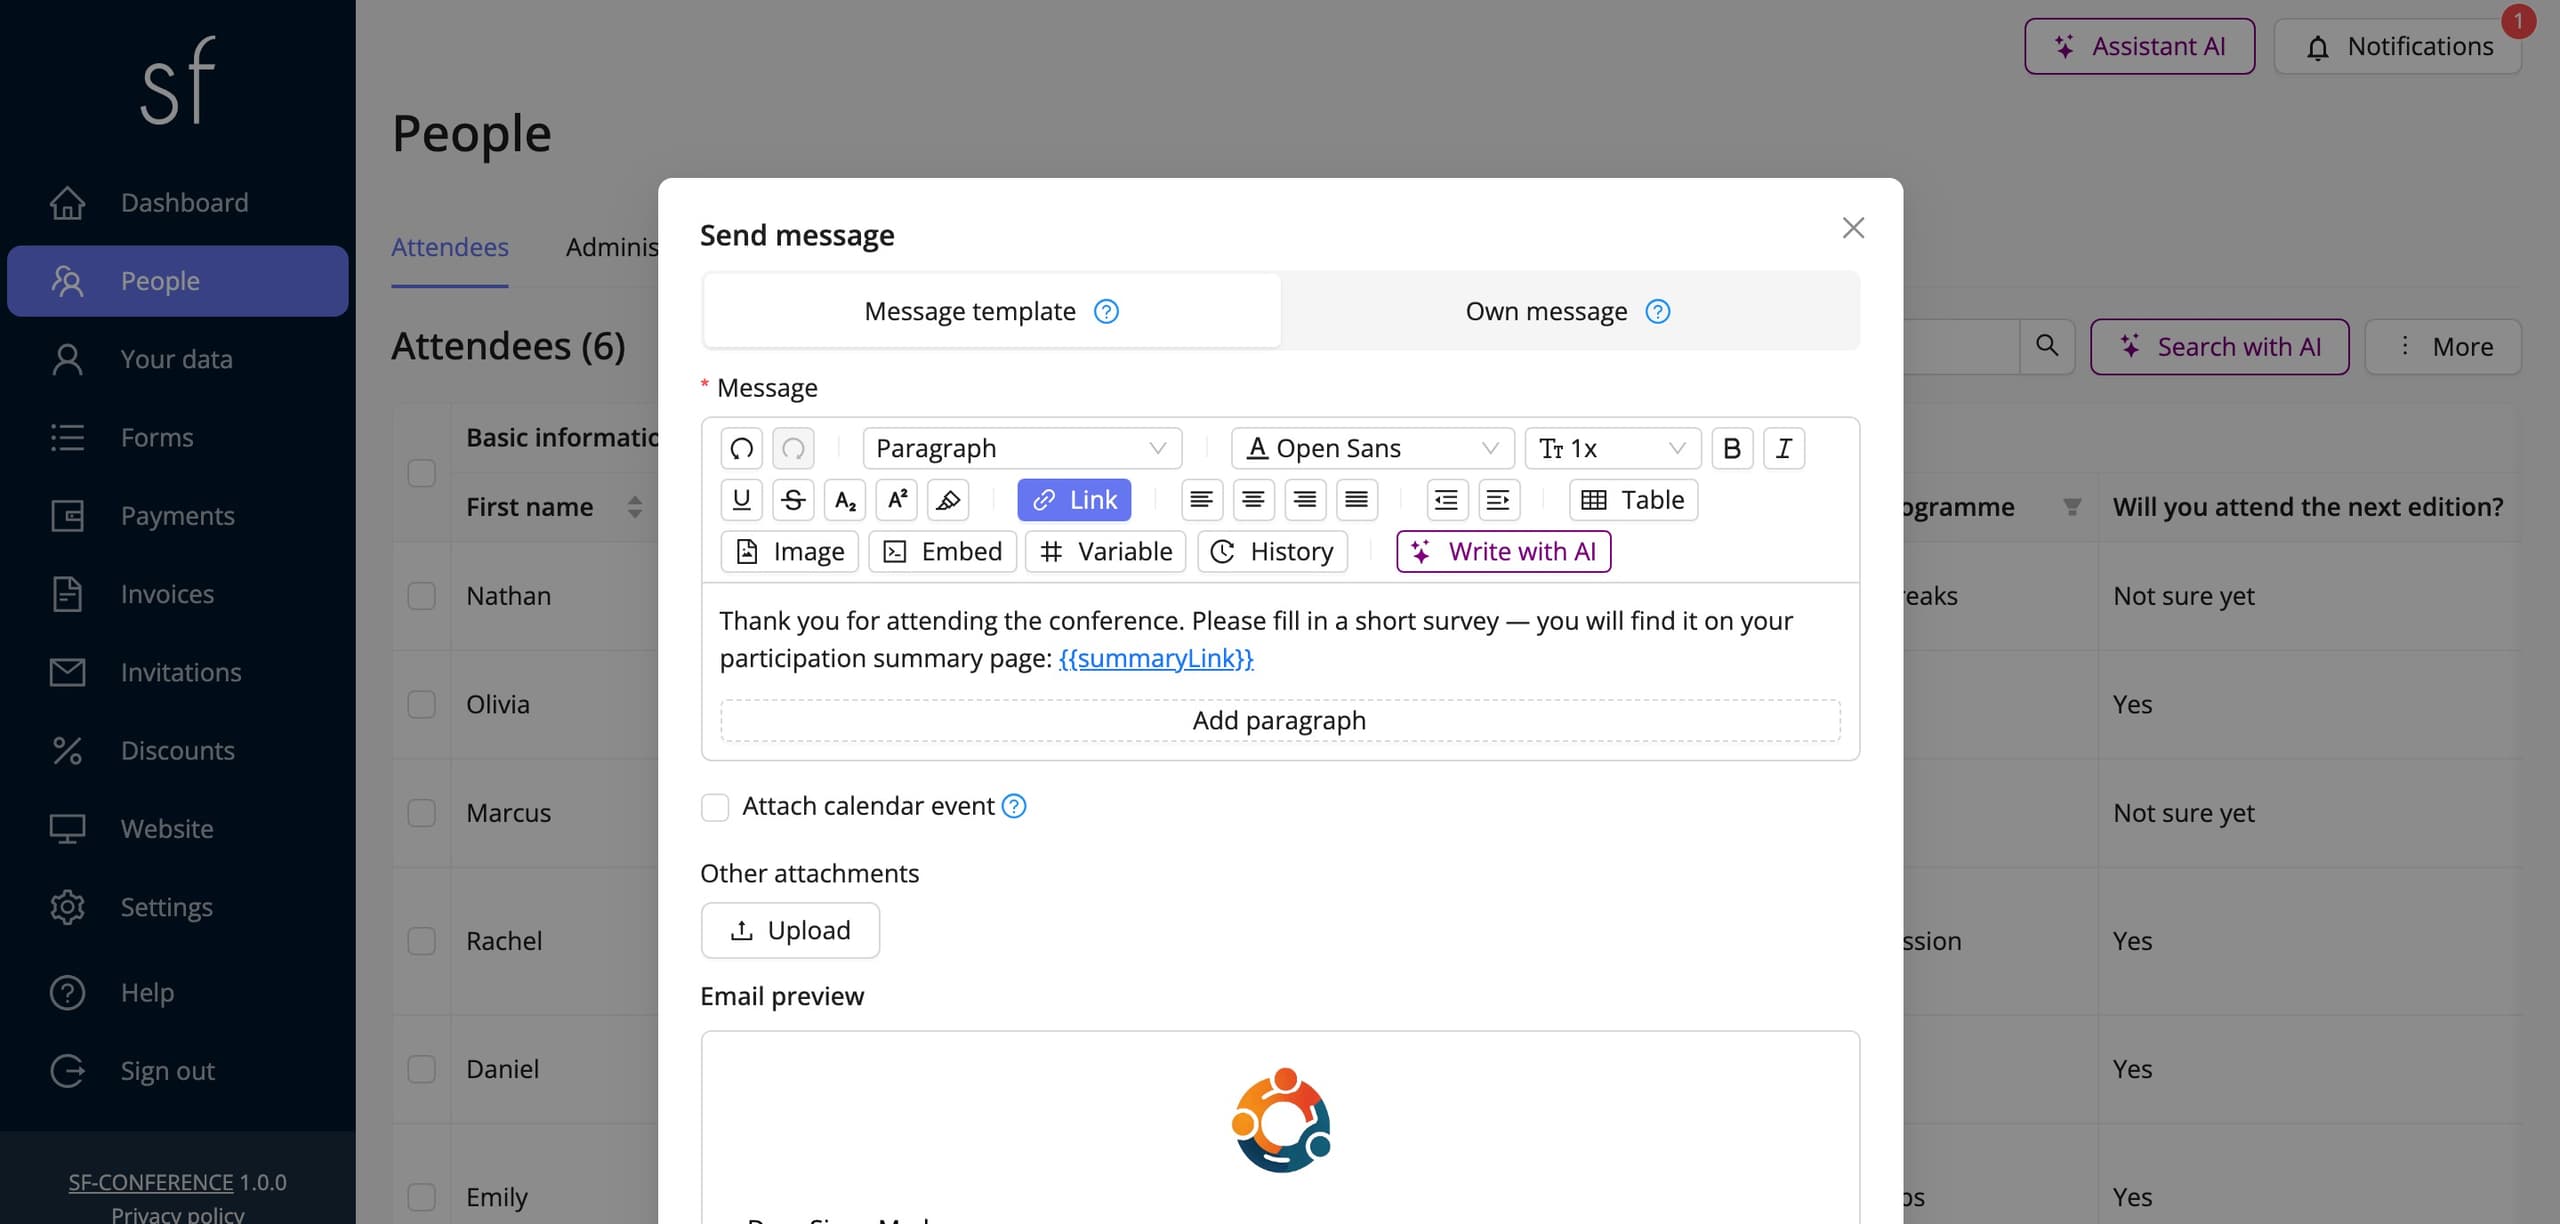
Go to the People entry in the side menu, tick the attendees in the table’s first column and click Send message to selected attendees. With nothing ticked the button reads Send message to all attendees and covers the whole list. The list honours the filters, so you can narrow it down to a particular group first - say to the people who actually collected a badge - and send the survey to them alone.
In the message window you first pick its kind. Message template drops your text into the branded email template configured in the settings, and Own message sends it as the entire email body, with a Subject of your own and no template.
The variables button on the editor toolbar is the important one. Behind it sits the Participation summary link entry, which inserts into the text a link to the recipient’s own private page. Everyone gets their own address, opening without a login and without a password, so the road from email to completed survey is a single click. The same menu holds variables for the first and last name and the email address, so the message need not open with an impersonal Dear Sir or Madam.
Before you send the message to everyone, use the Send test message to yourself button. It arrives at your own address and shows you the finished email with the variables substituted. The simplest way to check that the summary link really goes where it should.
How an attendee fills the survey in
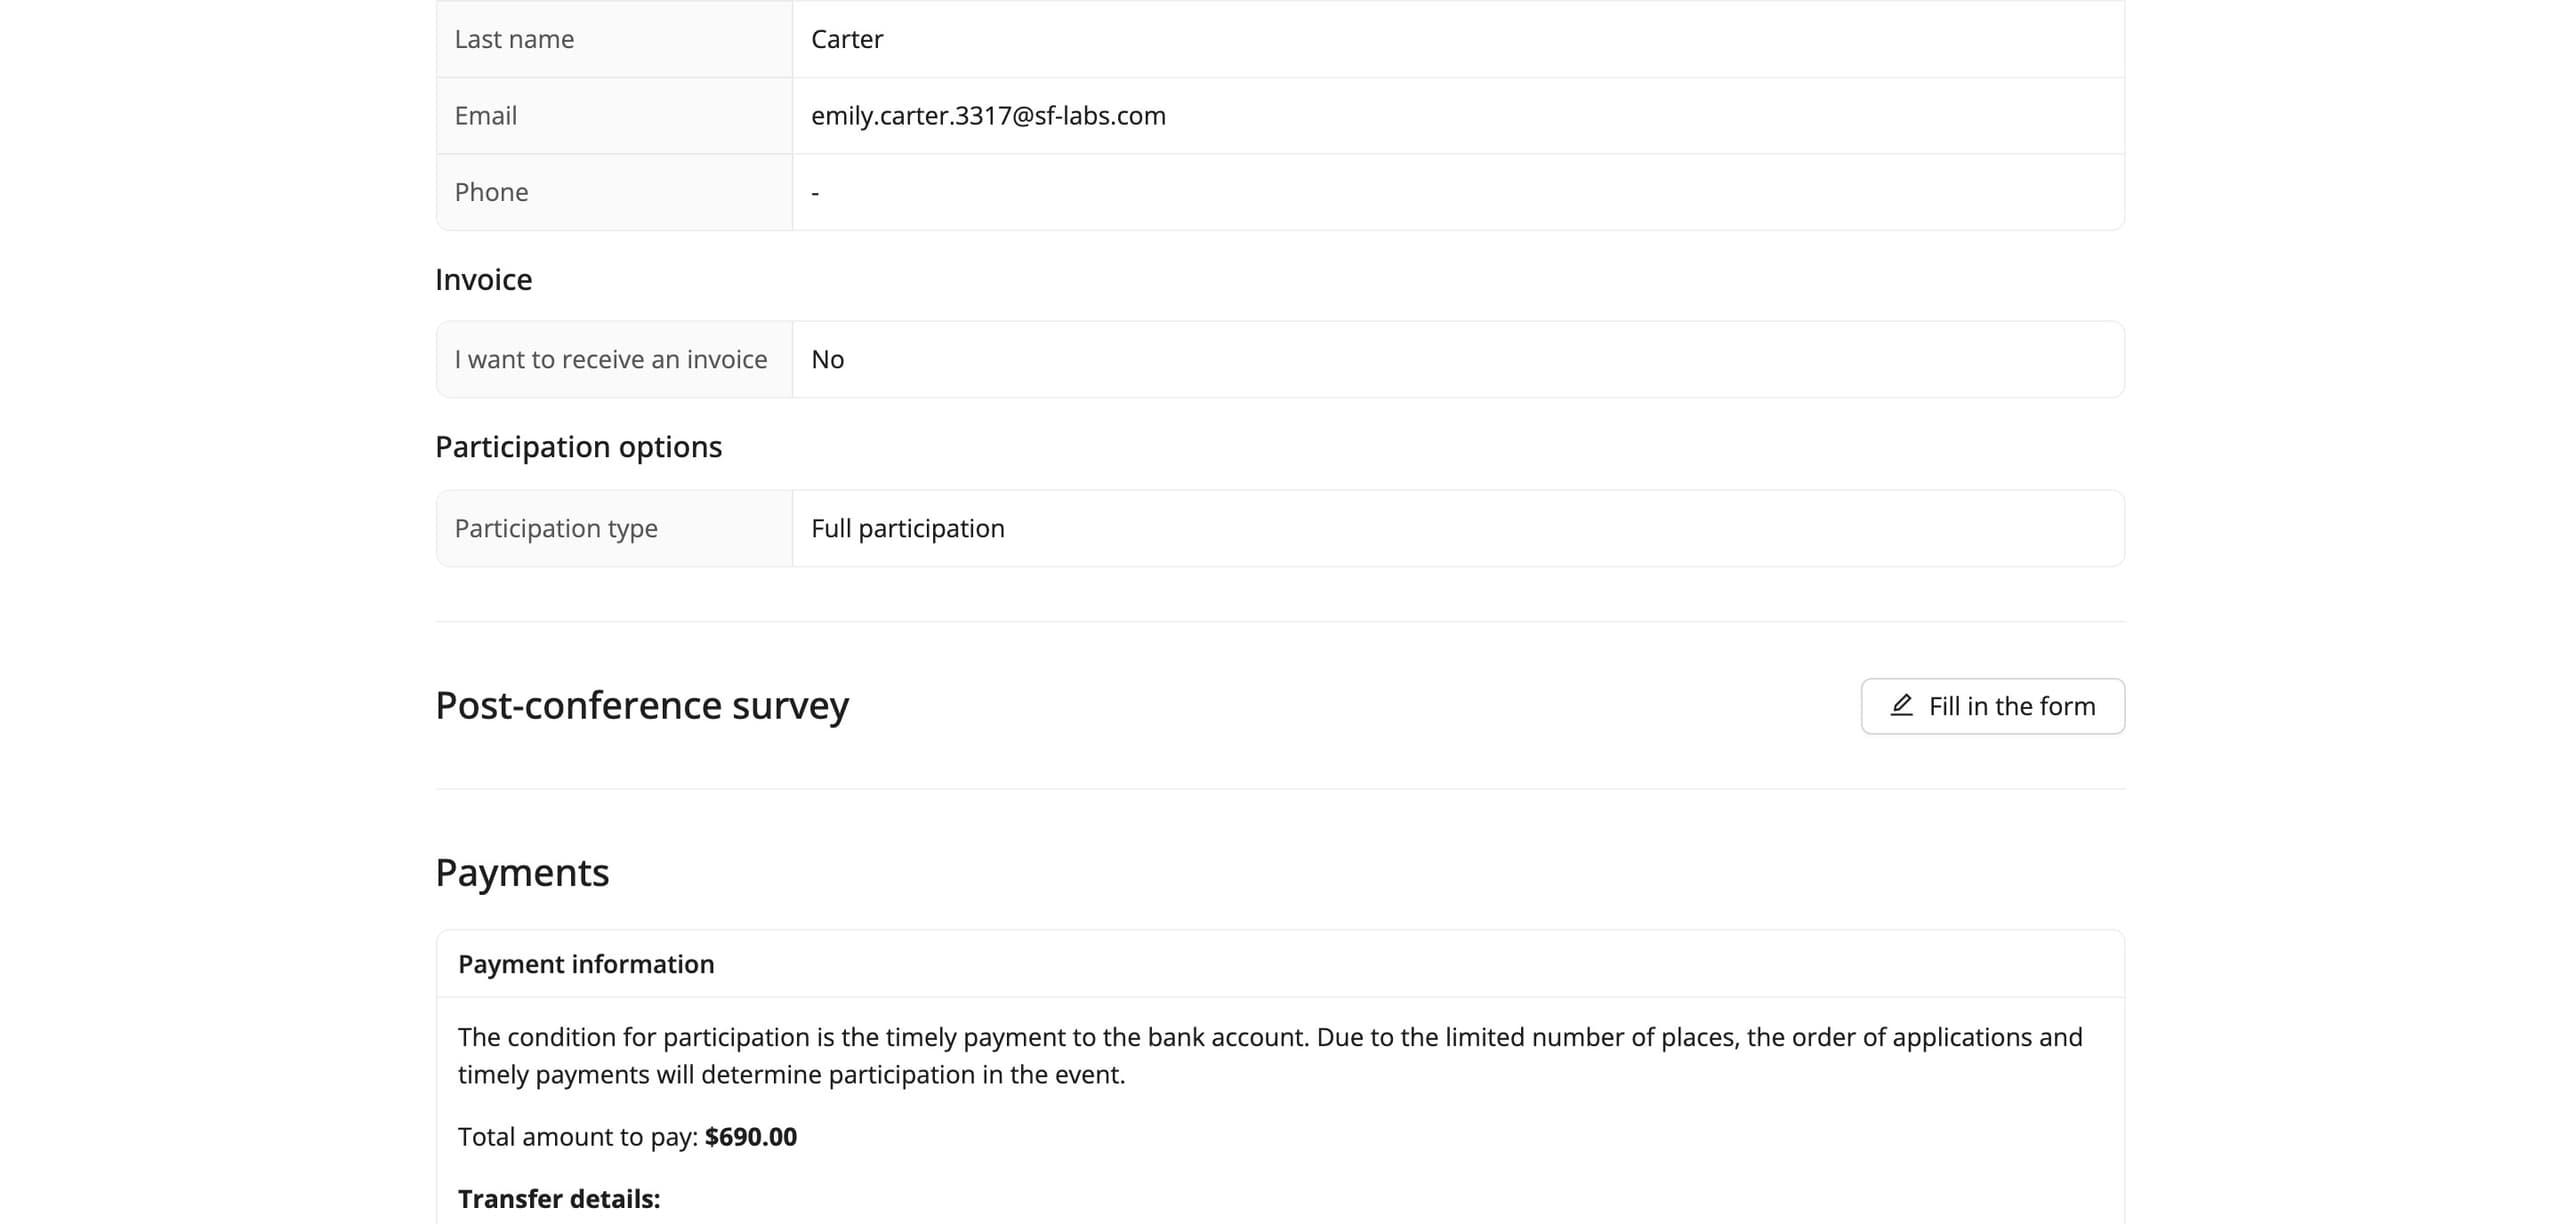
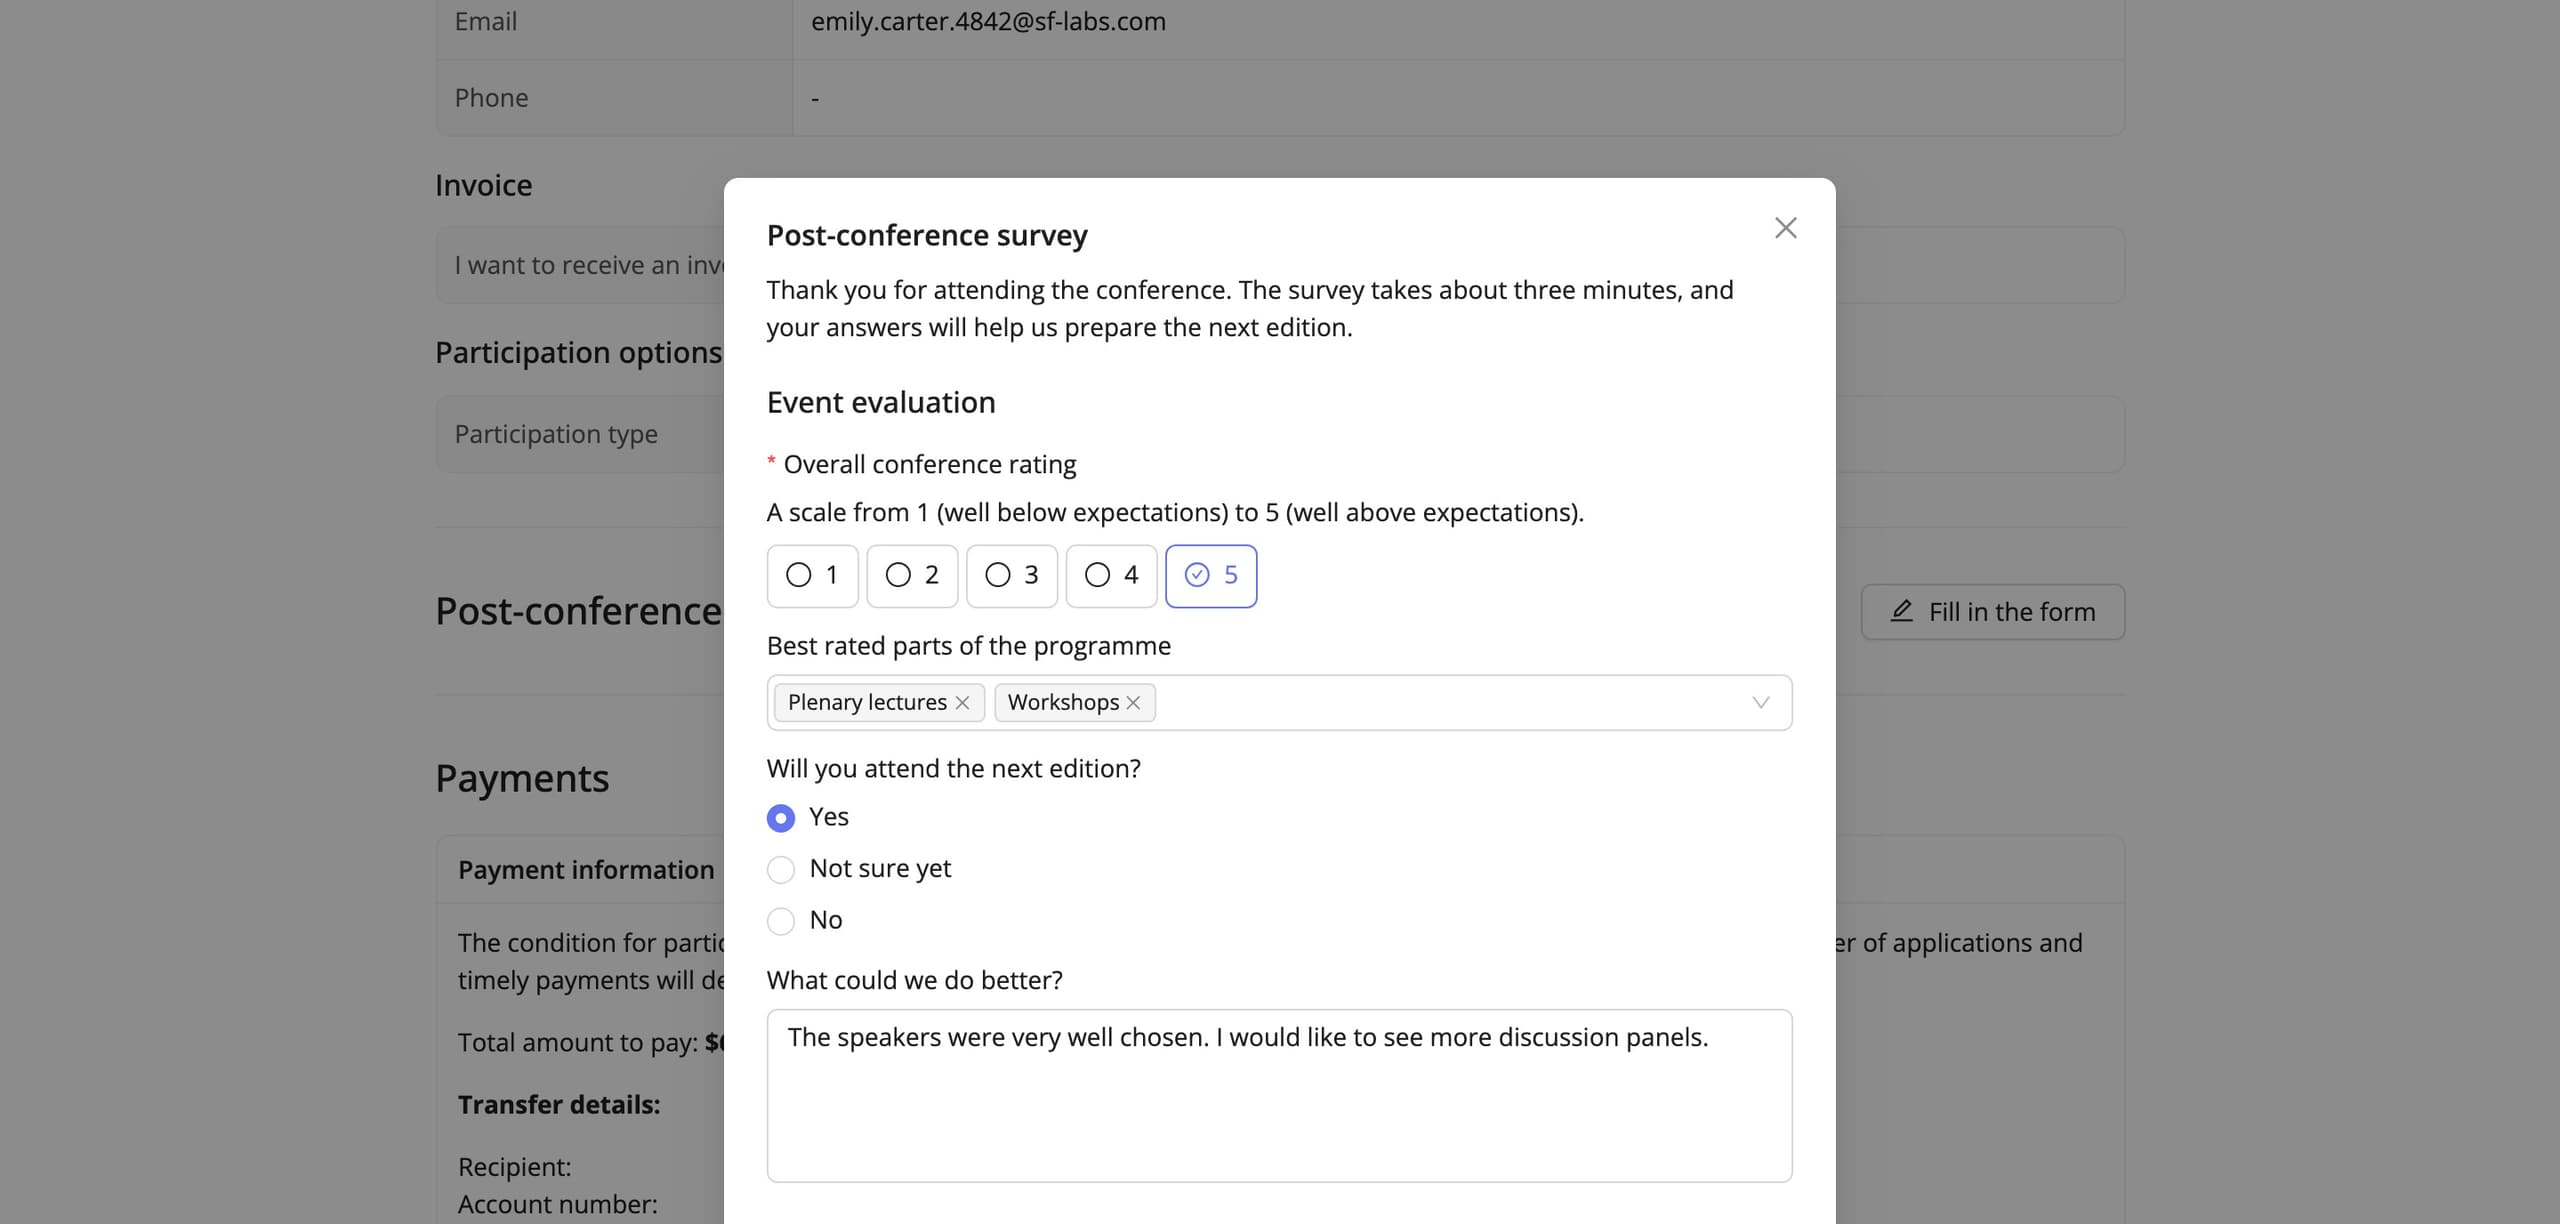
Clicking the link takes the attendee to their participation summary page. They see their registration details, payments and documents there, and below them a separate section with the survey’s name and a Fill in the form button. The button opens a window with the questions, the same ones you laid out in the panel, in the same order and with your introduction on top.
Once the answers are sent the section is no longer empty: the attendee sees their own answers in it, and the button changes to Update the form. Beside it appears Clear the form, which wipes every answer and restores the state from before. As long as the survey is open the attendee can change their mind freely; once it closes the answers stay as they were, and an attempt to send changes ends with a message about the form being closed.
The answers in the panel
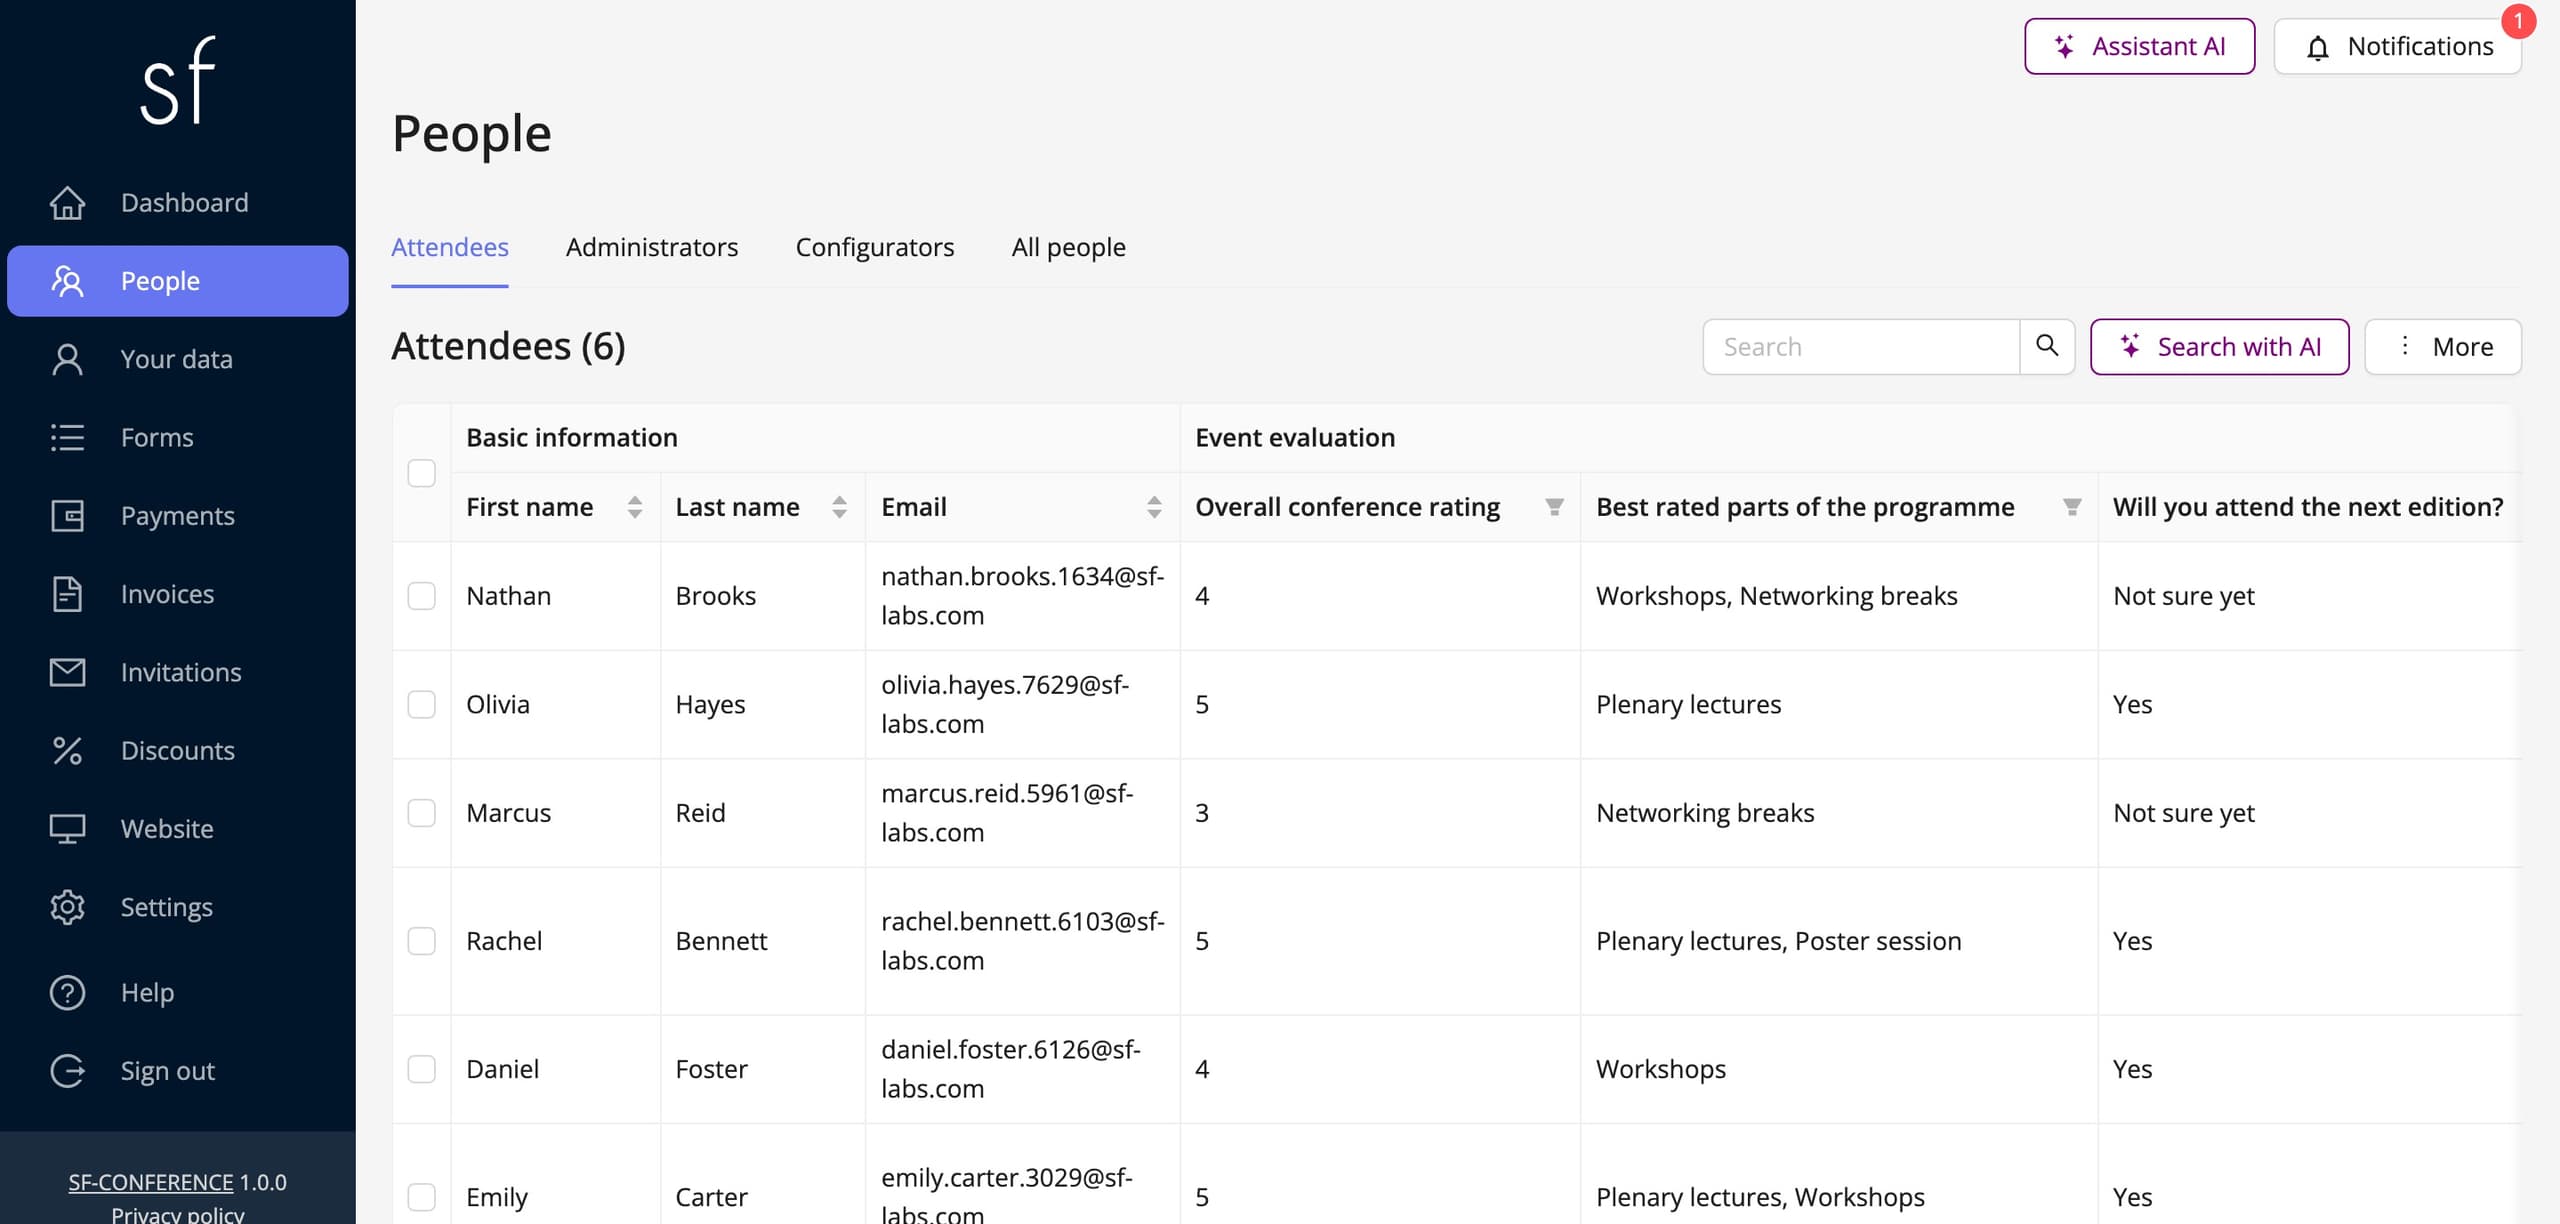
The answers do not go into a separate module. They are appended to the attendee’s registration, so you look for them where the rest of their data is. On a single person’s page, under the People entry, the survey has a section of its own with a switch telling you whether it has been filled in. An administrator with the right permission can fill it in on the attendee’s behalf or correct an answer. Handy when someone reports their remarks over the phone.
In the people table the survey answers appear as columns grouped under the name of the section the questions belong to, exactly like the registration form’s fields. Every column has a filter and sorting, so you can narrow the attendee list down to the people who picked a particular answer. Which columns are visible is set with the Edit people table view button above the table.
Closed questions can also be counted without an export. On the panel’s dashboard, in the Statistics section, the Edit statistics view button lets you pick the fields whose answer distribution is shown. Questions with a ready list of answers and checkboxes are supported, precisely the ones worth counting. The matching Edit summary view button on the summary page decides which answers the attendee sees at their own end.
Exporting the answers to an XLS file
The full results are downloaded from the People entry. Above the table sit two download buttons: Download all attendees in XLS and, once rows are ticked, Download selected attendees in XLS. The second honours the selection and the filters, so exporting just one group’s answers is easy.
Survey answers are always in that file. Nothing has to be ticked or switched on: the export pulls the registration form’s fields and every custom form’s fields at once, and each question gets a column of its own labelled with its wording, grouped by section. One person is one row, so the registration, payment and survey data sit side by side and need no matching up by email address. Someone who did not fill the survey in has an empty value in those columns. The simplest way to measure the response rate. Fields marked as visible only to administrators reach the file only when the person downloading it is allowed to see them.
Workshop sign-ups the very same way
A custom form does not only have to ask. It can sell too. Workshop sign-ups are built exactly like a survey: a new custom form, one select field and the workshops as its options. The difference is in the option settings. Each of them has its own Limit of places, after which it stops being available, and a Price if the workshop is paid for. On top of that come the Available from and Available to fields, which bound the sign-ups in time.
Every custom form also has a Payment details section of its own, which a plain survey does not use but workshop sign-ups certainly do. The Base price is added for everyone who fills the form in, whatever they choose, the Payment title describes the transfer and the invoice, and Show detailed costs breaks the summary down into individual items. The Payment in form toggle moves the payment method choice into the sign-up window itself, so the attendee lands on the payment page straight after submitting. The amount raised this way is a separate payment, independent of the registration fee, so the attendee pays for the workshops even if they have already settled up.
The attendee survey in short
An attendee survey comes down to five steps: create a custom form, set its availability window, lay out the questions, send a message carrying the Participation summary link variable and collect the answers in the people table or in the XLS file. Because it all happens inside the attendee’s registration, you never have to reconcile results from an external survey tool with the attendance list. They are already together. There is more about working with the attendee list in the participant management description.
See all instructions 2026 © SF-LABS sp. z o.o.ul. Józefa Marcika 6, 30-443 KrakówAll rights reserved+48 512 988 220office@sf-labs.comwww.sf-labs.comEntered into the register of entrepreneurs of the National Court Register kept by the District Court for Kraków-Śródmieście in Kraków, 11th Commercial Division of the National Court Register, under KRS number 0000886671. Share capital amount: PLN 5,000.