How to organize an in-person event
An in-person event has a hall, a reception desk and doors every attendee has to walk through. It is at those doors that most spreadsheets fall apart: the list of the signed-up says one thing, the queue at the entrance another, and the person with a list on paper has no quick way to compare the two. This guide walks through organizing an in-person event in the SF-CONFERENCE system: from creating the event and registration, through payments, to entry tickets with a QR code and scanning them at the entrance, with the mobile app or with a scanner connected to a computer over USB.
The core of the work looks the same as at any event. The registration form collects entries, payments and invoices settle participation, and the attendee list in the panel is the single source of truth. An in-person event adds two things that do not exist online: the ticket the attendee brings to the entrance, and checking that ticket on the day of the event. The second half of this guide is devoted to exactly those two topics.
The order of the chapters follows the order of the work: decisions outside the system, event configuration, the registration form, payments, entry tickets, checking the list before the event and finally scanning at the entrance. If your event is free, the chapter about payments can be skipped. Tickets and scanning work exactly the same.
What to decide outside the system
Before you sit down at the panel, a few decisions are made on paper. The venue and its capacity, because it becomes the entries limit in the form. The date. The price and what sits inside it: the hall, catering, materials. Finally the participation options, everything the attendee chooses beyond the participation itself: the gala dinner, workshops, accommodation, meals. Each of these options becomes a field in the form, and you will see the answers later when scanning the ticket, so it pays to think them through once and well.
A separate decision concerns the entrance itself. Decide how many control points there will be and who stands at them. One person with a phone and the app is enough for each entrance, and the main reception desk works best with a computer and a USB scanner, because from it you can print a badge or fix a payment right away. It is also worth agreeing up front what the staff does with a person whose ticket is unpaid or has already been scanned. These situations will happen for sure and it is better if the answer is not being invented in the queue.
Creating the event in the system
You create the event by giving its name, web address, dates, languages and currency. Once it exists you land in the organizer panel, whose side menu is the map of all further work. In this guide we come back to four entries. People is the list of everyone signed up, the place messages are sent from and where tickets are scanned with a USB scanner. Forms holds the registration form. Invoices shows the issued documents, and Settings the configuration of payments, messages and entry tickets.
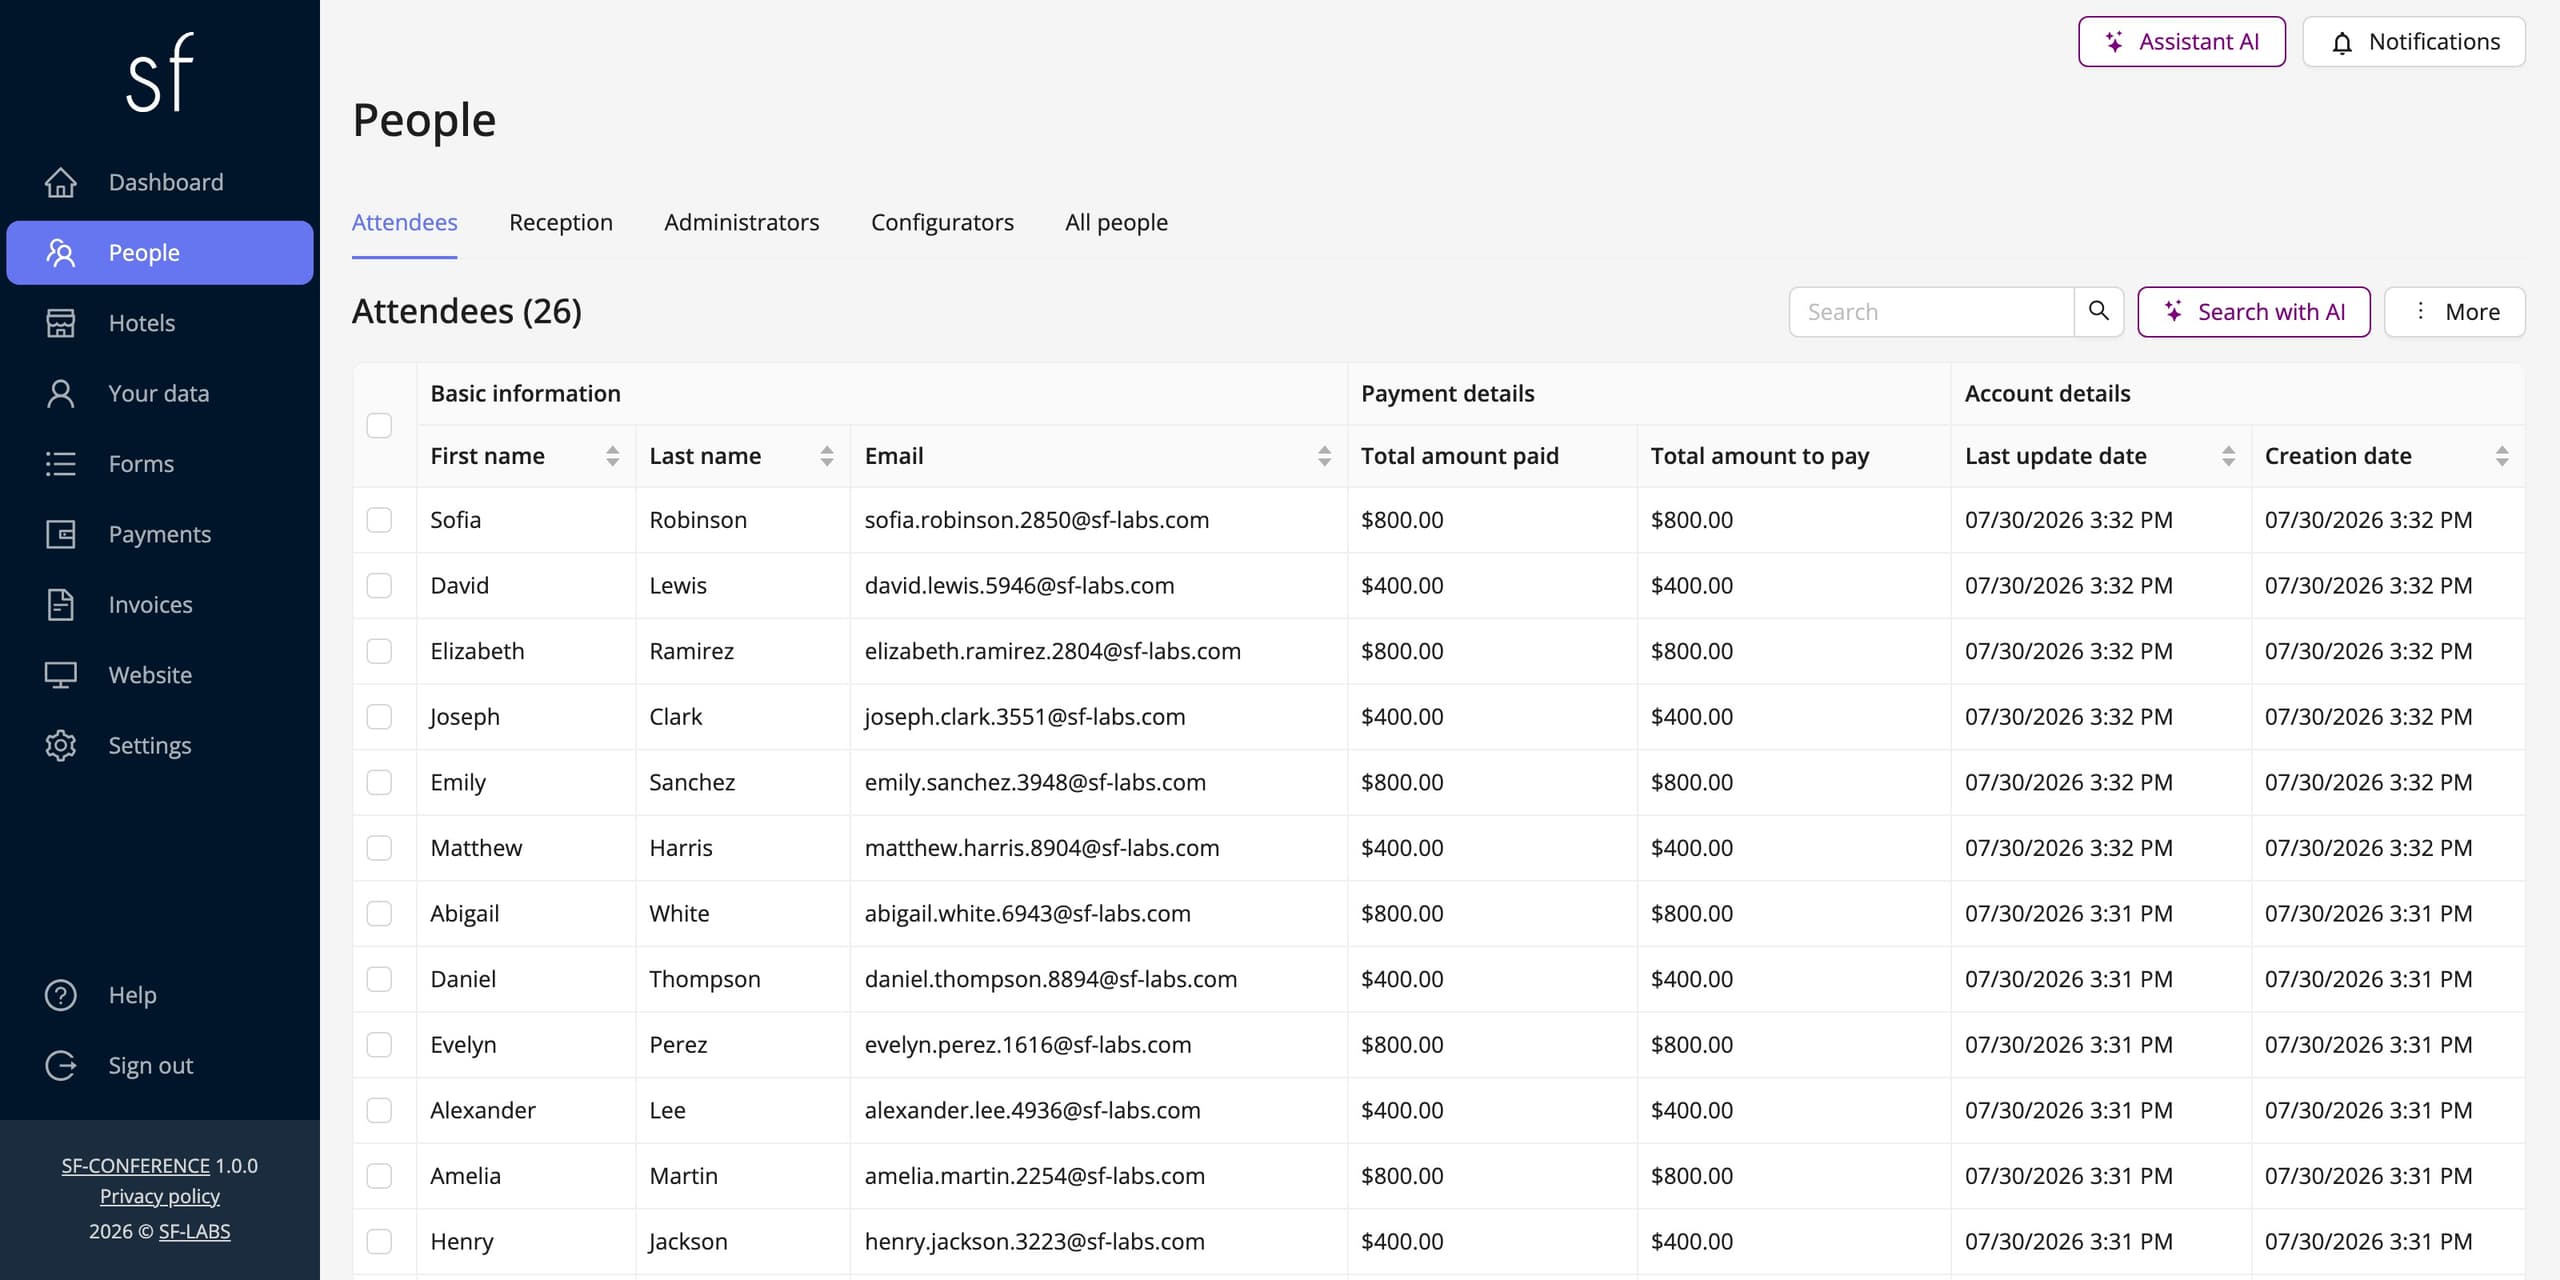
At an in-person event the event website works harder than at an online meeting, because it also answers the questions about directions, the agenda and the speakers. It is assembled from ready-made blocks, with no developer, which the building the event website instruction describes.
The registration form of an in-person event
The form lives in the Forms entry, on the Standard forms tab. The base is the same as always: first name, last name and an e-mail address with the contact address property, because that is where the ticket goes. Then come the fields that really work at an in-person event: participation options as choice fields, each with its own price and seat limit, plus the data processing consents. If you issue invoices, add the buyer data fields as well.
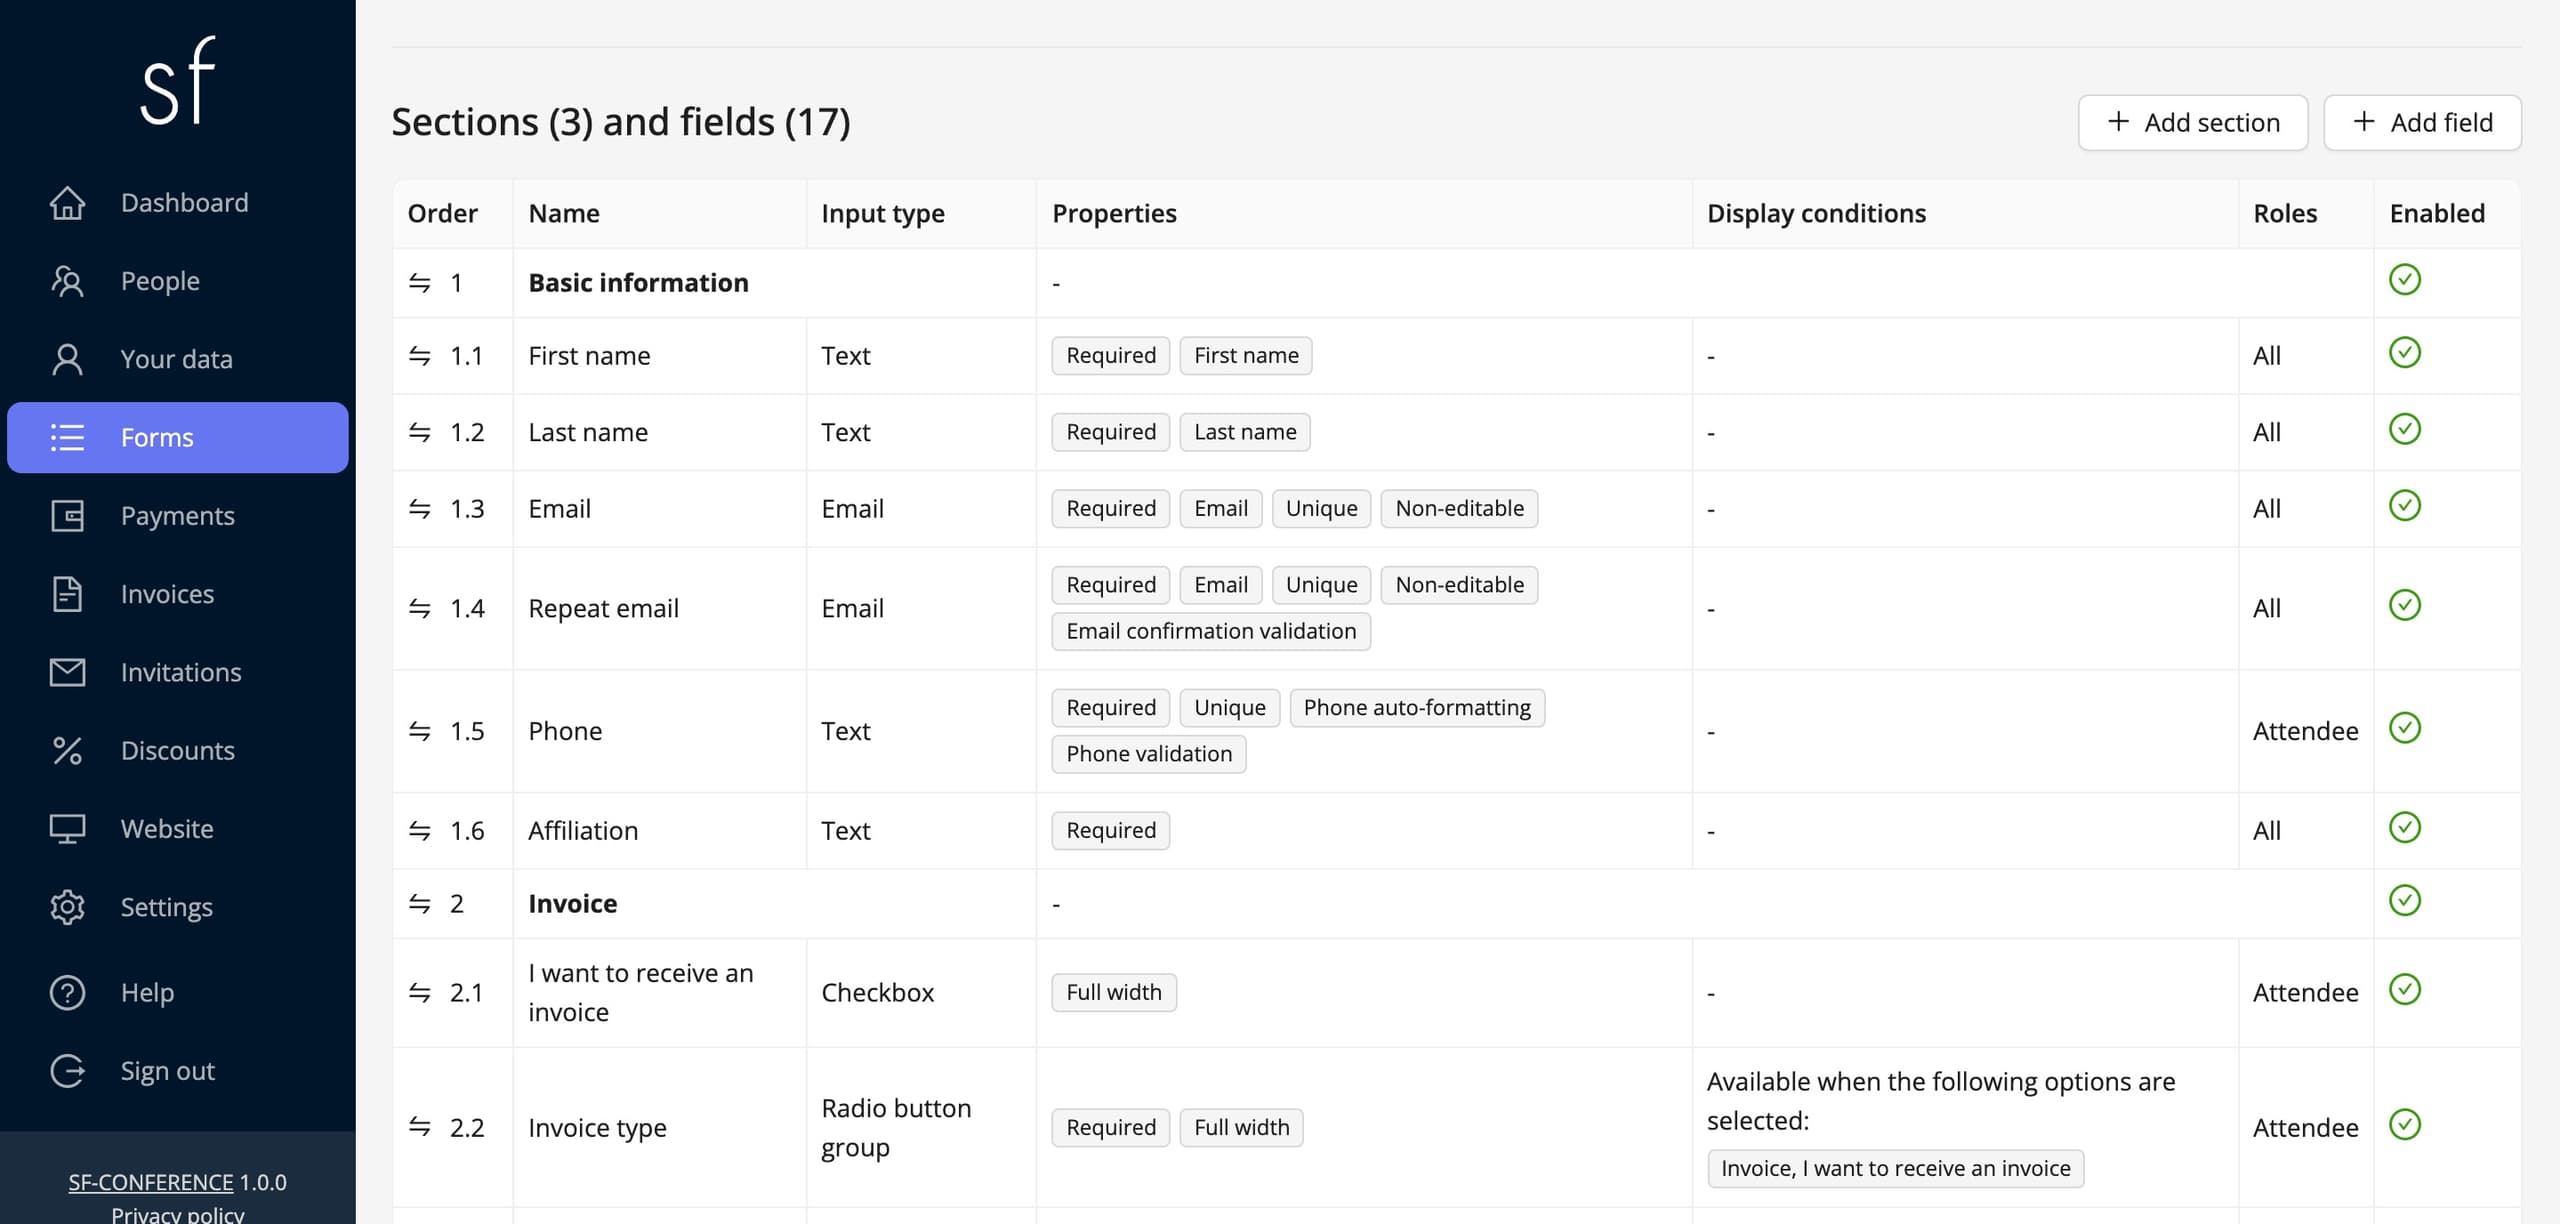
Two settings deserve special attention. Set the Entries limit in the Basic information section to the venue capacity, and the form will close sign-ups by itself once it is reached. The Form status set to Opened conditionally with a To date a day or two before the event leaves you time to close the list, send the tickets and prepare the reception. The price goes into the Payment details section, and early-bird pricing, discounts and dependencies between fields are covered by the registration form editing instruction. Codes for partners and guests live in the adding a discount code instruction.
Payments and invoices
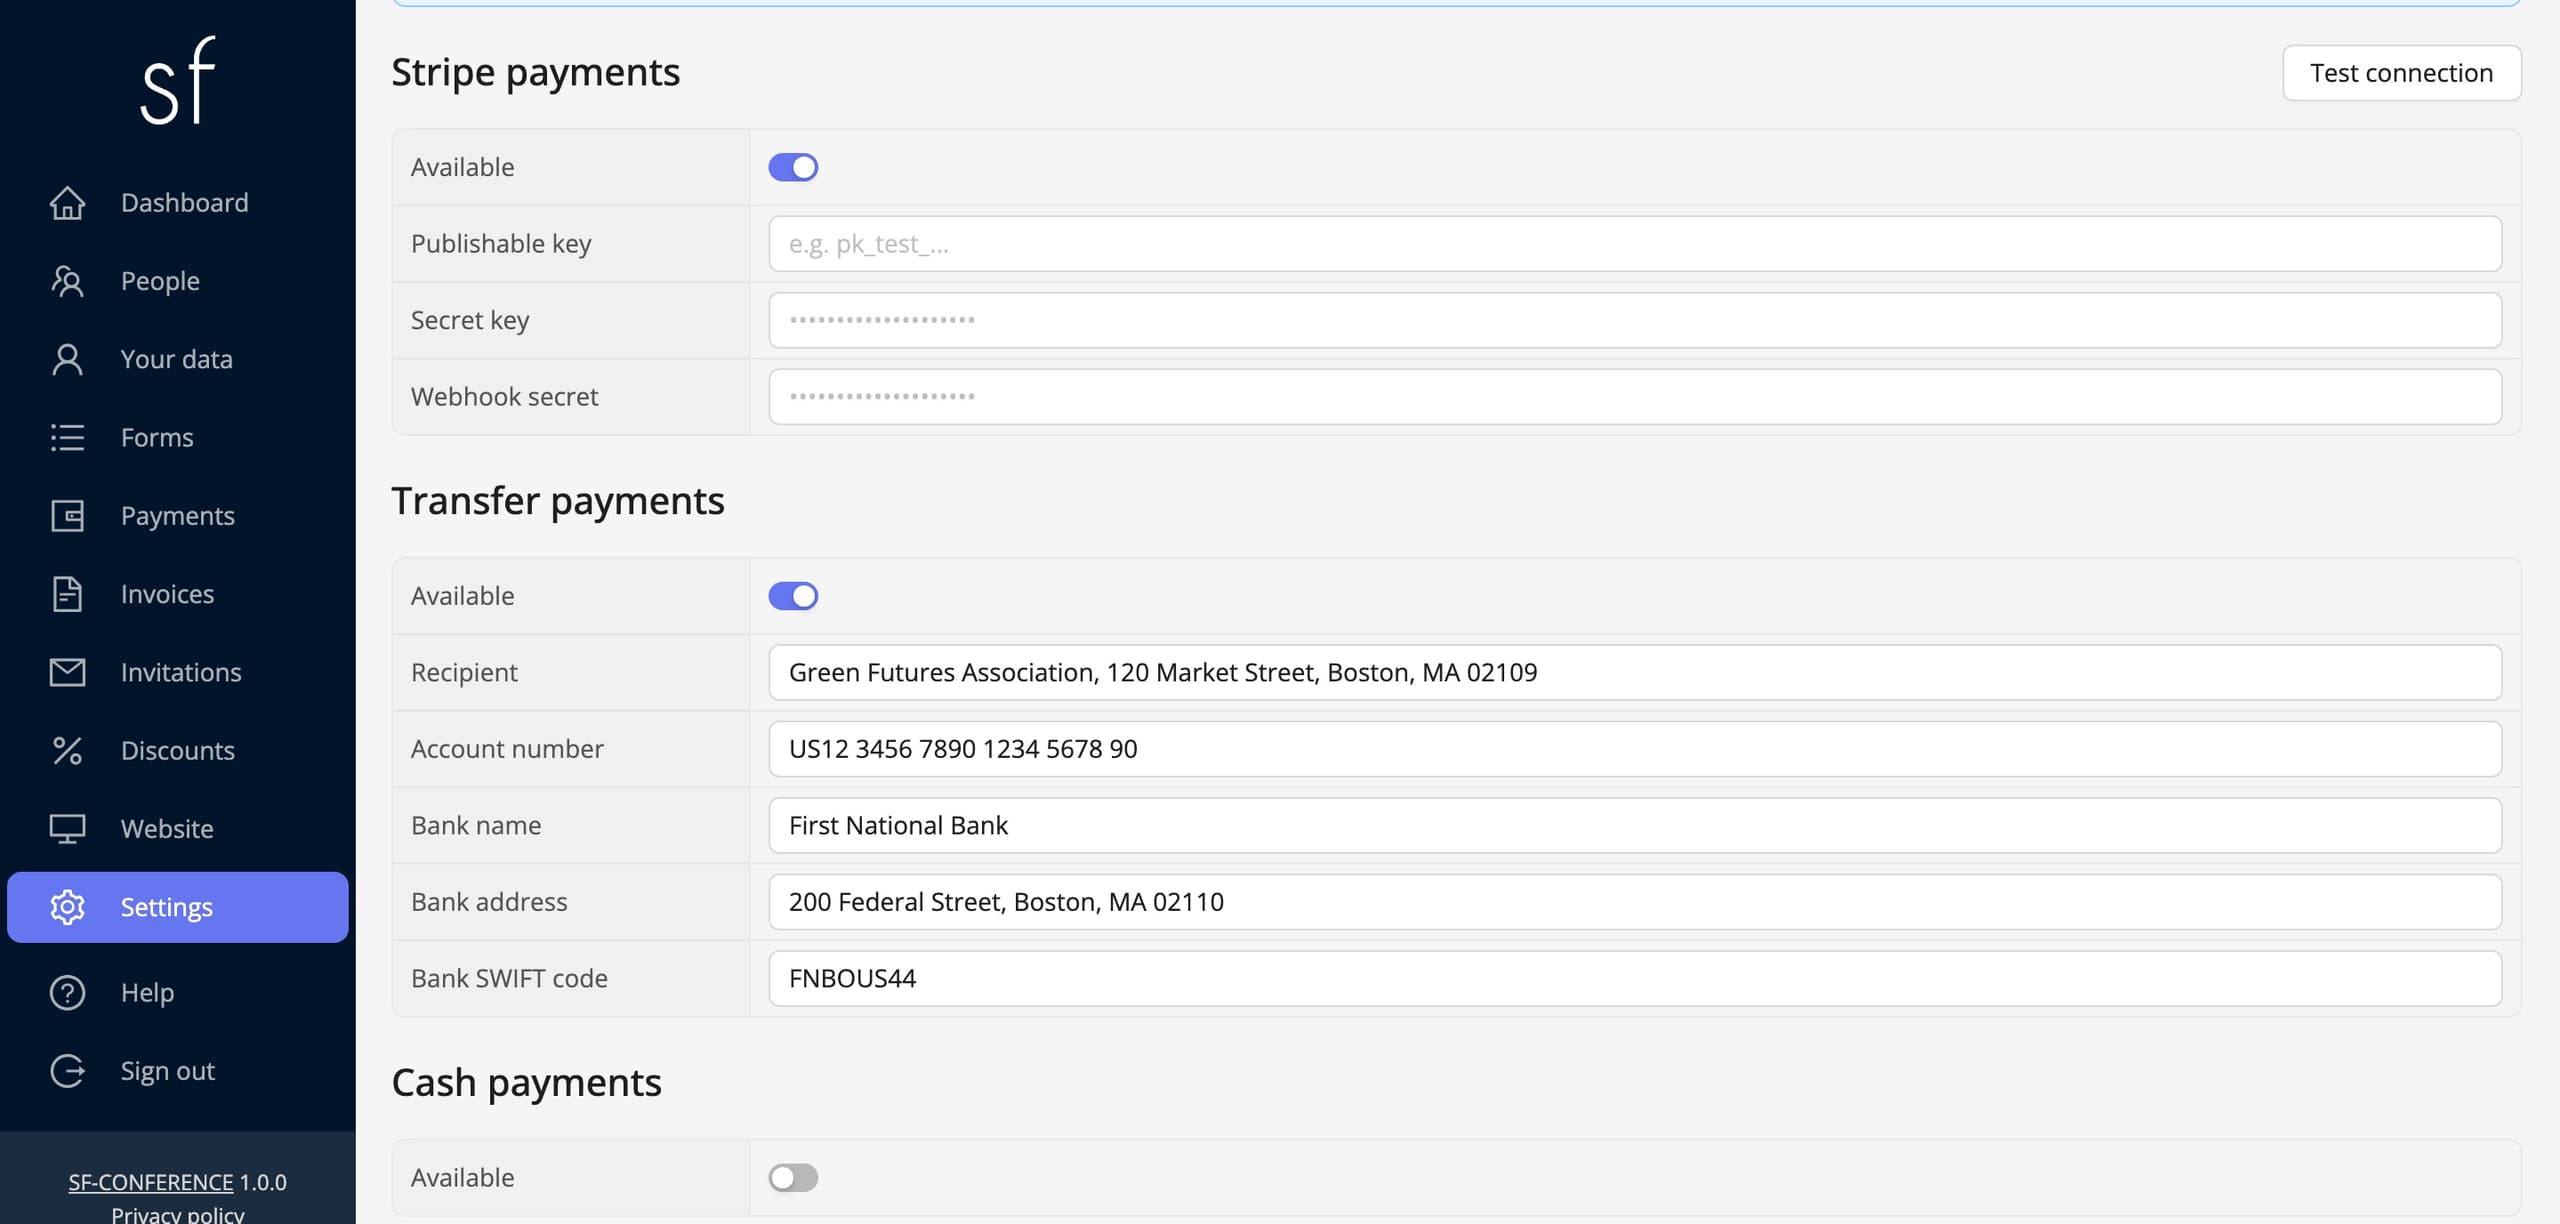
Payment methods are set once for the whole event, in the Settings entry. Online payments let people pay by BLIK, card or instant transfer and mark themselves as paid. The traditional transfer matters more at an in-person event than at a webinar, because it is used by the companies and institutions that settle participation against a proforma. In practice it is best to enable both.
Invoices issue themselves if you enable automatic issuing in the document templates: usually a proforma after the payment is created, and a VAT invoice after the payment is paid. Currencies, tax rates and numbering are described by the collecting payments and issuing invoices instruction. The payment status will come back at scanning time, because it decides what the staff sees at the entrance.
Entry tickets with a QR code
An entry ticket is a PDF document with a unique QR code the system generates separately for every attendee. There is nothing to print or import: the ticket appears on its own, and the QR code points at a specific person from the list. It is enabled in the Settings entry, on the Entry tickets tab. The Enabled for download switch lets the attendee download their ticket from the participation summary page, the private page where they also see their registration, payment and invoice.
The second switch, Enabled for download by unpaid participants, is best left off at a paid event. The ticket then becomes the reward for paying: it appears only once the payment is booked and nobody turns up at the entrance with a ticket they never paid for. Guest list conditions let you additionally restrict who gets a ticket at all, for example only the people who picked on-site participation in the form. In the Template & Preview section you set the content and look of the document itself and preview it before it goes out.
The ticket still has to reach the attendee. The simplest route happens by itself: the e-mail templates in the Settings entry have an Attach entry ticket toggle, so the ticket can travel as an attachment, for example with the payment confirmation. The same option appears when sending by hand from the People entry. A good practice is one collective message a day or two before the event: the ticket in the attachment, the reception opening time and a request to have the QR code ready on a phone or a printout.
Every ticket setting, from the template with its QR code to scanning, is covered step by step by the entry tickets and scanning at the entrance instruction.
Checking the list before the event
Everything that came through the form lands in the People entry: one row per person, the answers from the form as columns, each with a filter and sorting. In the week before the event this table is the command centre. Narrow the list down to the people with an unpaid payment and send them a reminder, mark the transfers visible on the account as paid, and add the registrations that arrived by e-mail by hand, following the adding an attendee instruction. A person added this way gets a ticket on the same terms as everyone else.
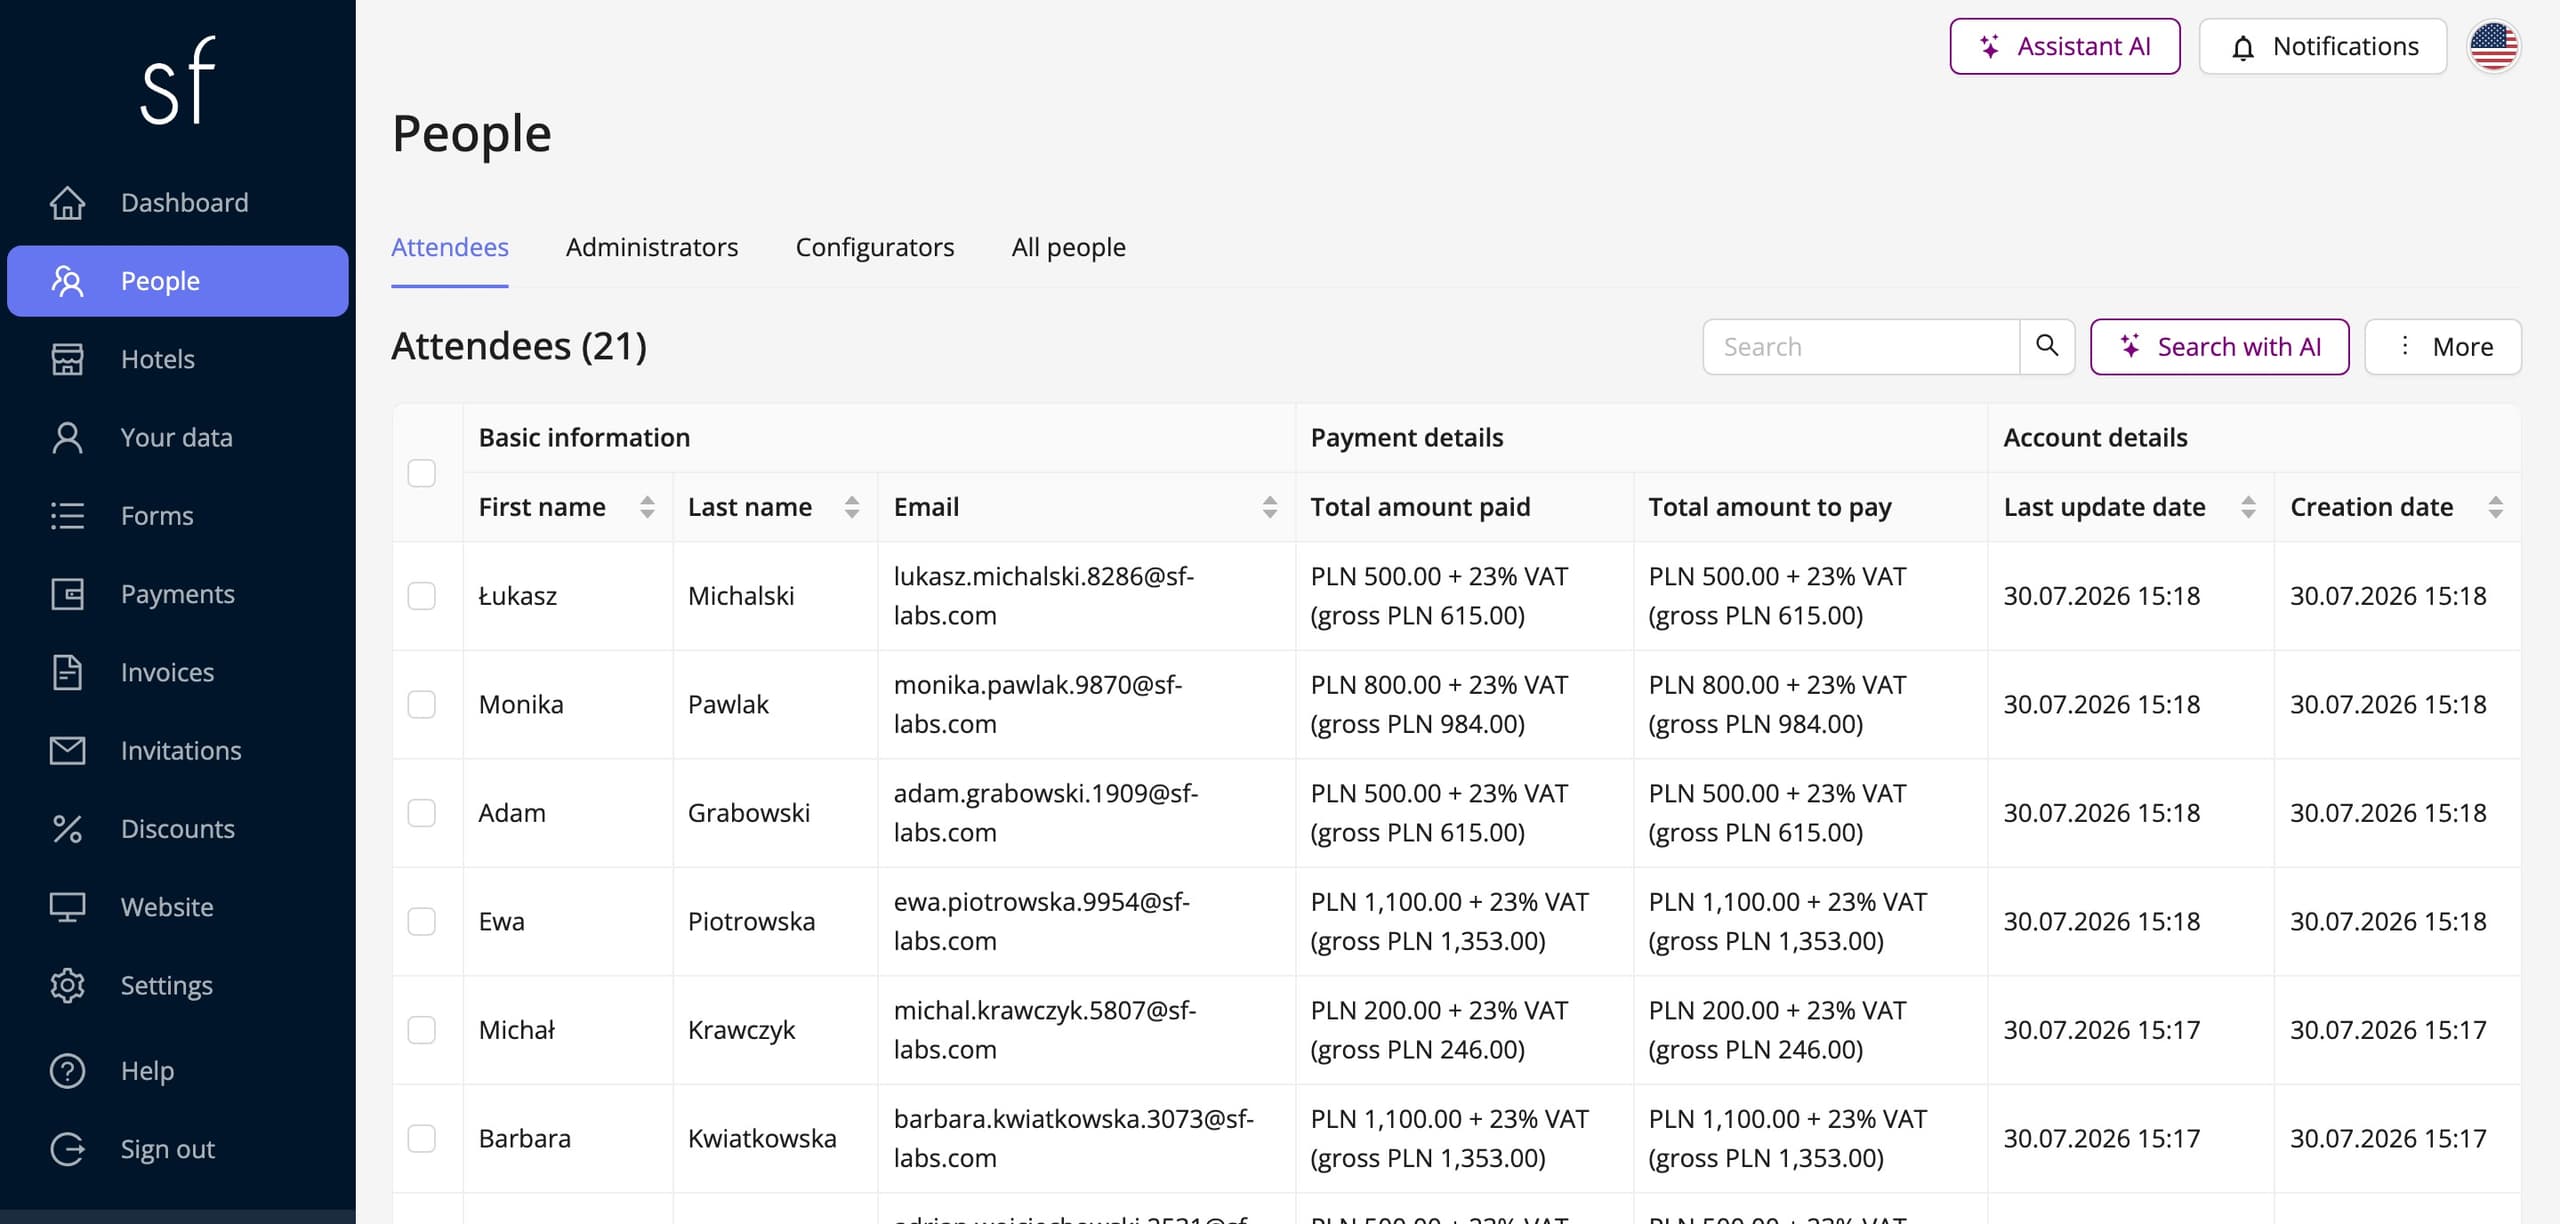
Finally, download the list with the Download all attendees in XLS button and put it on a phone or print it. If scanning goes smoothly you will not open it once, but a reception desk with a backup list sleeps better than one without it.
Scanning tickets with the mobile app
Entrance control is handled by the SF-CONFERENCE mobile app for organizers, available in the App Store and Google Play. You log into it with the event administrator account, the same one you use for the panel. The home screen immediately shows the three numbers everyone cares about on the day of the event: the number of attendees, the number of scanned tickets and the attendance. The statistics update live, so at any moment you know how many people are already in the room.


The Scan QR code button opens the camera. You point it at the code from the ticket, from the attendee's phone screen or from a printout, and the result appears at once: the first and last name plus three statuses. Whether the person is on the guest list, whether the participation is paid and whether this is the first scan of the ticket. Below that the app shows the data from the form along with the participation options, so the person at the entrance sees right away whether the guest has the gala dinner or the workshops booked, without asking anyone.
If someone tries to enter a second time on the same ticket, the first scan status turns into a warning that the ticket has already been scanned. It is the simplest protection against tickets being passed on: the first person walks in without stopping, every next one requires a decision from the staff.


Scanning in the panel with a USB scanner
At the main reception desk, where a computer stands anyway, a plain QR code reader plugged in over USB is often handier than a phone. Such a reader needs no drivers or configuration, because to the computer it is simply a keyboard that types out the contents of the code very quickly. Any model that can read QR codes will do.
In the People entry click Scan entry ticket. A window opens with a message about waiting for a QR code scan and from that moment you just point the reader at consecutive tickets. After every scan the system shows the verification: whether the participation is free or paid, or unpaid, and whether the ticket was scanned for the first time or had already been scanned before. Below you will find the attendee data from the form and the scan history with the date and the person who scanned, so on a repeated scan you can see which entrance and who handled the first one.
Four buttons wait under the result. Open person details leads to the attendee's full page, for example to take a payment on the spot and mark it as paid. Download badge and Print badge let you print the badge right at the entrance, on a printer connected to the same computer. Scan another goes back to listening and the reception serves the next person in the queue.
The form also has a Visible after entry ticket scan field property. A field with this property does not appear in the registration, but the staff sees its content once the ticket is scanned. It is a good place for reception notes, for example about collecting a VIP invitation or about a special diet.
The reception desk on the day of the event
Both scanning methods work off the same data, so they can be combined. A proven setup looks like this: one person with a phone and the app at every entrance, and a computer with a USB scanner and a printer at the main reception desk. The phones clear the queue, because they scan on the move, and the reception handles everything that takes a longer while: payment on the spot, adding a person who did not manage to register, printing a badge.
The statuses at scanning answer exactly the two questions a reception desk asks most often. An unpaid ticket is a signal to direct the guest to the main desk, where the payment can be taken and marked right away. A repeated scan is a signal to ask about the first entry. The attendance on the app home screen tells you in turn when the reception can close and join the event.
An in-person event step by step, in short
- Decide the venue and its capacity, the date, the price and the participation options, as well as who staffs the control points at the entrance.
- Create the event in the system and build a website with the agenda, the speakers and directions.
- Build the registration form with the participation options and set the Entries limit to the venue capacity.
- Enable online payments and the traditional transfer, plus automatic document issuing.
- On the Entry tickets tab enable ticket downloads, keeping the tickets of unpaid participants blocked.
- Attach the ticket to the payment confirmation and send a message with the ticket a day or two before the event.
- Before the event close the list in the People entry: mark the transfers, add late registrations, download a backup XLS.
- Install the app on the staff's phones and prepare a computer with a USB scanner at the reception desk.
- On the day of the event scan tickets at the entrance and watch the attendance on the app home screen.
Confirmations, invoices and statistics happen along the way by themselves. Planning the event itself, from budget to promotion, is described more broadly by the how to organize an event step by step guide, and if your meeting takes place online, read the how to organize a webinar guide.
See also
How to add an attendee
Add an attendee manually from the panel, without waiting for them to register through the registration form.
How to edit the registration form
Add and change fields, set prices, dates and dependencies between answers and decide when registration is open.
How to collect payments and issue invoices
Set the currencies, bank transfer and online payments, and let the invoices issue themselves.

Complete event management on a single platform. An event website, attendee registration and a full set of organizer tools.
2026 © SF-LABS sp. z o.o. All rights reserved
Entered into the register of entrepreneurs of the National Court Register kept by the District Court for Kraków-Śródmieście in Kraków, 11th Commercial Division of the National Court Register, under KRS number 0000886671. Share capital amount: PLN 5,000.