How to organize a webinar
A webinar is an online meeting somebody has to sign up for first. The slides, the speaker and the chat look exactly as they would in a room, and the difficulty sits somewhere else entirely: you have to collect the sign-ups, check who paid, send everyone the stream link exactly when it is needed and afterwards find out whether it was worth it. This guide walks through that whole road in the SF-CONFERENCE system, from creating the event to the survey once it is over.
One distinction up front saves a lot of confusion. SF-CONFERENCE is not a streaming platform and it does not replace Zoom, Microsoft Teams, Google Meet or YouTube. You run the stream wherever you have been running it. The system takes care of everything around it: the event website, the registration form, the price list, payments and invoices, the attendee list, the correspondence and the surveys. In practice that is the part which eats the time, while the streaming tool comes down to a single address that has to reach someone at the right moment.
The chapters follow the order the work actually happens in: setting the event up, the registration form, pricing with an early-bird tier, payments, keeping an eye on the attendee list, sending out the stream link, email communication and the post-webinar survey. If your webinar is free, the chapters on price and payments can be skipped. The rest stays the same.
What sets a webinar apart from an on-site event
Half the cost and half the trouble disappears. There is no room, no catering, no accommodation and no travel, so the budget comes down to the speaker’s fee, the platform licence and promotion. The hard seat limit goes too: a room holds as many people as it holds, while a webinar holds as many as your plan with the streaming provider allows.
In exchange three new things turn up, and they are easy to forget. First, registration is the only point of contact with the attendee before the meeting, so the form has to be short and the confirmation immediate. Second, some of the people who signed up simply will not come. That is normal at online events and it is worth assuming it up front when planning the reminders. Third, the room is a link, and the link has to be delivered. There is no reception desk to ask at.
Before you sit down to the panel, settle a few things on paper. The topic and the promise, that is the sentence saying what the attendee walks away with. The speaker. The length, because with a single presenter forty-five to sixty minutes plus time for questions works better than three hours. The date and the time, ideally in the middle of the week. The streaming platform along with its attendee limit. Finally the two decisions attendees always ask about: whether the webinar is paid and whether it will be recorded. Write both plainly in the form, or they will reach you by email a dozen times over.
Creating the event in the system
You set a webinar up in the system just like any other event. You give it a name, the web address it will live at, the dates, the languages and the currency. The name and the address go straight into search results and into every link you send, so they are worth a moment of thought. Set the dates to a single day, with the start and end time of the stream.
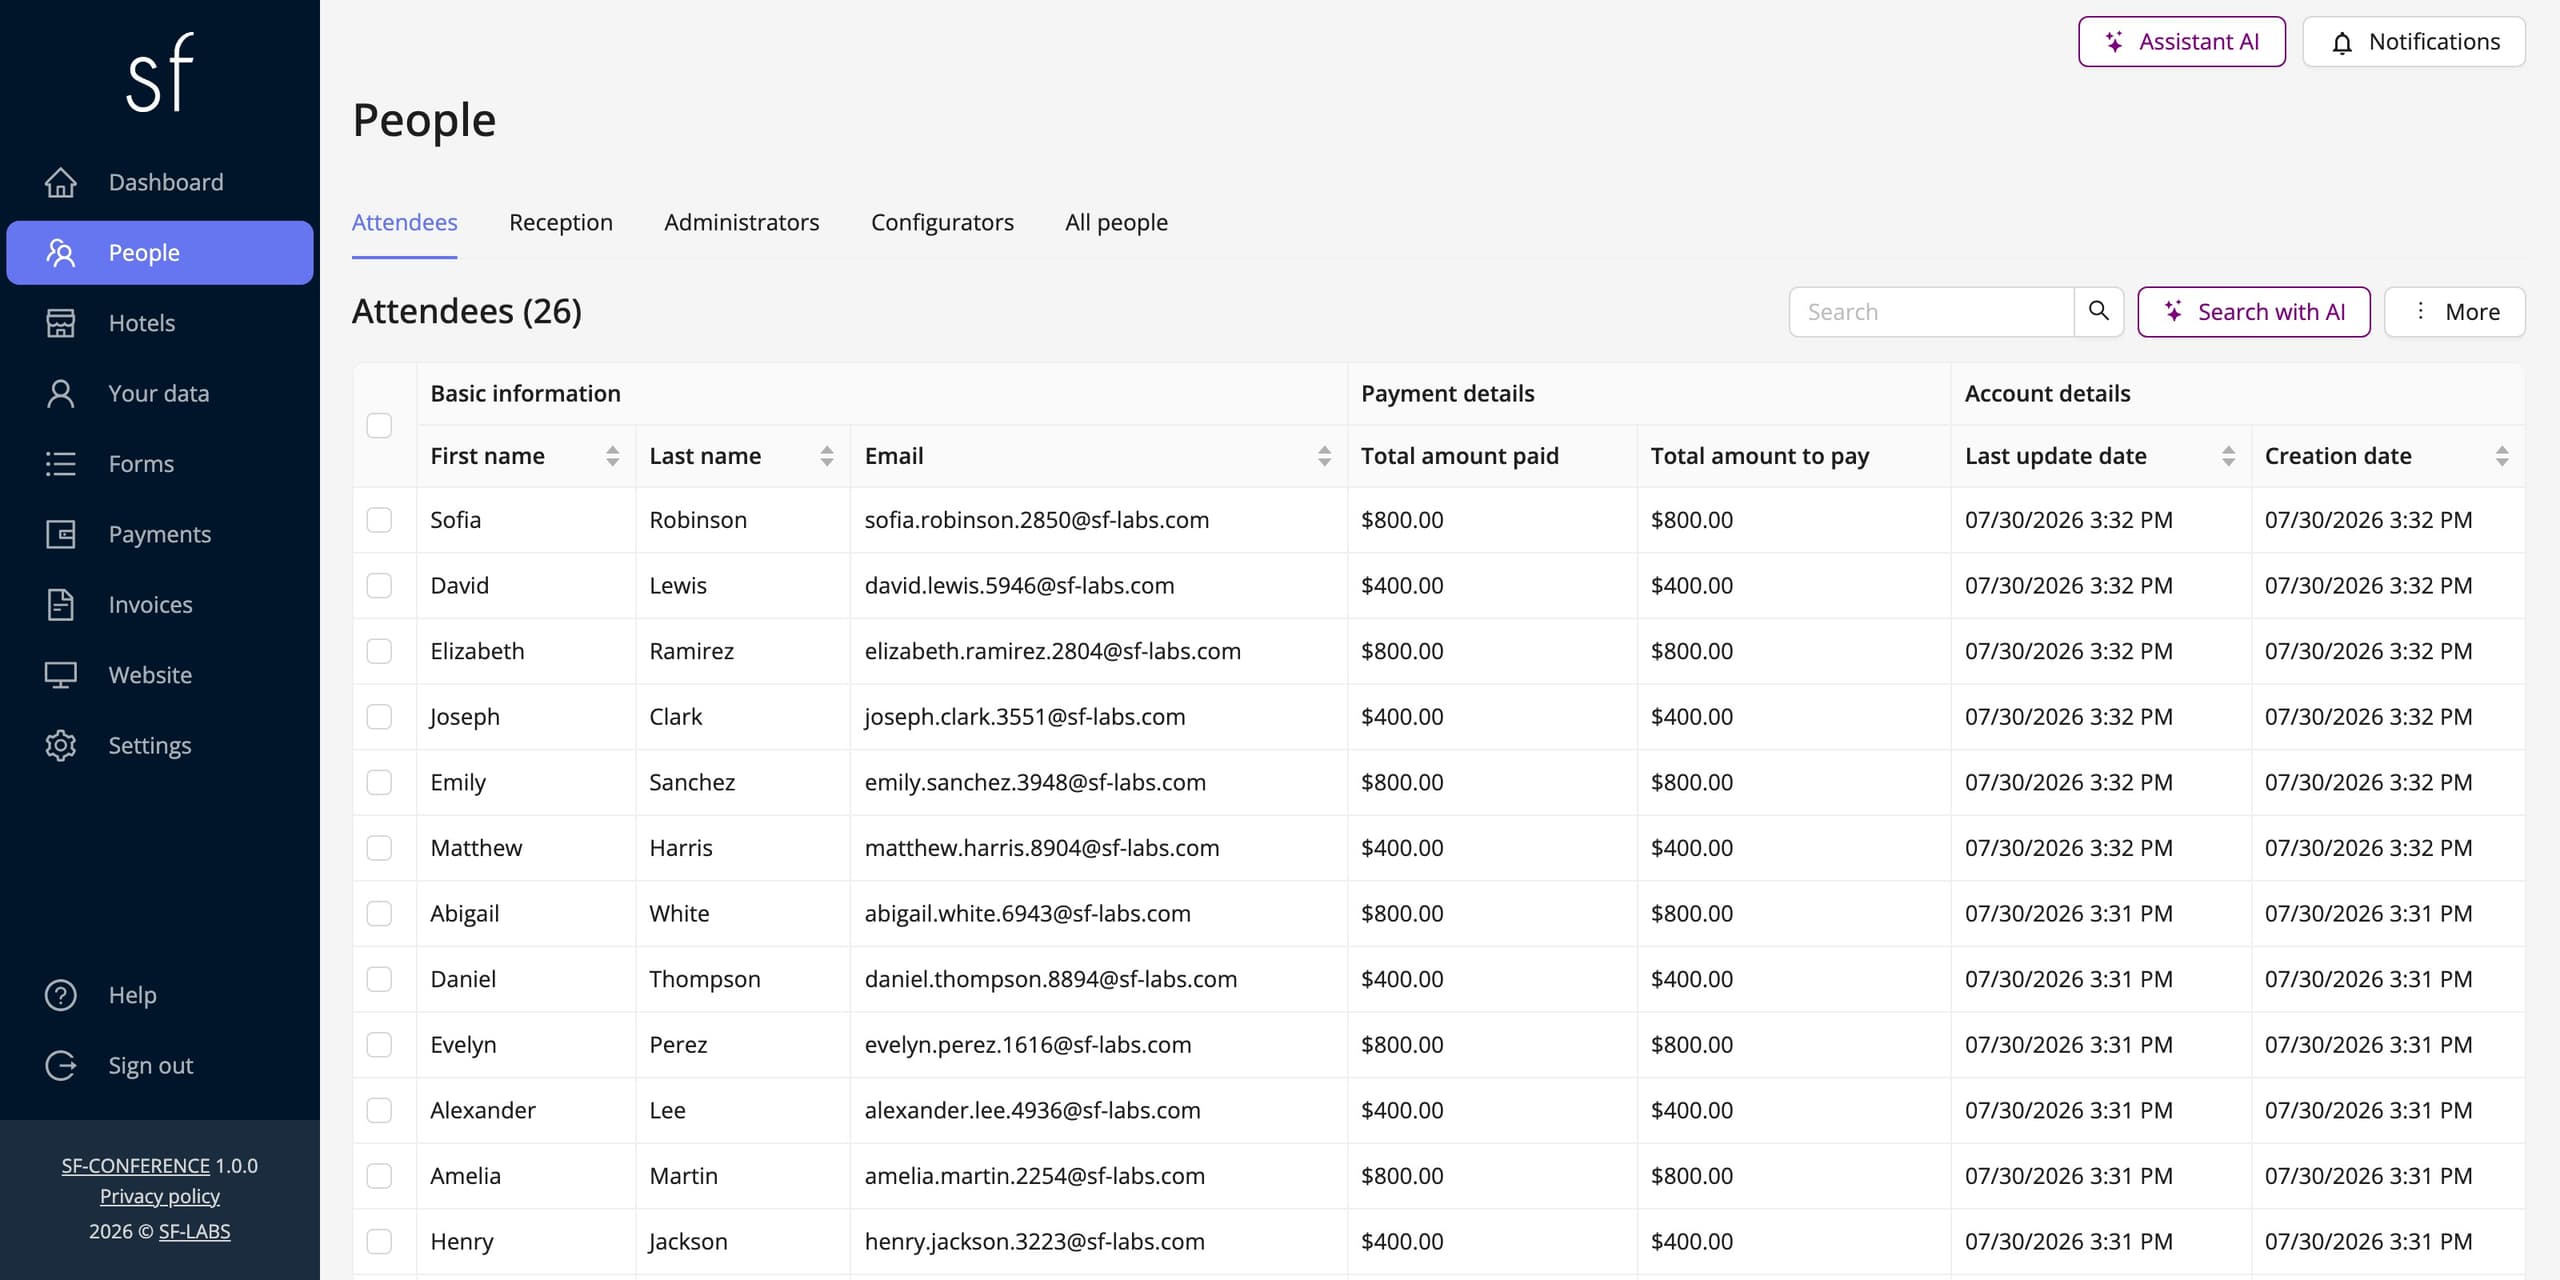
Once the event exists you land in the organizer panel. The side menu is the same map at every event and in this guide we come back to four of its entries. People is the list of everyone signed up and the place you send messages from. Forms covers the registration form and the external forms the survey will be built on. Invoices shows the issued documents, and Settings holds the payment configuration and the look of the messages.
An event website is optional at a webinar, but it usually pays off. Sign-ups very often start in a search engine, and a page with a description of the topic, a profile of the speaker and a registration button catches that traffic far better than a bare form. It is assembled from ready-made blocks, with no developer, which the building an event website guide describes. If you already have a site of your own, a link to the registration form on it is enough.
The webinar registration form
The form lives in the Forms entry in the side menu, on the Standard forms tab, under the name Registration form. Its page starts with the settings for the whole form, and below them sits the Sections and fields table, where you arrange the questions.
One rule holds at a webinar: the shorter the form, the more sign-ups. Every extra field is another reason to close the tab. In practice first name, last name and email address are enough, because the stream link goes to that address. The email field has to carry the property telling the system that this is the attendee’s contact address. Without it the messages have nowhere to go.
Only then add questions, and only the ones you will genuinely use. Company or institution and job title earn their place when the webinar is a sales activity. A select field asking where you heard about the webinar tells you which promotion channel works. A Text box with a question for the speaker is the cheapest way to build the question part, because you walk into the meeting already knowing what the room cares about. Add the consents separately: the data-processing clause as a required field and the marketing consent as an optional one, if you want to invite these people to later meetings.
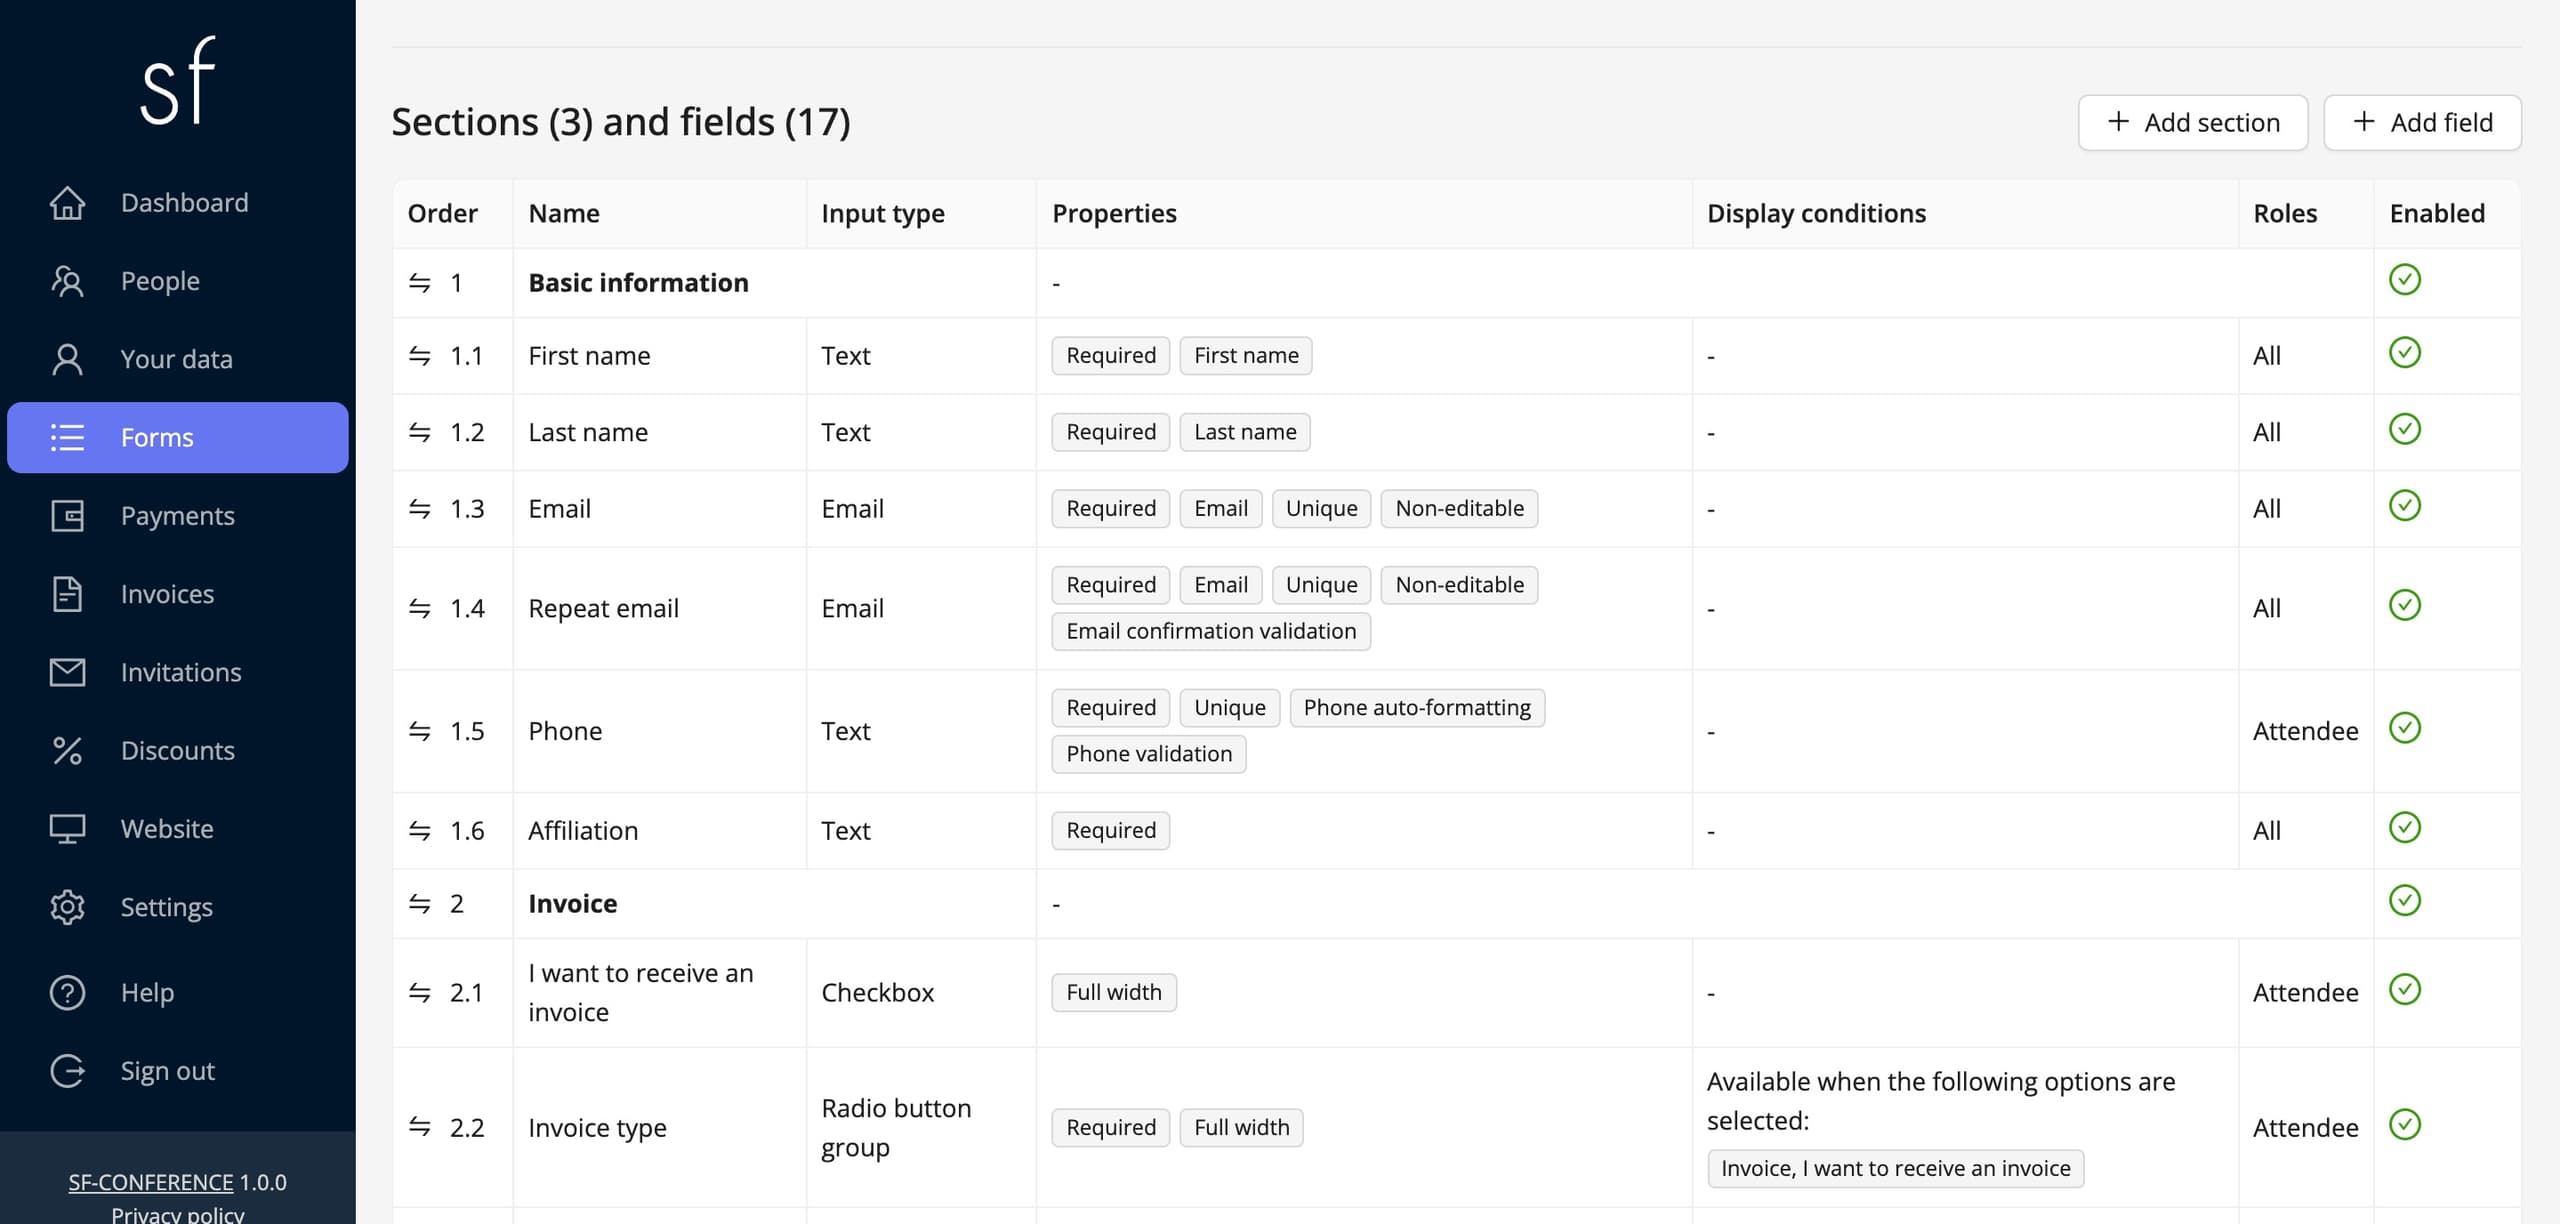
A full account of adding fields, their types and properties is in the editing the registration form guide. Below we return only to the settings that look different at a webinar than at a conference.
When webinar registration is open
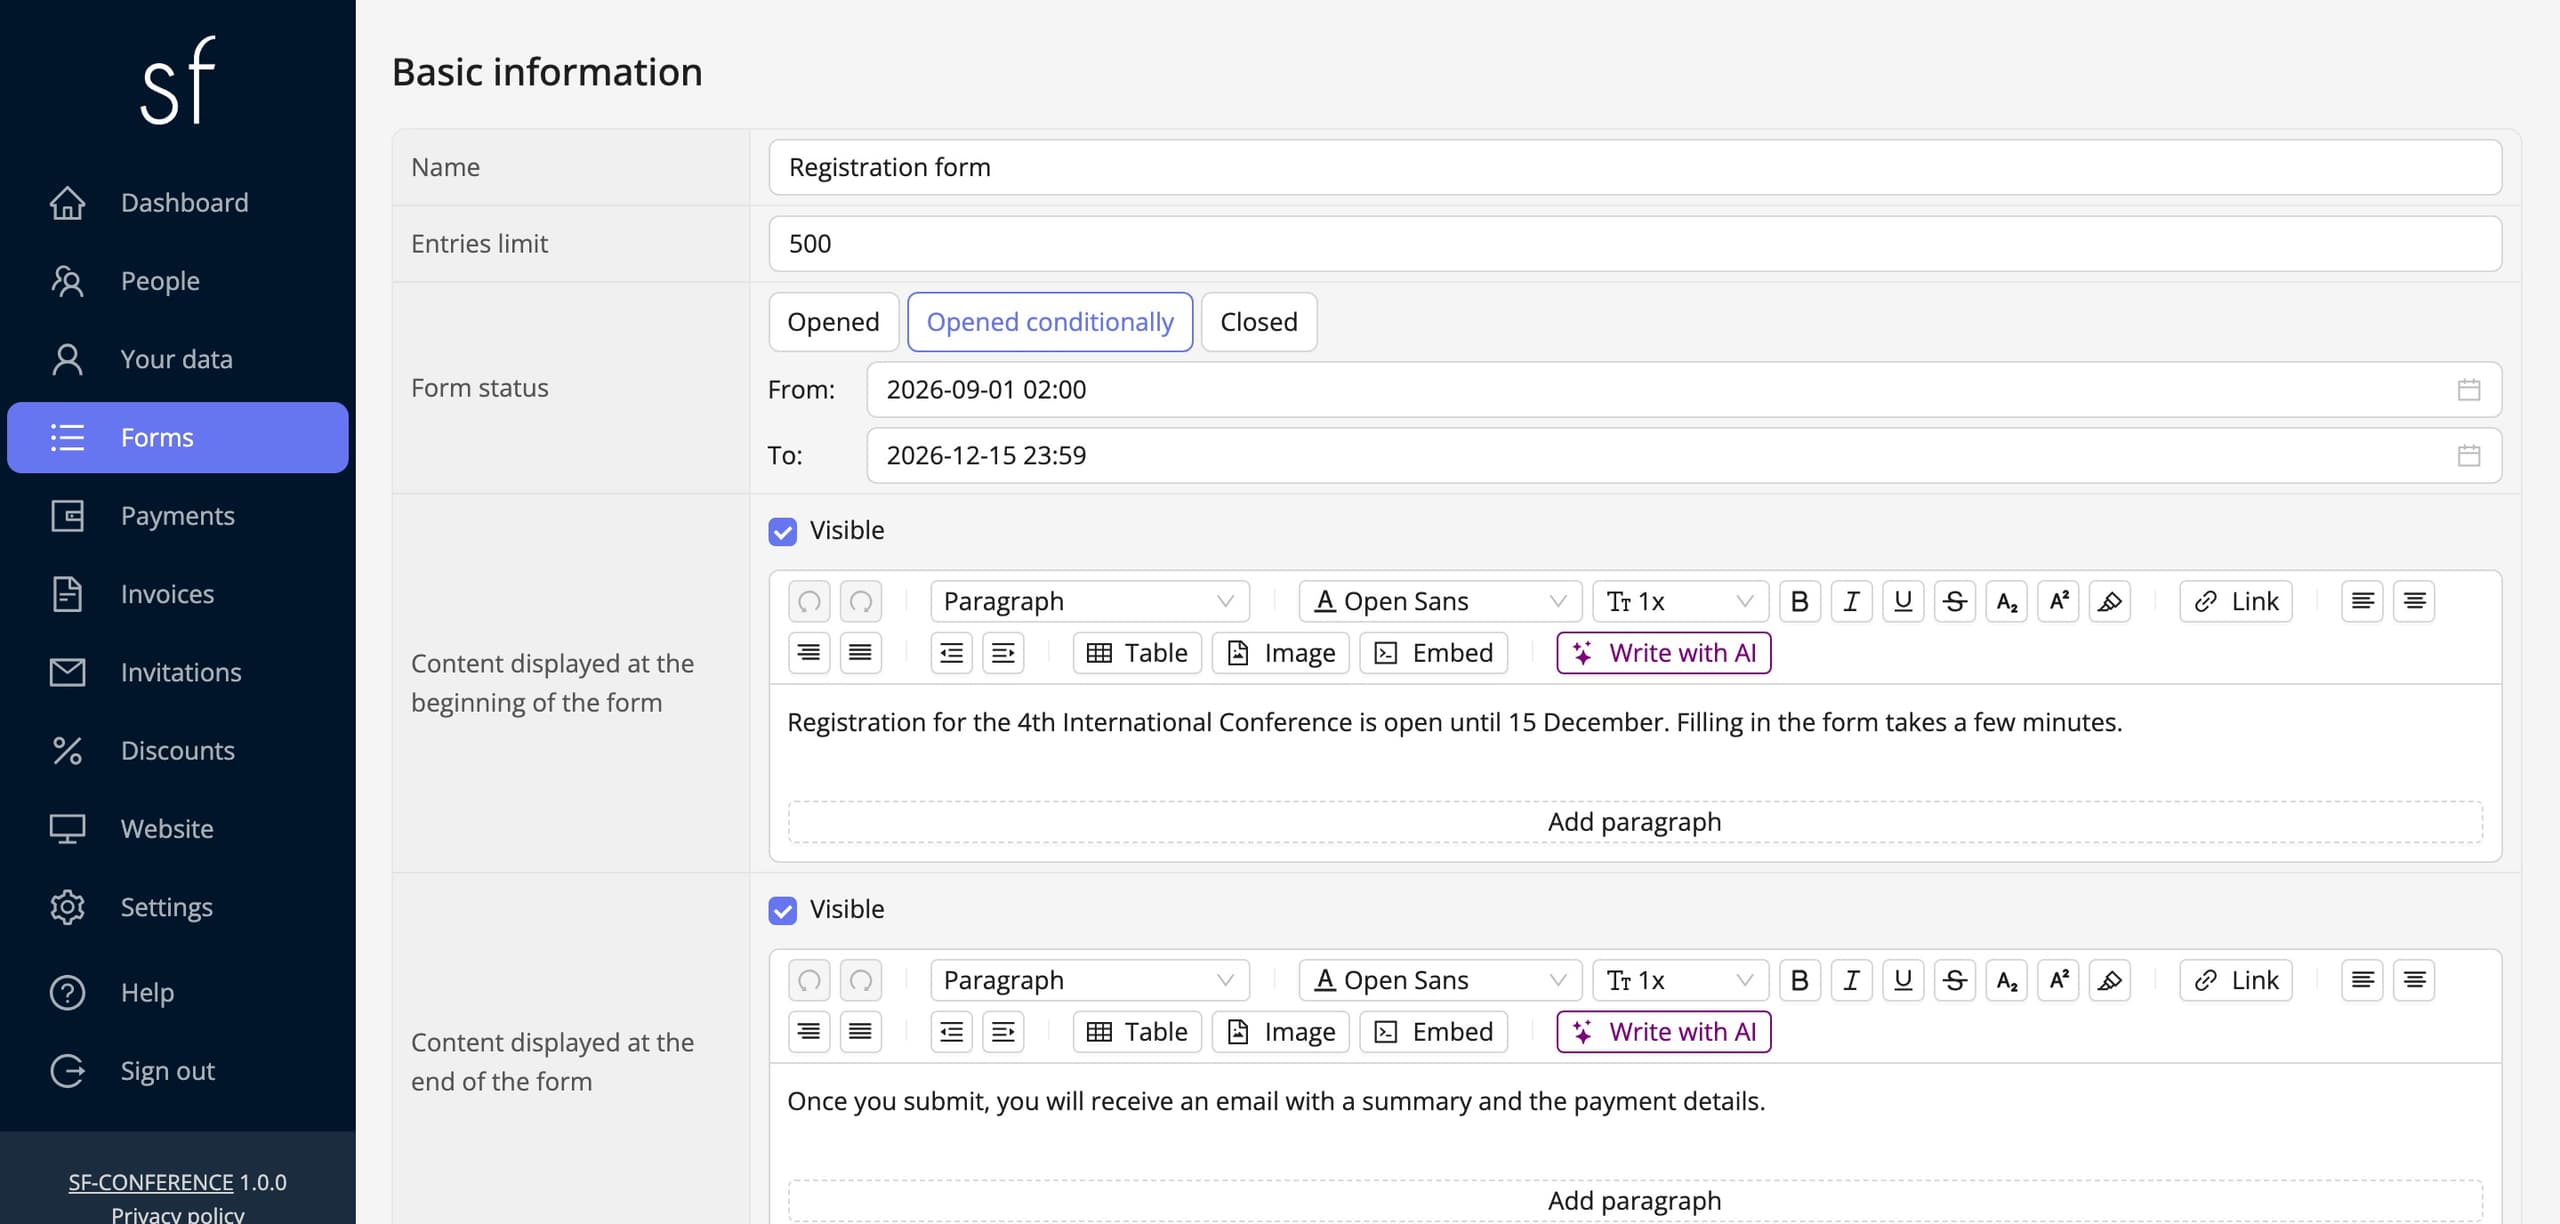
In the Basic information section the Form status field decides whether the form takes registrations. Open runs with no time limits, Closed stops sign-ups at once, and Opened conditionally reveals the From and To fields with a date and a time, after which the form opens and closes on its own.
At a webinar the easiest thing is to set To an hour or two before the start. That leaves time for the last send of the link to everyone signed up and nobody joins the list in the middle of the stream, when you would not manage to send them anything anyway. If you prefer to take sign-ups right to the end, leave the form open, but be ready to send the link to latecomers by hand.
Right above the status sits the Entries limit. Put in it the number of seats your streaming platform allows, and the form will stop taking registrations by itself once that number is reached. It is the simplest guard against having more people signed up than the meeting can hold. It is worth filling in ahead of time the Content displayed when the form is closed as well: someone who reaches the page after the deadline will then see your explanation and a note about the recording or about the next date instead of a system message.
Webinar pricing and the early-bird tier
The pricing settings for the whole form live on its page, in the Payment details section. The Base price is added to everyone regardless of what they choose, so at a webinar with a single rate it is the only field you need to fill. The Payment title describes the transfer and the invoice, and Payment in form moves the choice of payment method into the registration itself, so the attendee goes straight to the payment page after submitting. At an online event that setting makes particular sense, because the road from decision to payment should be as short as it can be.
If there are several rates, say a standard one and a student one, or an individual one and a corporate one, leave the base price empty and add a select field with options. The price then belongs to the option and not to the form, and you will find it in the Advanced settings of each of them.
The early-bird tier is built from two options of the same field. The first, the cheaper one, gets the lower amount and Available to set to the last day of the promotion. The second, the regular one, gets the target amount and Available from set to the day after. The windows must not overlap, or both prices would be on show at once for a while. Two toggles go with them, and without them the effect is only half there: on the early option tick Hide option after availability ends, and on the regular one Hide option until availability. The attendee then always sees exactly one price, and the switch from one to the other happens on its own, at midnight on the day you named.
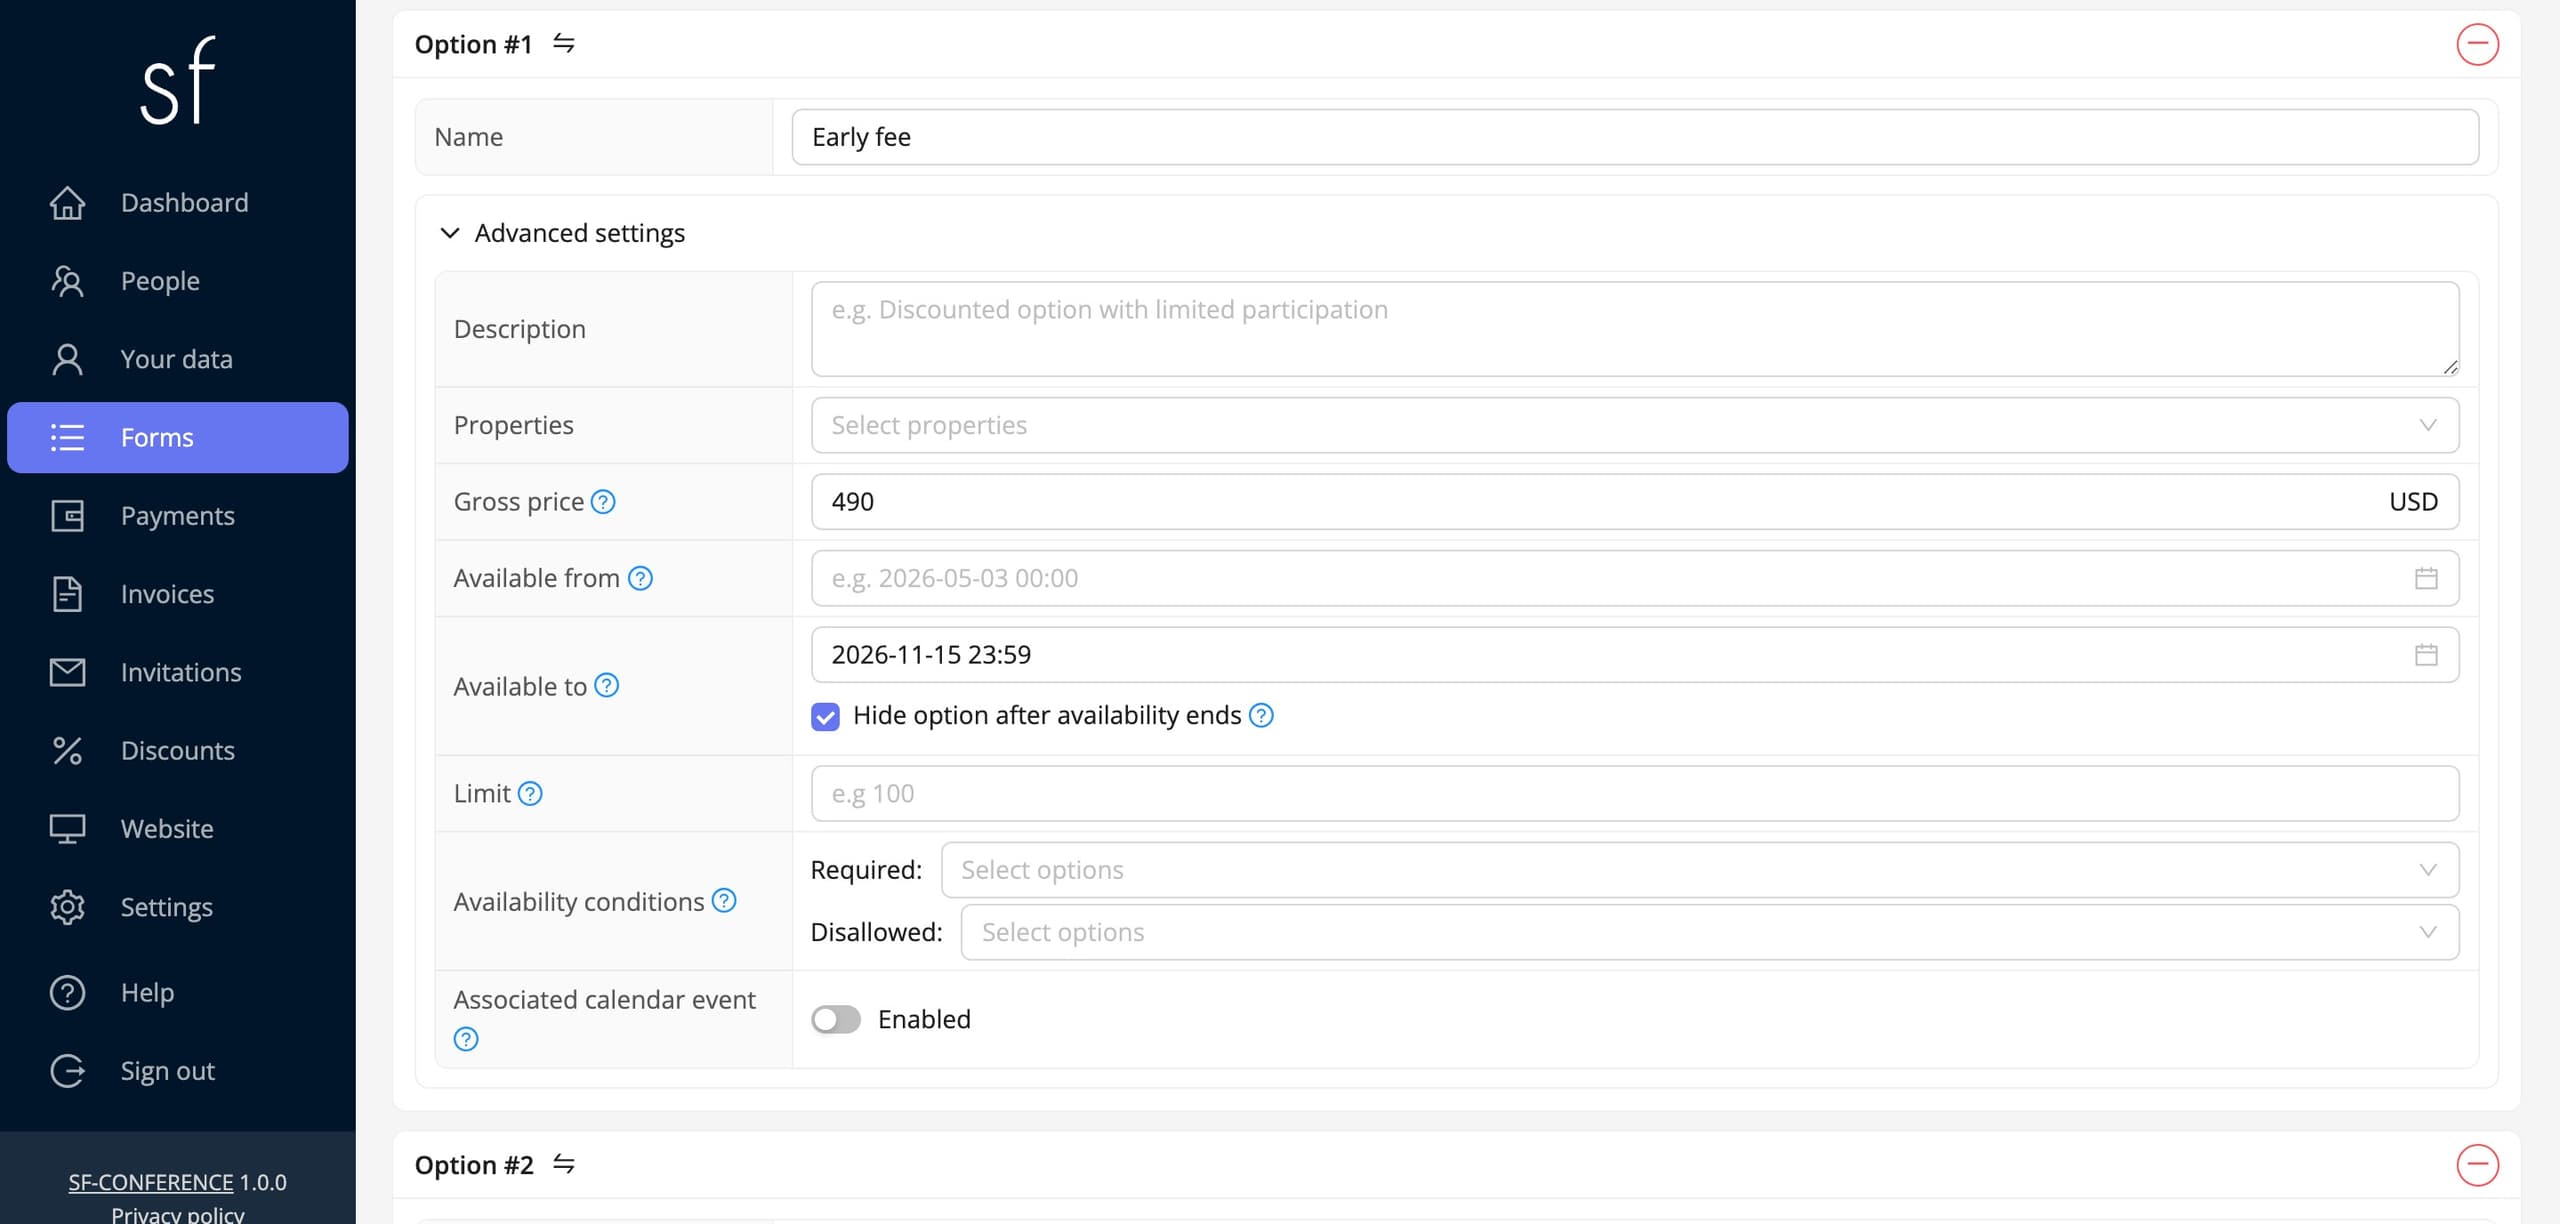
A tier based on the number of seats rather than on a date works just as well at a webinar. Give the early option a Limit, say fifty, and tick Hide option when the limit is exhausted. The cheaper entry disappears after the fiftieth registration, whatever the calendar says. Both methods also work together. Discount codes are a separate tool, and with them you can invite partners, media or regular customers without changing the price list for everyone.
Webinar payments and invoices
Payment methods are set once for the whole event, in the Settings entry. There are bank transfers, where the system shows the attendee the transfer details and waits for you to confirm the money arrived, and online payments, where the attendee pays by card or instant transfer and the payment marks itself as paid.
At a webinar online payments are all but compulsory. Access is immediate, while an ordinary transfer takes up to two working days to clear, so with sign-ups for a meeting a week away half the attendees would wait for confirmation longer than the whole promotion runs. Keep the bank transfer as an option for companies and institutions that cannot account for the cost any other way.
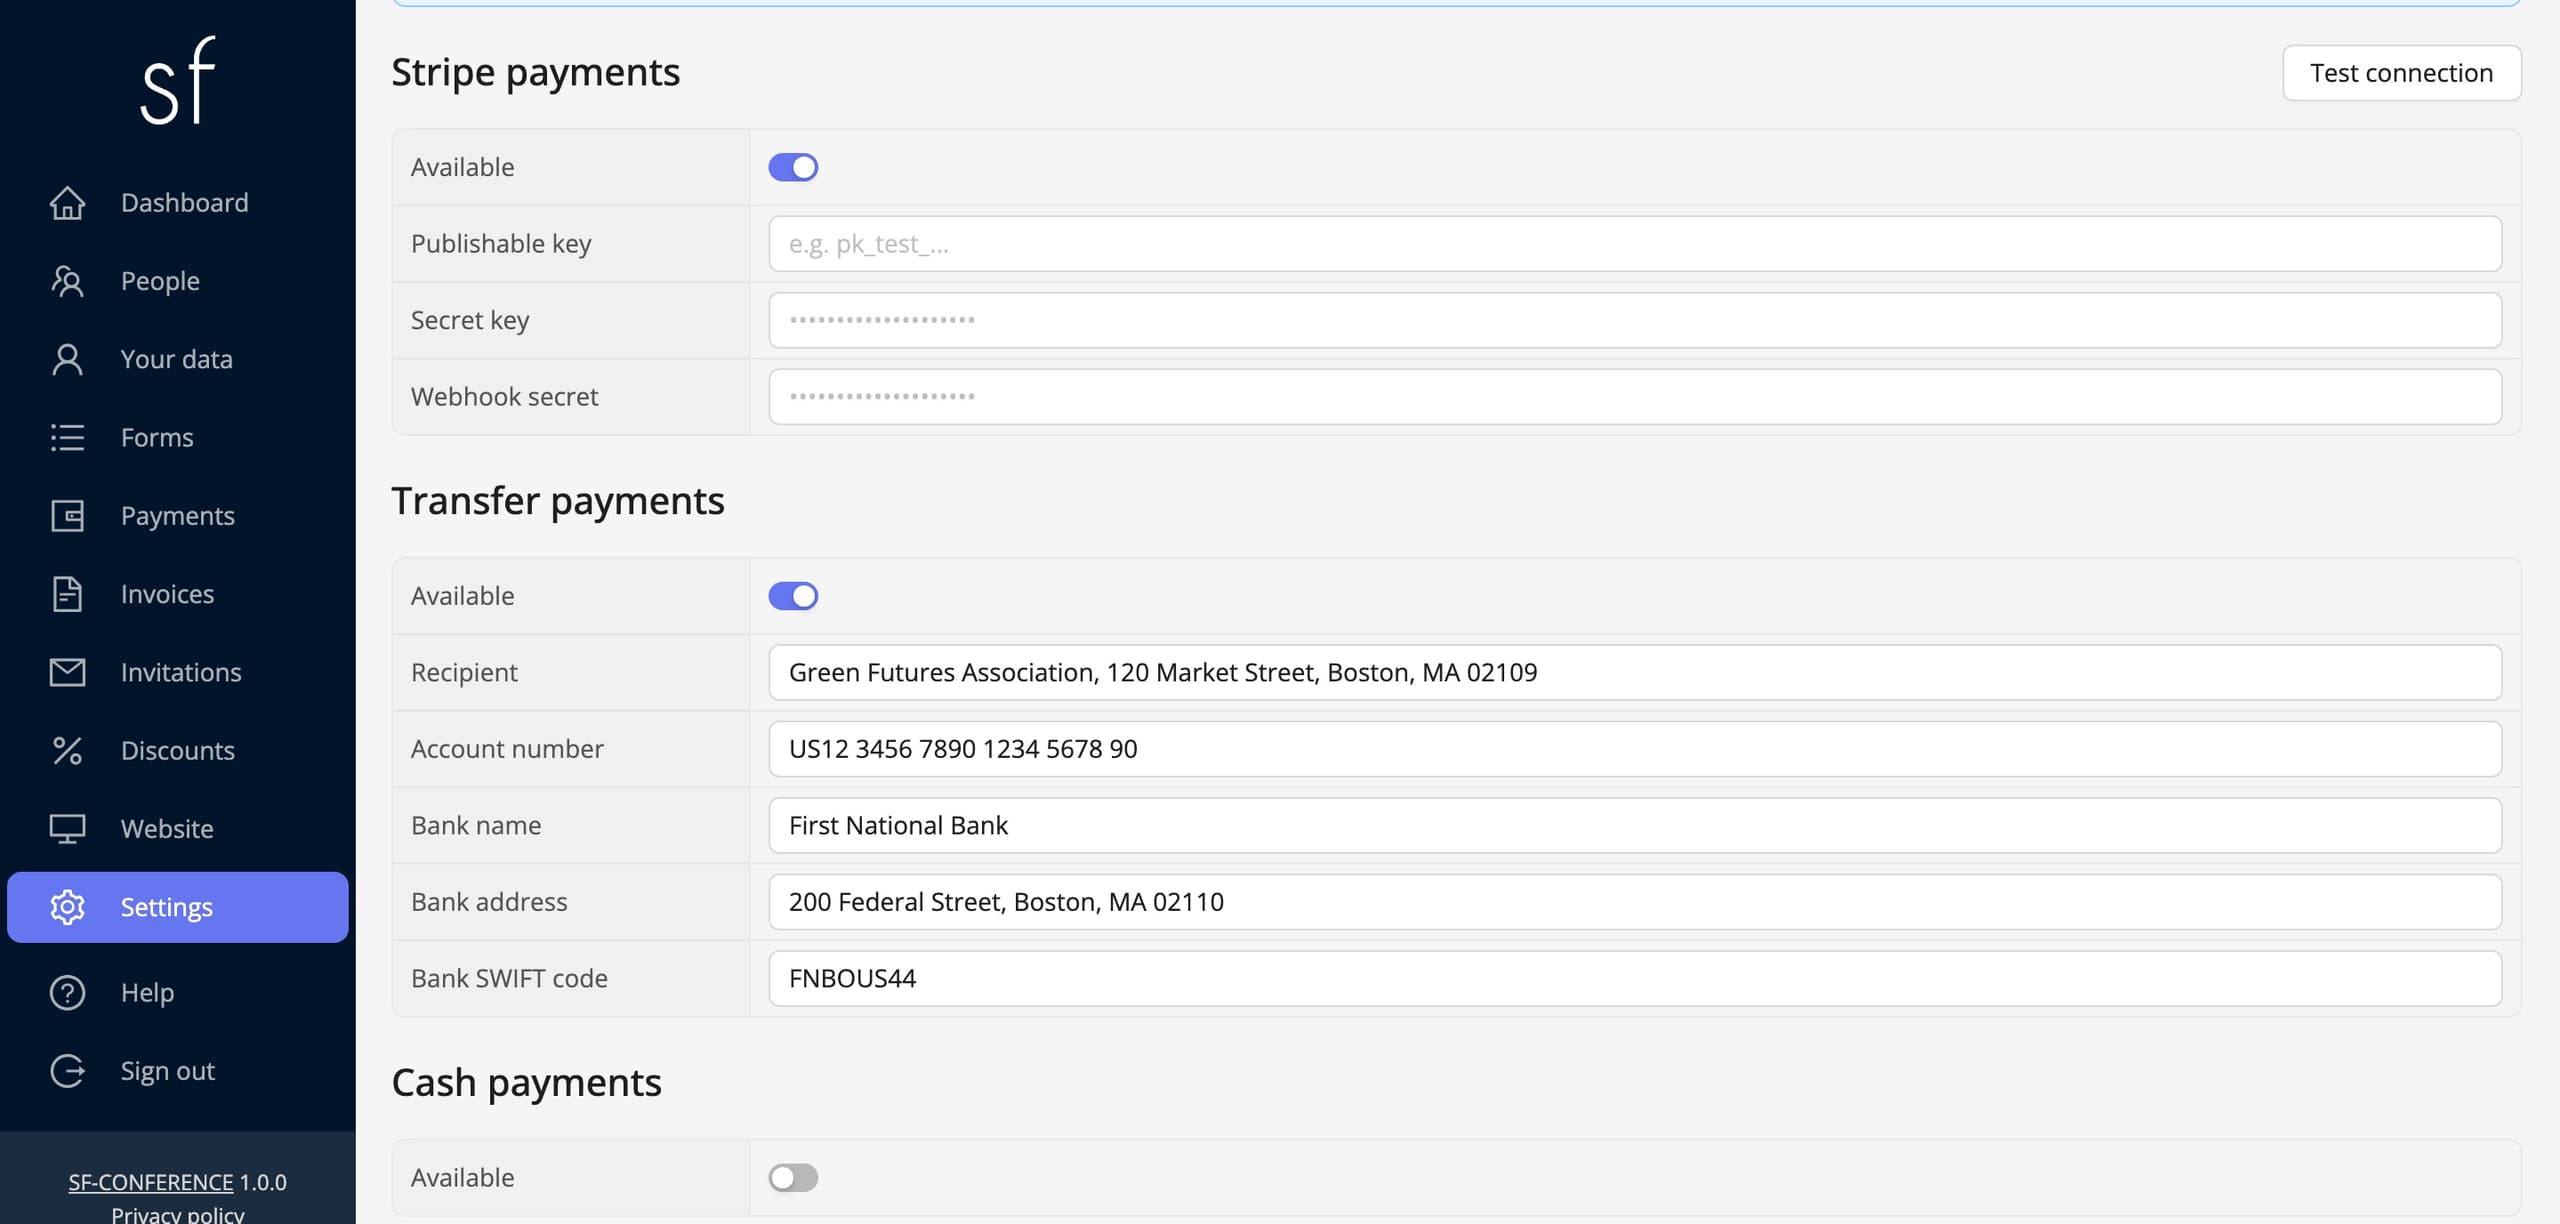
Invoices issue themselves once you switch automatic issuing on in the document templates. A proforma is usually created After payment is created, because it is what the attendee pays against, and the VAT invoice After payment is paid. For the document to carry the buyer’s details, the form needs fields with the properties prefixed with Invoice, that is the company name, the tax number and the address. A freshly created event has automatic issuing switched off, so without this step no document is ever produced.
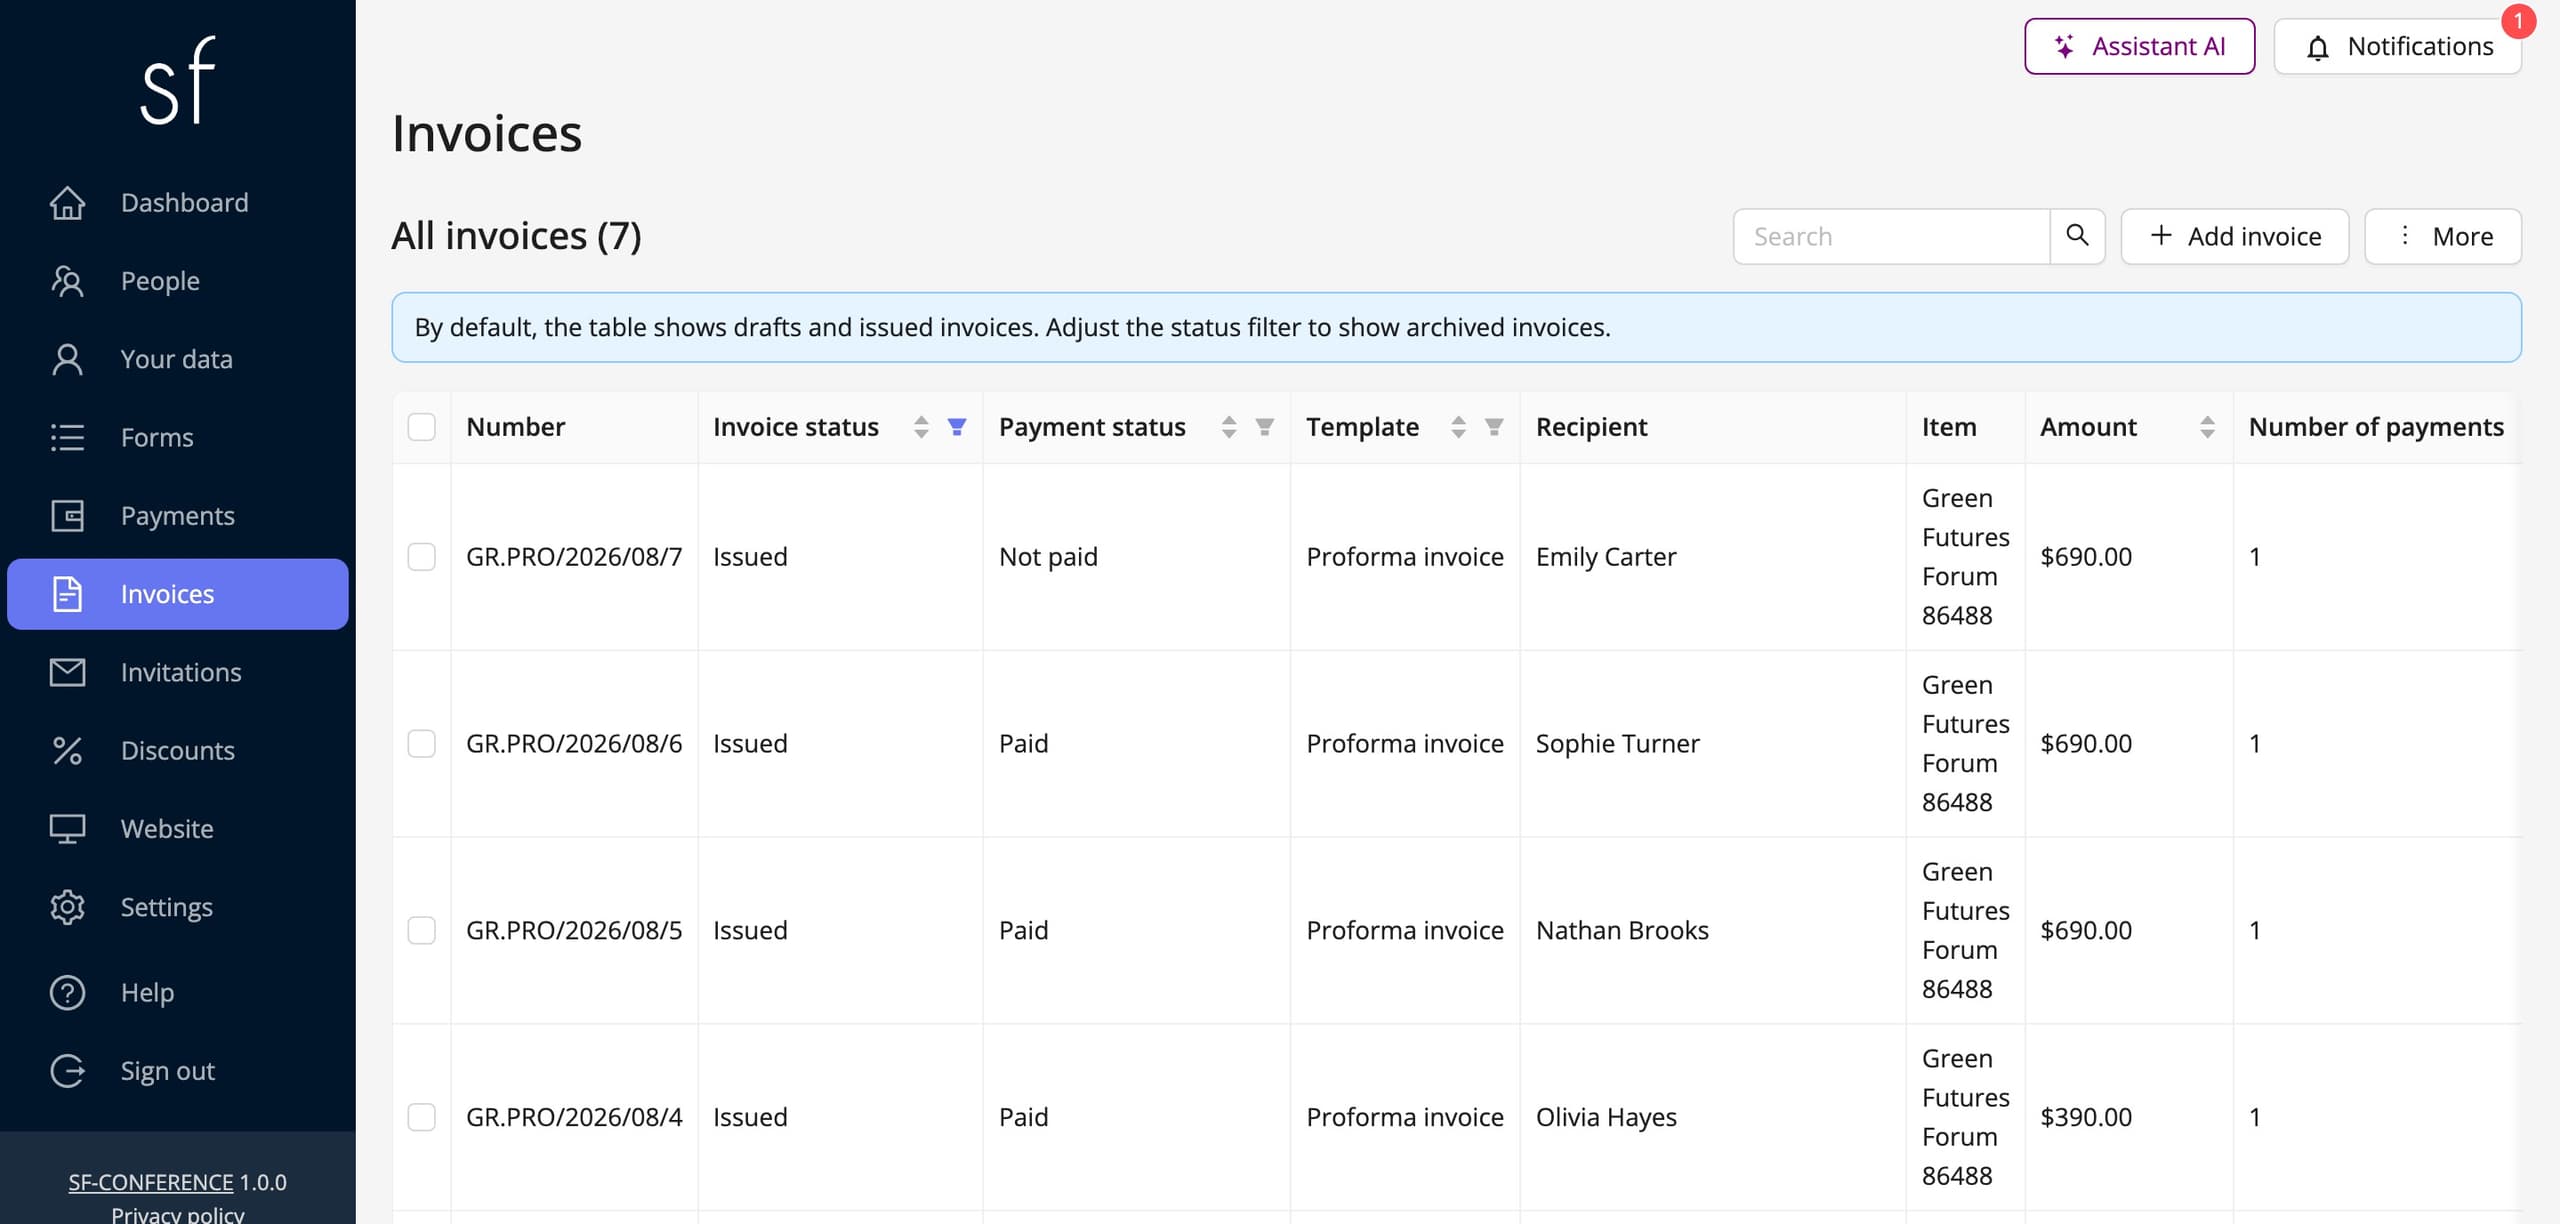
Currencies, tax rates, numbering and the content of the documents are covered separately by the collecting payments and issuing invoices guide.
Keeping track of attendees and payments
Everything that came in through the form lands in the People entry. The table shows one row per person, and the answers from the form become its columns, grouped by section. Every column has a filter and sorting, so the list narrows down to any group you like: the people who have not paid yet, those from a particular company, or those who ticked the marketing consent. Which columns are visible is set with the Edit people table view button above the table.
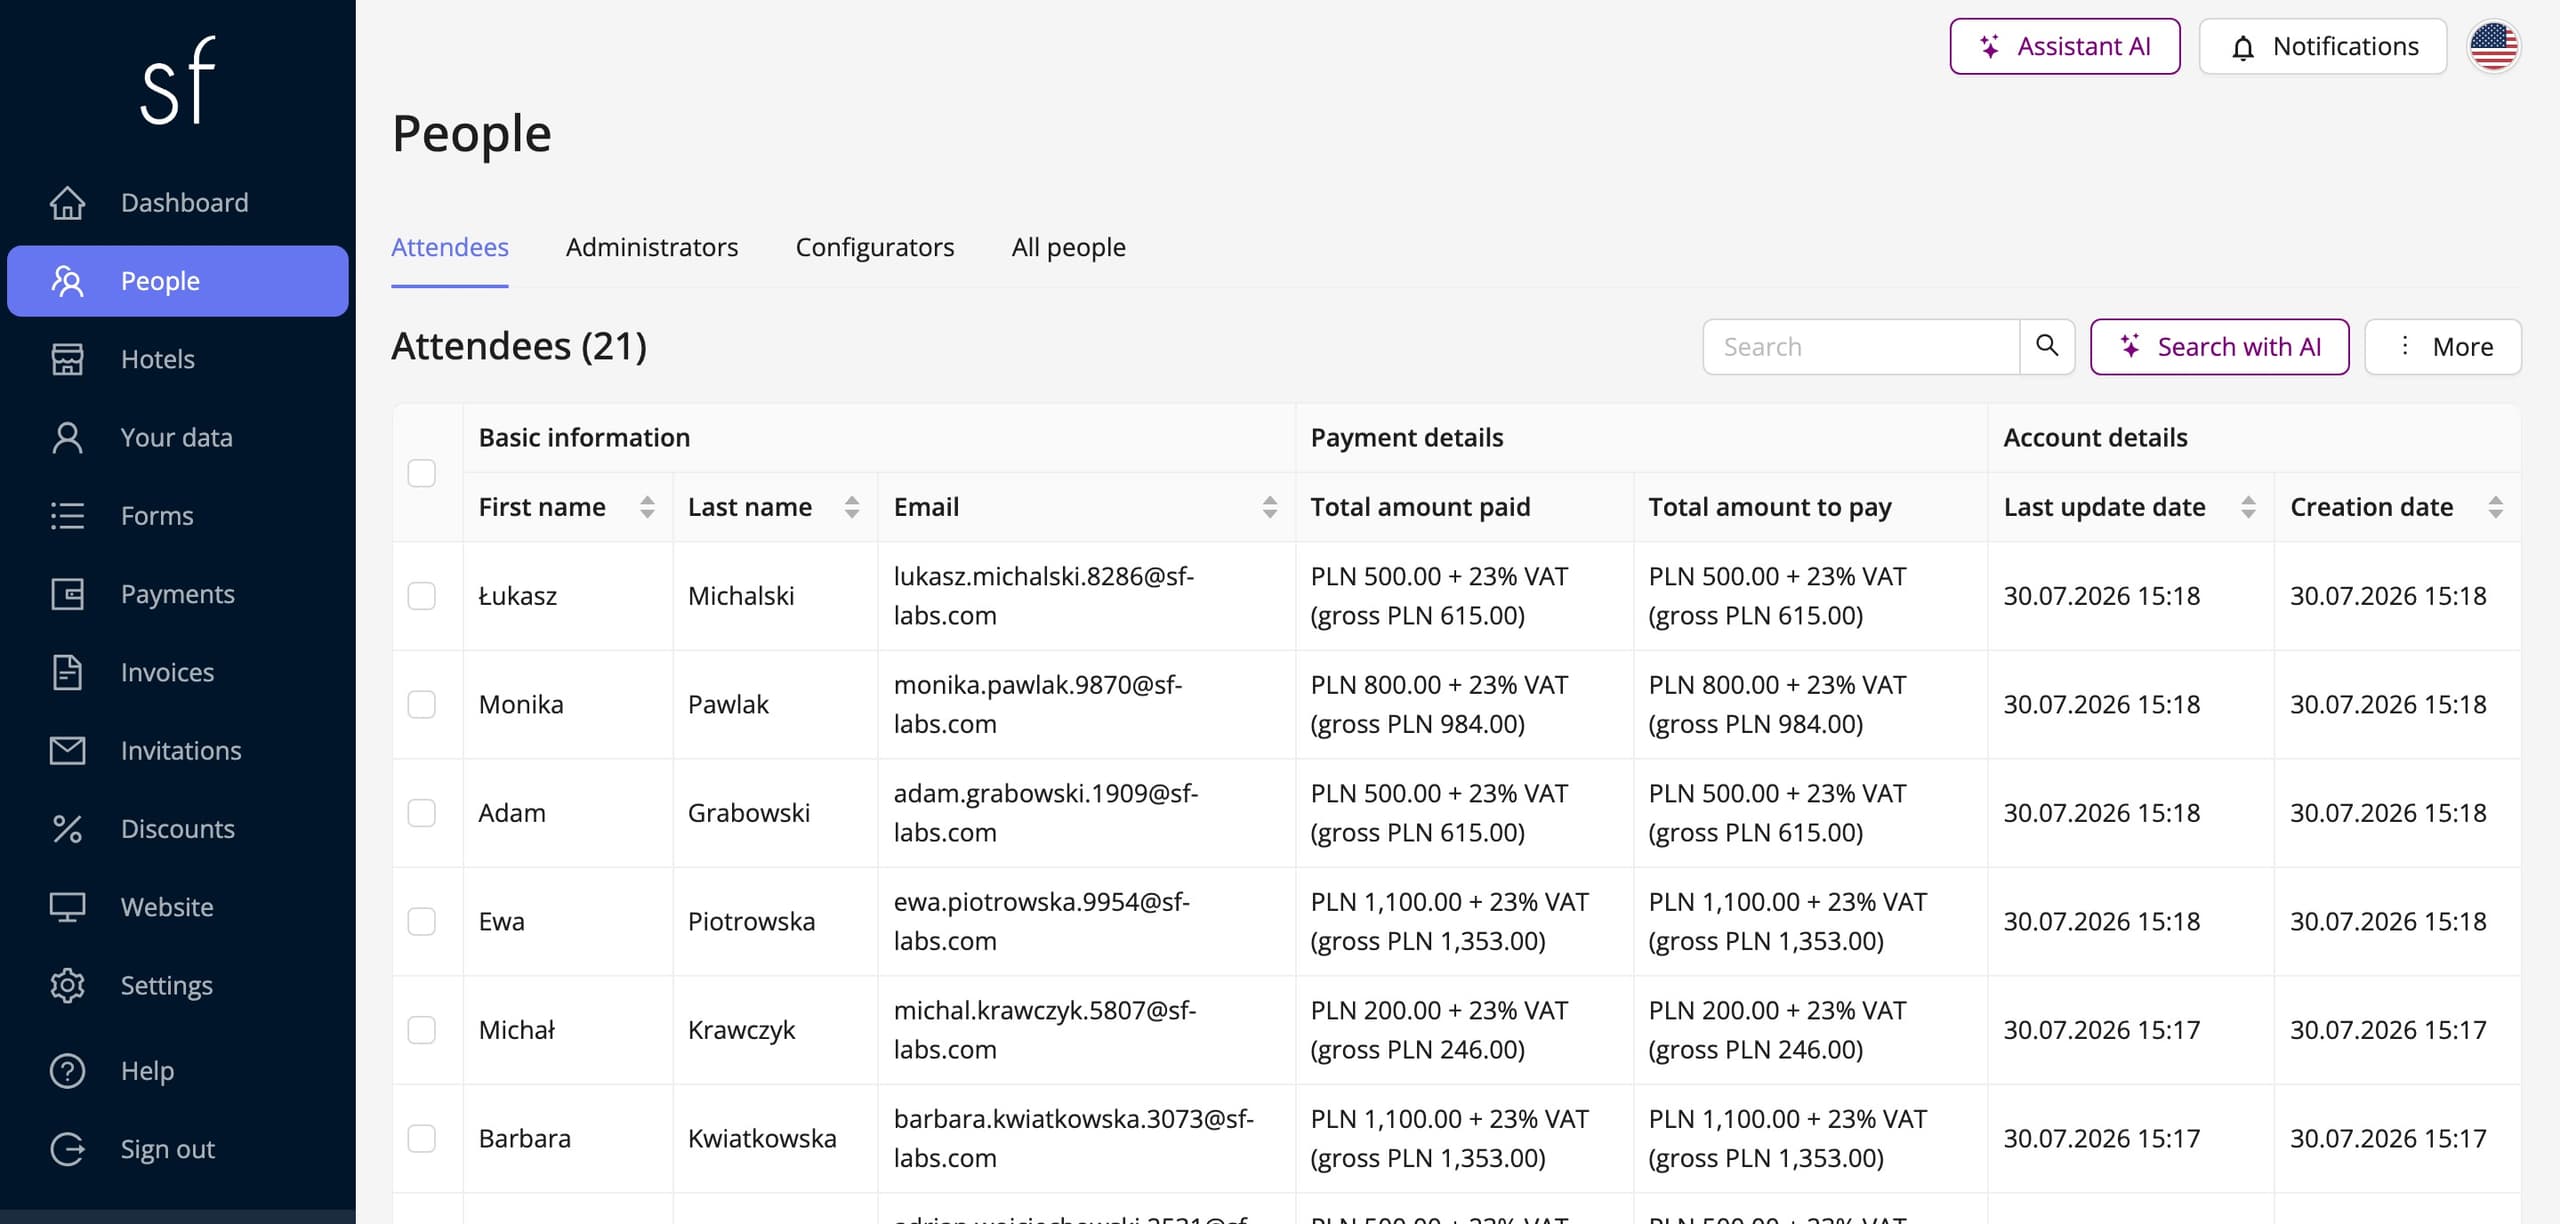
Payments show up in that same table and on each person’s own page. With online payments the status changes by itself once the money is booked. With a bank transfer you mark the payment as paid by hand when you see the money on the account. That single move sets off the rest: it issues the VAT invoice if a template is waiting on payment, and moves the person into the group you are about to send the link to.
Registrations that arrived by email or over the phone are added by hand. It is done from the same view, and the adding an attendee guide covers it step by step. The whole list together with the answers downloads through the Download all attendees in XLS button, and with rows ticked only the people selected. The same file comes in handy later for comparing the list of sign-ups with the attendance list you export from the streaming platform.
Sending attendees the webinar link
This is the point where a webinar differs from everything else. The stream link is the way into the room and it has to reach everyone signed up, at the right time, at the address they gave in the form.
Go to the People entry, tick the attendees in the table’s first column and click Send message to selected attendees. With nothing ticked the button reads Send message to all attendees and covers the whole list. The send honours the filters, so at a paid webinar narrow the list down to the people with a settled payment first and only then send. The link reaches nobody but those who paid, with no going through the list by hand.
In the message window you pick its kind. Message template drops your text into the branded email template configured in the settings, and the Own message option sends it as the entire body of the email, with a Subject of your own. The stream link itself you simply paste into the body. The variables button on the editor toolbar adds the recipient’s first and last name, so the message does not open with an impersonal Dear Sir or Madam, and the Participation summary link entry gives everyone a link to their own private page, where they see their registration, their payment and their invoice.
Before you send anything to the list, use the send test message to yourself button. You will get the finished email with the variables substituted and you can check the thing that matters most: whether the stream link really opens where it should and whether it demands a login the attendee does not have.
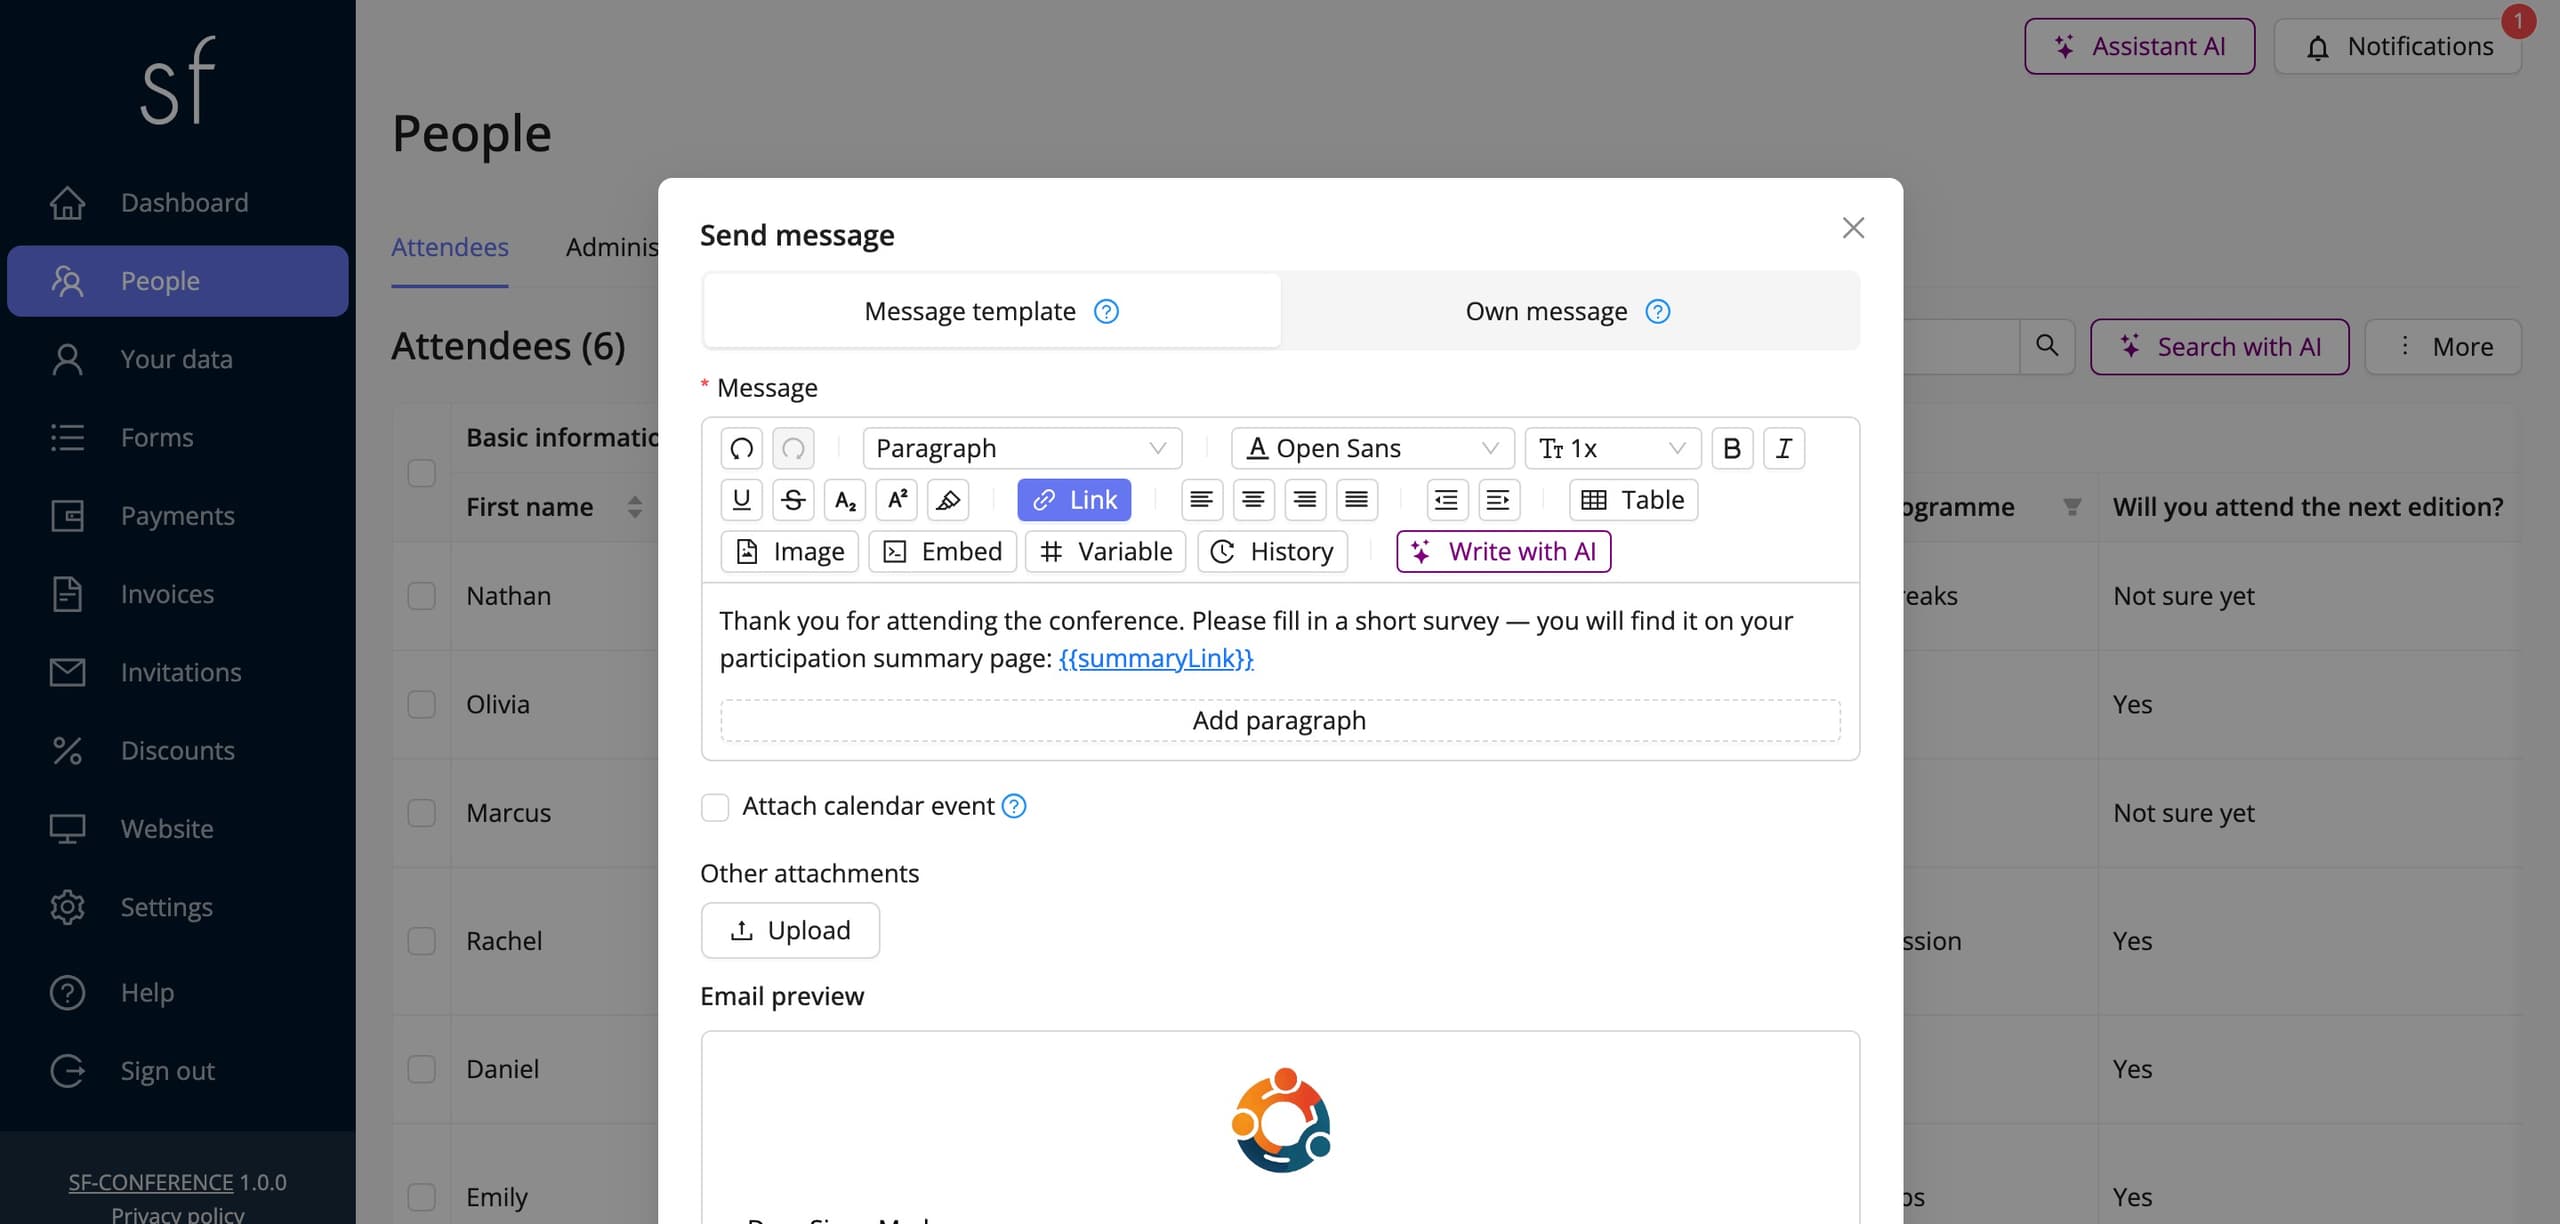
The schedule that works is a short one. Right after signing up the attendee gets a registration confirmation. The day before the meeting you send a reminder with the link, the time and a sentence about what to expect. An hour before the start the last message goes out, a short one, with nothing but the link at the top. That last one makes the biggest difference to turnout, because it reaches the inbox exactly when people are planning the next hour.
If your streaming platform issues a separate, personal link for every attendee, add a field visible to administrators only, put those addresses in once the list has been imported into the platform and send the messages one by one, or place that link on the participation summary page. With one shared link, which is the case for the vast majority of webinars, none of this is needed.
Email communication around a webinar
Some of the correspondence happens without you. Once the form is submitted the attendee gets a registration confirmation, once they pay a payment confirmation, and with it an invoice if a template issues one. How those messages look, the logo, the colours and the footer, is set once in the Settings entry and applies everywhere, including in messages sent by hand.
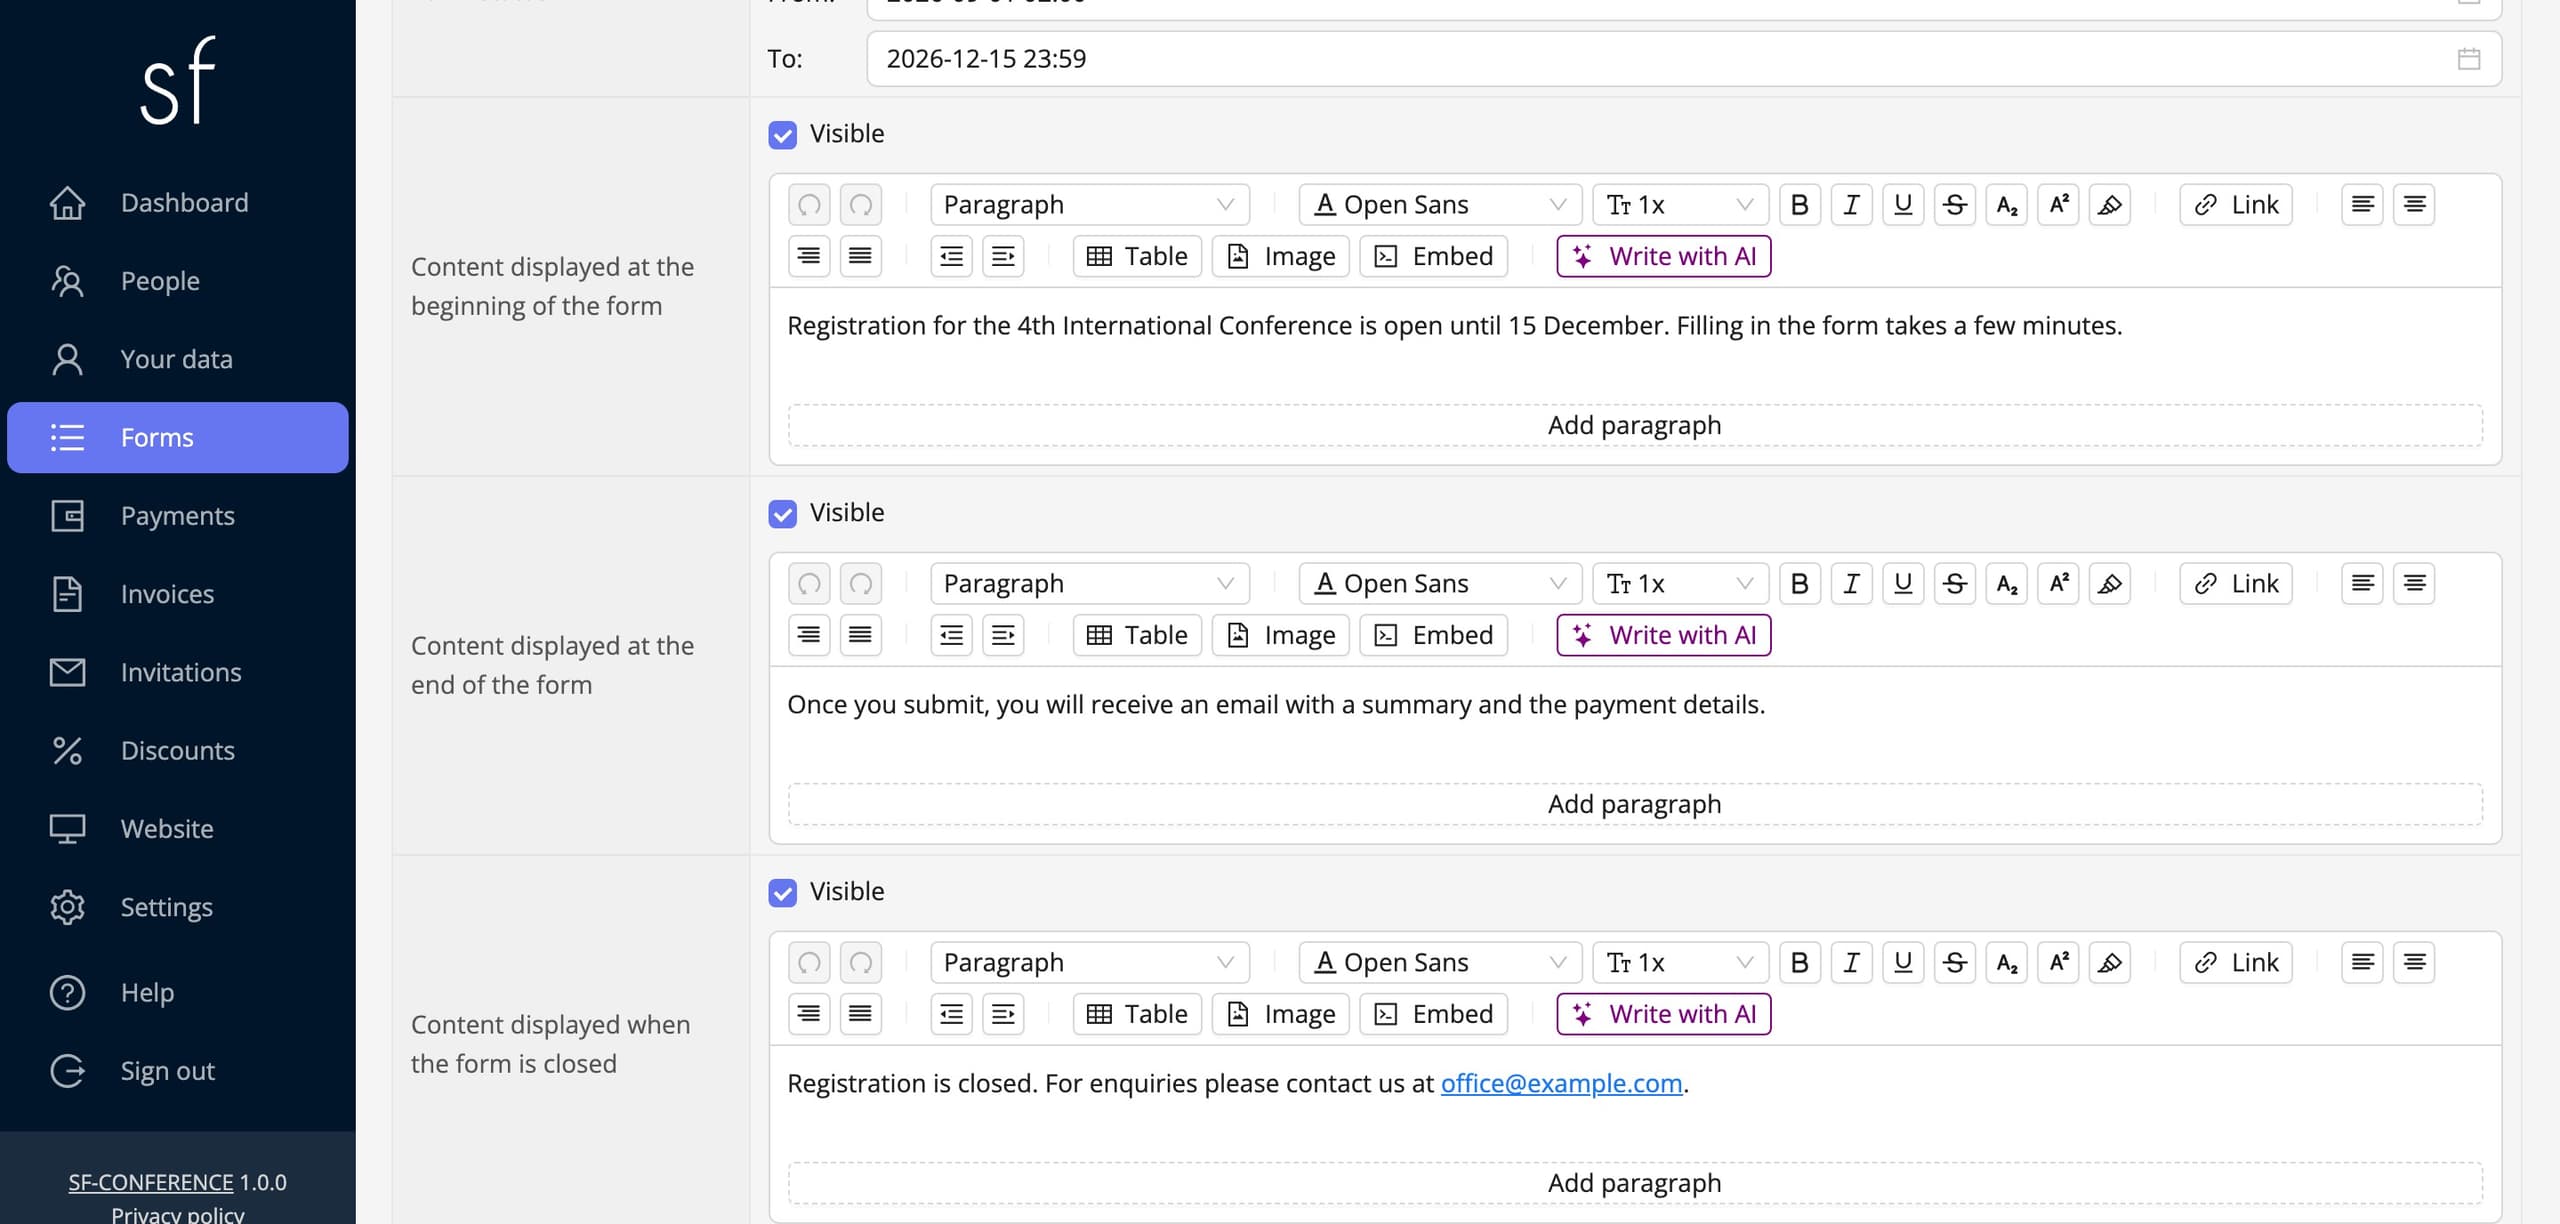
The text an attendee reads around the form itself is set in its Basic information section. Content displayed at the beginning of the form is the place for the date, the time, the speaker’s name and a note about whether the meeting will be recorded. Content displayed at the end of the form sits above the submit button and comfortably holds a sentence about when the link will arrive. It is the cheapest way to cut down the number of emails asking whether the sign-up worked.
Watch a few things on every send. The subject line should carry the webinar name and the date, because that is how the attendee finds the email in their inbox an hour before the start. Put the link high up, in the first or second sentence, never in the footer. Send from an address on your own domain, correctly configured for outgoing mail, because that decides whether the message lands in the inbox or in spam. And always test on yourself before sending to everyone. If you are inviting particular guests, speakers or partners by name, the sending invitations guide will help.
A post-webinar survey with an external form
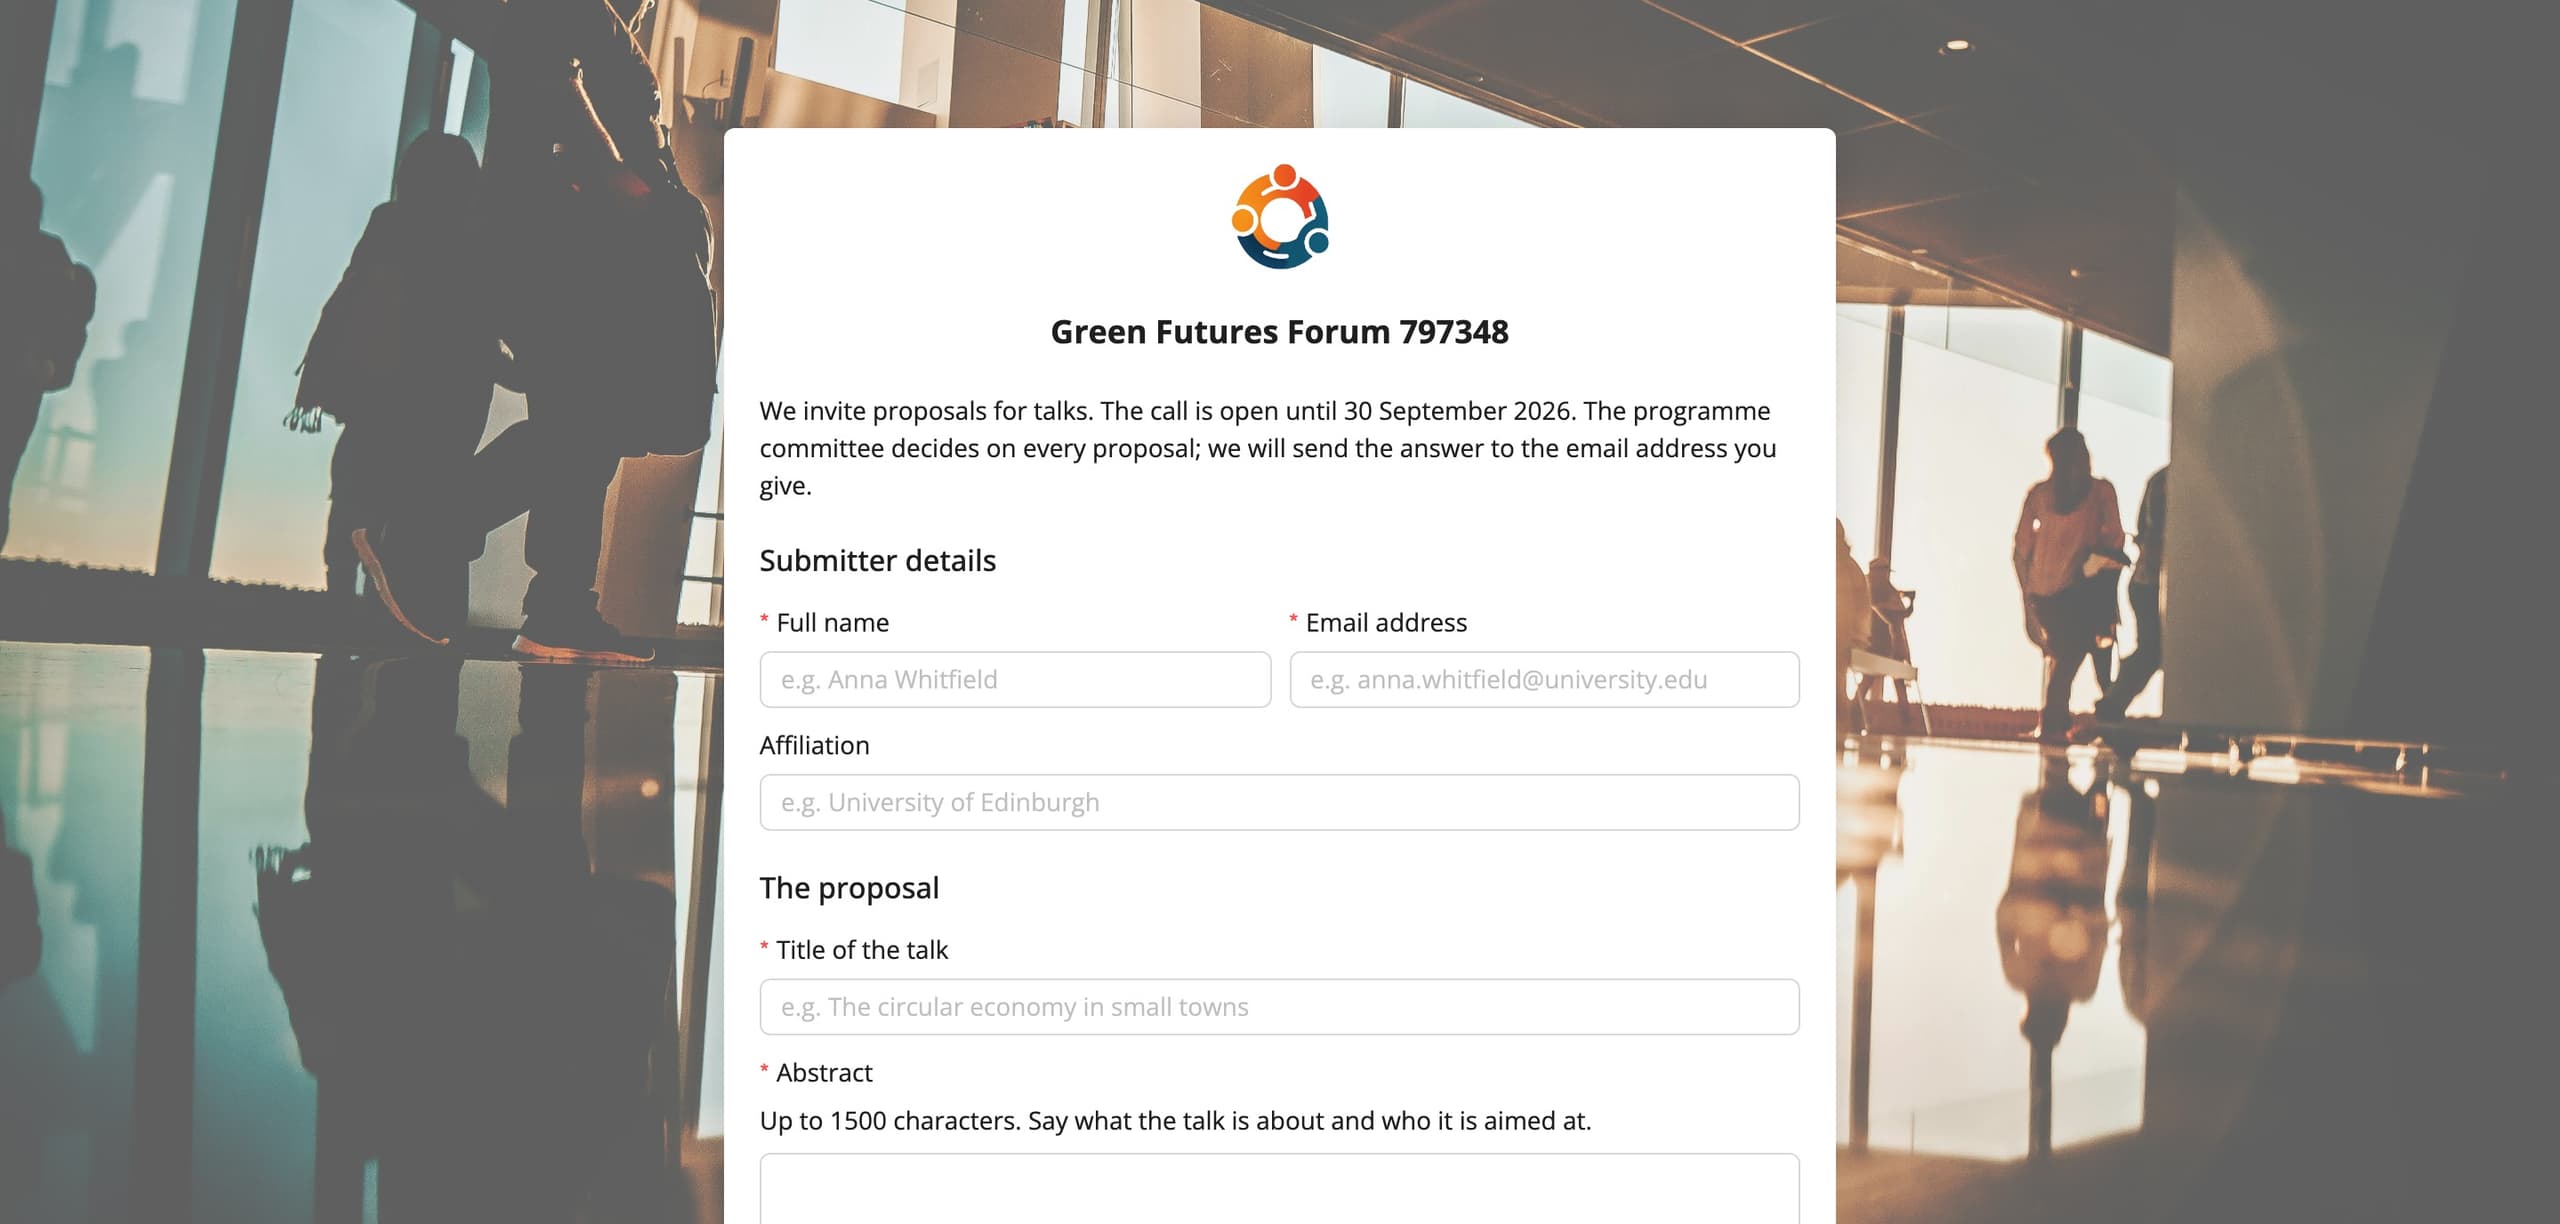
The most valuable part is left once the meeting is over: the answer to whether it was any good. An external form fits a webinar best, because it has its own web address, it is filled in without logging in and without creating an account, and if you leave the email field out of it, it stores nothing but the set of answers, tied to nobody. The rating of the speaker and of the organization comes out more honest when nobody has to sign it.
You create the form in the Forms entry, on the External forms tab. You give it a name and the system assigns it an address, which you can change to something shorter and easier to type out. That address matters most here, because it is what you paste onto the closing slide, drop into the chat in the last minute of the meeting and repeat in the email with your thanks.
The questions are laid out exactly as in any other form. A short survey collects more answers than an exhaustive one, so four are usually enough. A rating of the meeting on a scale of one to five, built as a radio button group with five options. A rating of the speaker in the same way. An open question about what to improve, as a text box. Finally a question about the topic of the next meeting, which will incidentally tell you what to organize next. Consider adding a checkbox consenting to the opinion being used in promotional material.
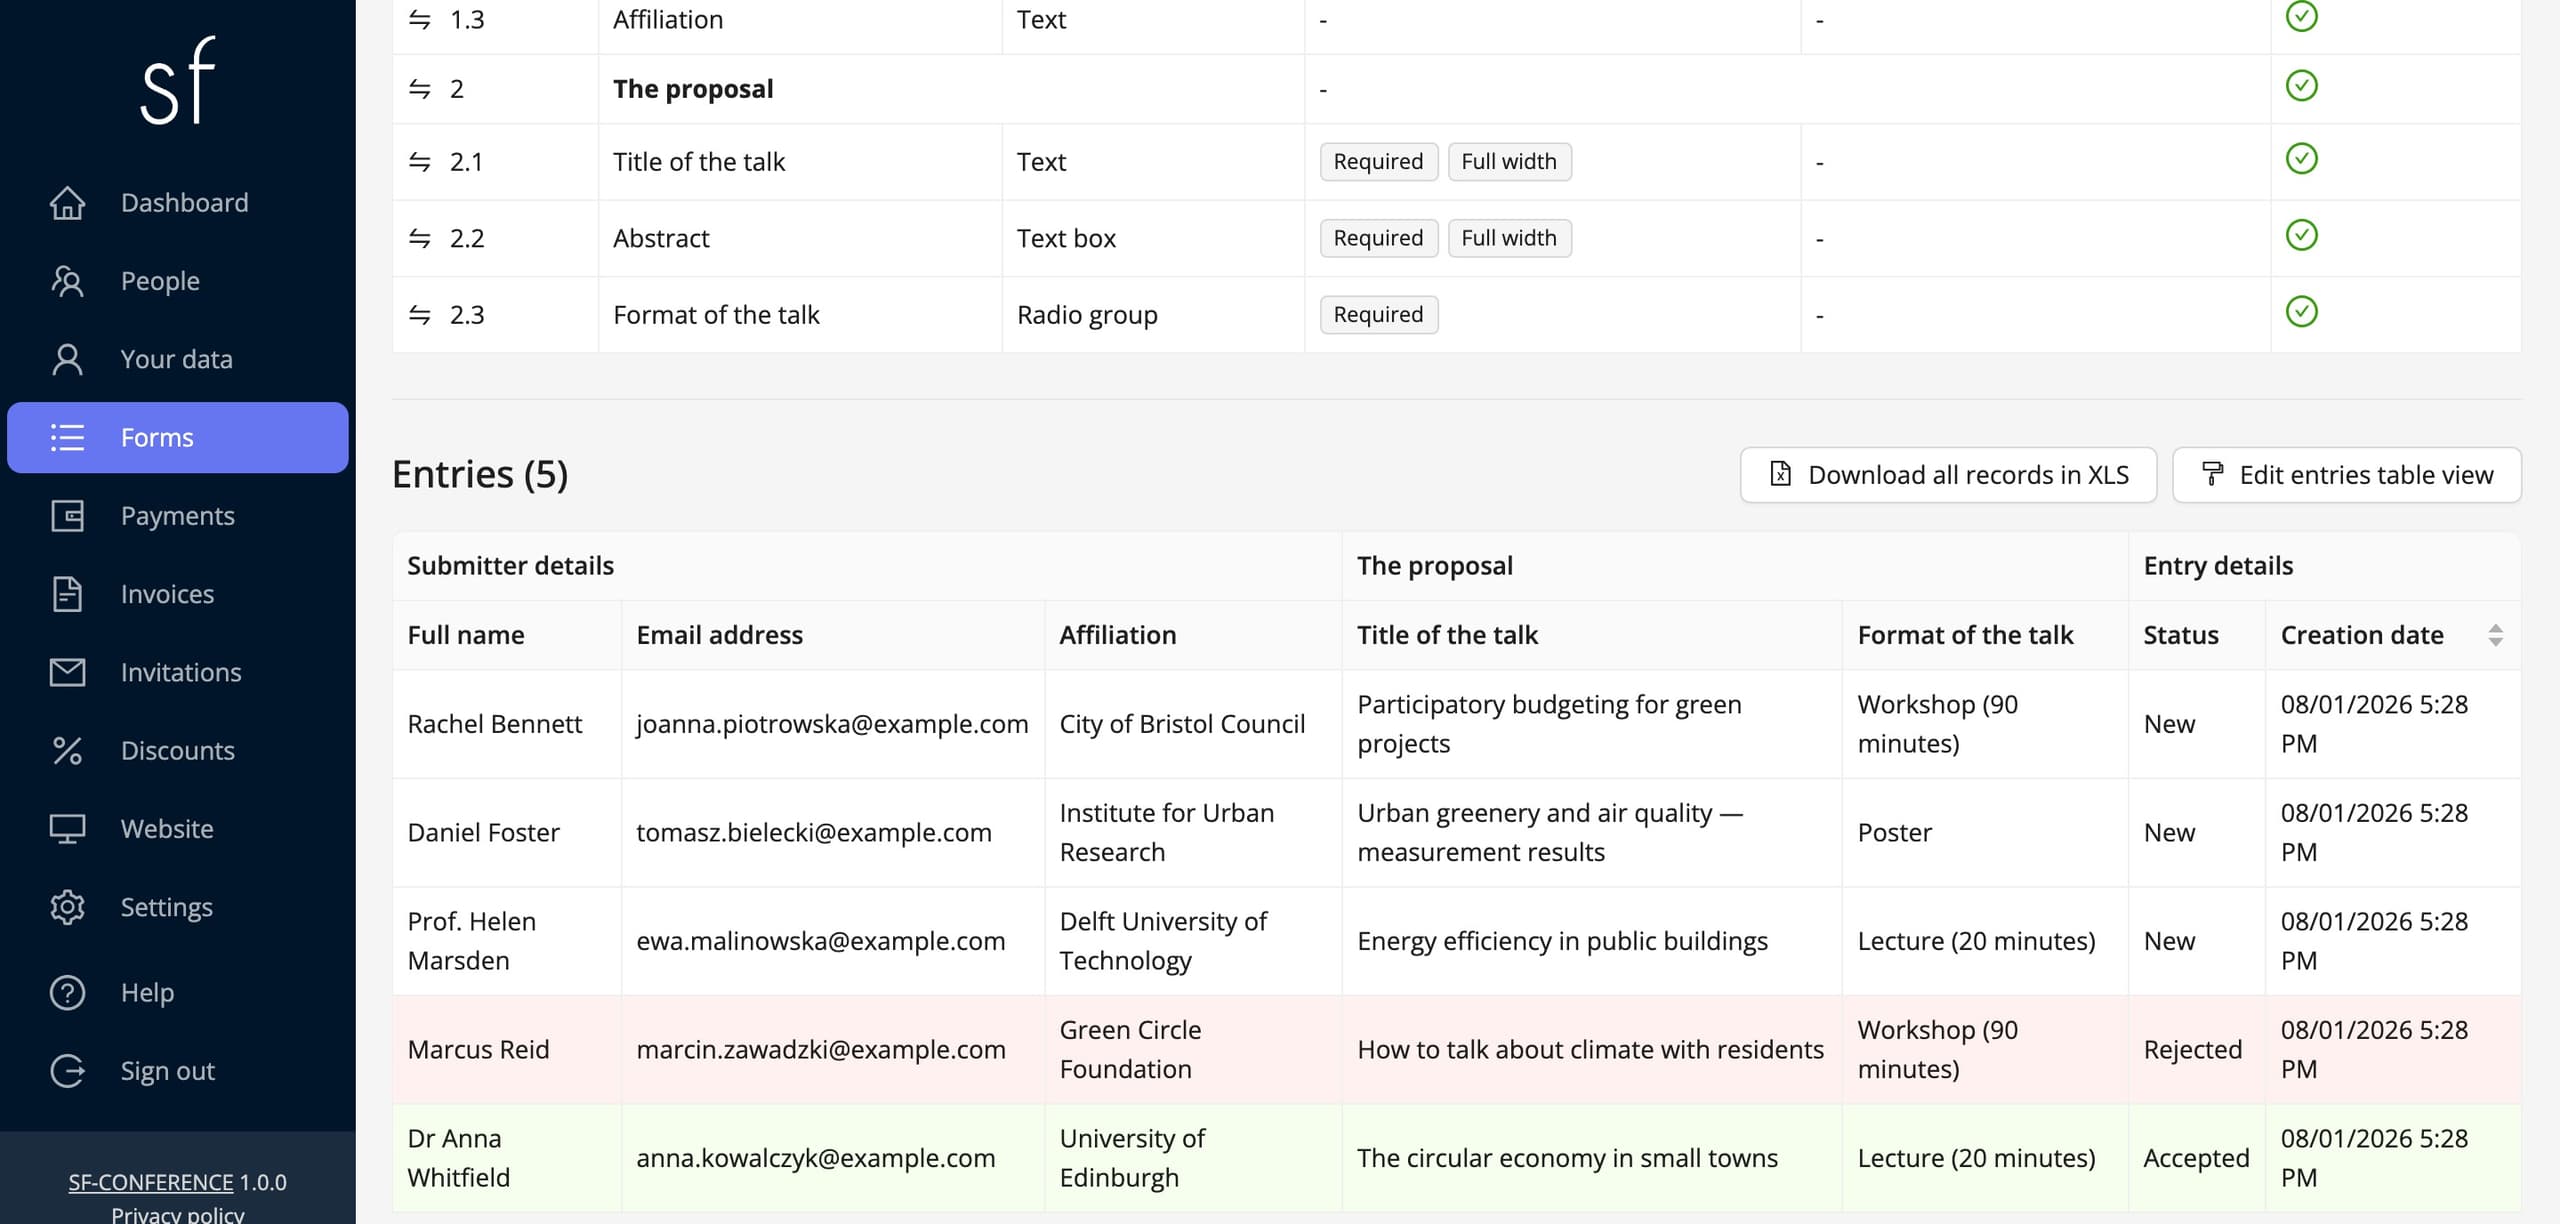
The answers collect in the panel, on the page of that form, in the entries table. Each row is one completed survey, the columns match the questions, and the whole thing downloads as an XLS file. Set Form status to Opened conditionally with a To date about a week after the webinar. The survey then closes itself and you end up with a finished set of answers instead of stray entries trickling in for another month.
The external form is covered in detail by the collecting entries with an external form guide. If you do need to know who said what, for instance to issue certificates only to the people who filled the evaluation in, use a custom form instead. The running an attendee survey guide walks through that.
The same day or the next one send one more message from the People entry: a thank-you, a link to the recording, the material promised during the meeting and the survey address. One message, four things. It is also the natural moment to invite people to the next webinar, because they will never be more interested than right after one they enjoyed.
A webinar step by step, in brief
- Settle the topic, the speaker, the date, the length and the streaming platform, as well as whether the webinar is paid and whether it will be recorded.
- Create the event in the system and set its name, address, dates and currency.
- Build a short registration form: first name, last name, email address and the consents, the rest only when you will genuinely use it.
- Set Form status to Opened conditionally and enter an Entries limit matching the capacity of your platform.
- Enter the price in the Payment details section, and build the early-bird tier from two options with windows that do not overlap.
- Switch online payments on and turn automatic document issuing on.
- Keep an eye on the list in the People entry, mark transfers as paid and add the registrations that arrived outside the form.
- Send the stream link the day before the meeting and an hour before the start, after a test message to yourself.
- After the webinar send a thank-you with the recording and the address of the survey in the external form.
Everything else, the confirmations, the invoices, the lists and the statistics, happens along the way on its own. If you are planning something larger than a single online meeting, the how to organize an event step by step guide walks through the whole process.
See also
How to edit the registration form
Add and change fields, set prices, dates and dependencies between answers and decide when registration is open.
How to collect entries with an external form
Collect talk proposals and ideas before registration. A form with an address of its own, filled in without creating an account.
How to collect payments and issue invoices
Set the currencies, bank transfer and online payments, and let the invoices issue themselves.

Complete event management on a single platform. An event website, attendee registration and a full set of organizer tools.
2026 © SF-LABS sp. z o.o. All rights reserved
Entered into the register of entrepreneurs of the National Court Register kept by the District Court for Kraków-Śródmieście in Kraków, 11th Commercial Division of the National Court Register, under KRS number 0000886671. Share capital amount: PLN 5,000.